CRM Record Selection gives you complete control over which CRM record an activity logs to. By default, Salesloft logs activity to the Lead or Contact record associated with a Person's email address — but for situations where you need to log to a different or more specific record, CRM Record Selection lets you choose exactly where that activity lands.
After completing this guide, you will be able to:
- Understand how CRM Record Selection works across Salesloft
- Log call activity to an alternative CRM record using the in-app Dialer
- Log meeting activity to an alternative CRM record when booking on demand
- Log activity to an alternative CRM record from the Salesloft Chrome Extension in Gmail and your CRM
In this article:
For admins:
- CRM Record Selection must be enabled from the Salesforce Connector Settings before reps can use it. To enable it, navigate to CRM Sync in your Admin Settings and go to the CRM Record Selection tab. Click the toggle to enable the feature — it will shift from gray to blue when active.
- Be aware that enabling this feature increases the number of Salesforce API calls your team makes. See the Additional Information section for a full breakdown of API call usage.
- To enable logging to custom objects, contact Salesloft Support with the following details for the Salesforce object: Object Level API Name, and the API Names of up to three fields that will display when reps search for the record.
For reps:
- CRM Record Selection must be enabled by your team admin before you can use it. If you don't see the option to edit the log-to record, reach out to your admin.
- This feature is available in the Salesloft application, the Chrome Extension in Gmail, and the Chrome Extension in your CRM.
- CRM Record Selection for calls applies to the in-app Dialer only.
- CRM Record Selection for meetings applies to meetings booked on demand only — it does not apply to Insert Availability.
Salesloft logs activity to a Salesforce Lead or Contact record based on the Person's email address by default. CRM Record Selection lets you override that default and choose the exact record where an activity logs — whether that's a different Lead or Contact, a related Account, or a specific Opportunity.
This is especially useful when a Person is tied to multiple opportunities and you need to ensure an activity logs to the right one.
CRM Record Selection is built around two fields in Salesforce:
- Who: The Salesforce Lead or Contact record tied to the Person in Salesloft. Selected by default.
- What: If the Person is tied to a Salesforce Contact related to an open Opportunity, that Opportunity is selected by default. If there are multiple open Opportunities, the most recently modified one is selected.
In addition to logging activity against standard Salesforce records, Salesloft supports activity logging against synced Salesforce custom objects. Admins must configure custom objects for logging before reps can use CRM Record Selection with them.
Prerequisites for custom object logging:
- CRM Record Selection must be enabled (see the Before You Begin section above).
- The custom object must already be synced with Salesloft and configured in Object and Field Configuration. See Custom Object Field Configuration for setup instructions.
- The following Salesforce settings must be active for the object before logging will work:
- Allow Search enabled in Salesforce Object Manager
- A Custom Tab exists for the object
- Tab Visibility set to Default On or Default Off at the profile level
Once a custom object has been configured, it will appear as an option in the Related To field when reps log call or email activity. Reps will see preview cards showing the three identity fields mapped by the admin (for example: Store Name, City, Status), making it easy to find and select the correct record before logging.
Things to Note:
- Custom object logging is available in the in-app Dialer and email compose windows. It follows the same CRM Record Selection workflow as standard objects.
- Only synced custom objects that have been configured in Object and Field Configuration and meet the Salesforce readiness requirements will appear in the Related To search results.
- Open the Dialer: Start a call from a Person Profile page or from a Cadence. The Dialer and Call Log box will open.
- Review the default log-to record: A grey bar at the top of the Call Log box shows where in Salesforce the activity will log.
- Open the Edit Log To window: Select either the Edit button on the far right of the grey bar, or the Log To button on the bottom toolbar.
- Select your records: The Log To window displays Salesforce matches divided into two fields:
- Name: Lead or Contact records tied to the email address.
- Related To: Account or Opportunity records tied to the email address.
- Update the record: Click the X on the right side of a dropdown to remove the current record and search for a different one. Use the dropdown to find and select the correct record.
- Confirm your selection: Click Confirm. Salesloft will remember these records as the defaults for future activity with this Person unless edited again.
- Complete and log the call: Finish your call notes and click Log a Call.
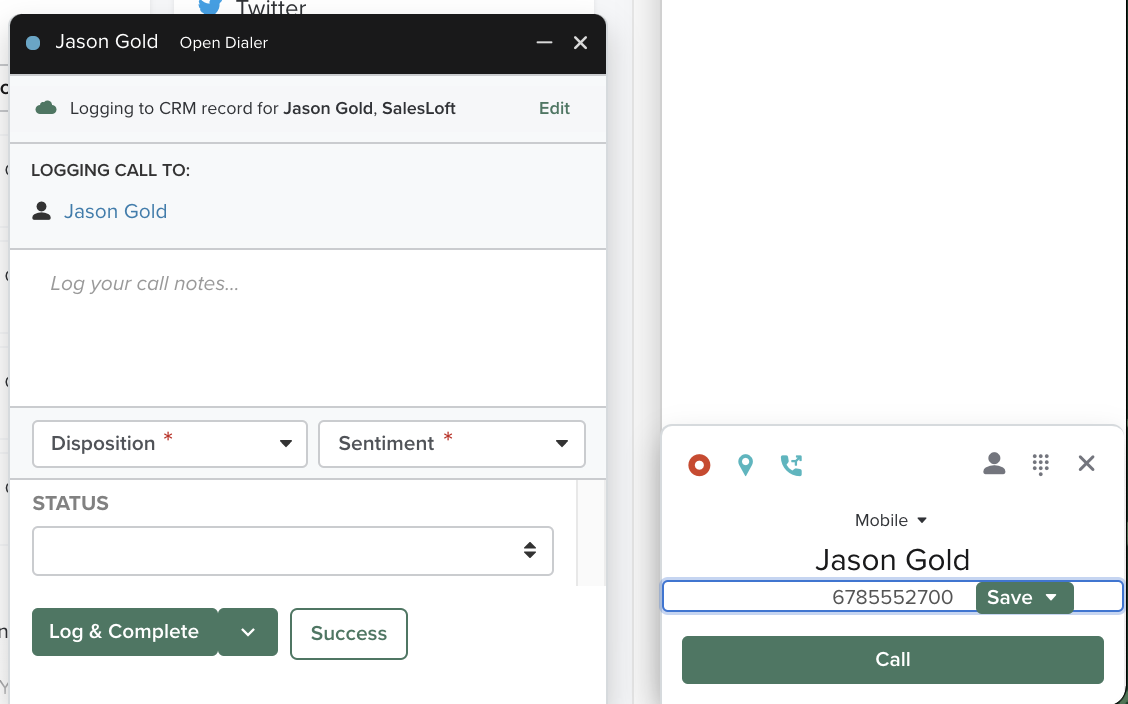
Figure 1: CRM Record Selection in app while logging a call
- Open the Book a Meeting module: Go to the Person's profile page and click Book a Meeting from Quick Actions or the Meetings tab in the Activities panel.
- Review the default log-to record: A grey bar in the upper left of the module shows which Who (Lead/Contact) and What (Account/Opportunity) the meeting will log to.
- Open the Edit Log To options: Click the Edit button in the Logging Activity section. This opens the Edit Log To options in the side panel.
- Select the Who: Click the link showing the number of matches in the Name field to view all Lead and Contact records tied to the email address. Select the correct record.
- Select the What: Click the link showing the number of matches in the Related To field to view all Account and Opportunity records related to the selected Contact. Select the correct record.
- Things to Note: You cannot select a Related To record if a Lead is selected in the Name field.
- Confirm your selection: Click Confirm.
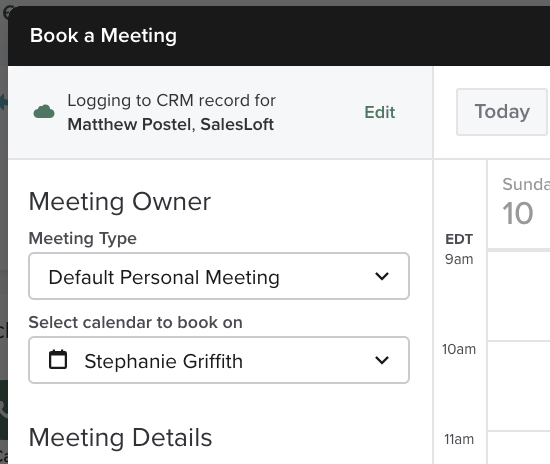
Figure 2: CRM Record Selection in the Book a Meeting window
CRM Record Selection is also available when logging email activity from the Salesloft Chrome Extension, whether you're working in Gmail or directly in your CRM. The workflow is the same across both locations.
Things to Note: When composing an email in Gmail for the first time with a specific email address, Salesloft will automatically search for a matching Lead or Contact record to pre-populate the log-to selection.
- Open a compose window or activity: In Salesloft, create an email or run an activity type. In Gmail, select Compose and enable the Lofting toggle. In your CRM, open the relevant record and initiate your activity from the Side Panel.
- Review the default log-to record: A grey bar will appear showing where the activity will log in Salesforce.
- Open the Edit Log To window: Select either the Edit button on the far right of the grey bar, or the Log To button on the bottom toolbar.
- Select your records: The Log To window displays Salesforce matches divided into two fields:
- Name: Lead or Contact records tied to the email address.
- Related To: Account or Opportunity records tied to the email address.
- Update the record: Click the X on the right side of a dropdown to remove the current record and search for a different one. Use the dropdown to find and select the correct record.
- Confirm your selection: Click Confirm. Salesloft will remember these records as the defaults for future activity with this Person unless edited again.
- Complete and send: Send your email using Loft It, or complete your activity as normal.
You've successfully logged activity to an alternative record when:
- The grey log-to bar updates to reflect the record you selected.
- The activity history for that Person in Salesloft shows the correct Salesforce record the activity was associated with.
API call usage:
Enabling CRM Record Selection increases the number of Salesforce API calls your team makes. The following is a summary of when additional calls occur:
| When a user enters a specific email address into a compose window in Gmail for the first time |
1 API call is used to find the matching Lead/Contact
- If a Contact is found, 2 additional API calls are used to find related Accounts & Opportunities
|
| When a user opens the Log To Alternative Record pop-up window |
If the default record is a Lead
- 1 API call is used to find matching Leads/Contacts with the recipient's email address
If the default record is a Contact
- 1 API call is used to search for matching Leads/Contacts with the recipient's email address
- 2 API calls are used to find related Accounts & Opportunities
|
| When a user searches for a Person in the pop-up window |
1 API call is used to search for matching Leads/Contacts
|
| When a user selects a Contact from their Person search results |
2 API calls are used to find related Accounts & Opportunities
|
| When a user searches for a related record (Account, Opportunity, Custom Object) |
1 API call is used to find matching records
|
Custom objects
Activity logs can be made to custom Salesforce objects. Admins can configure custom objects for logging directly in Salesloft. See Custom Object Field Configuration for setup instructions.
Logging to alternative records is available in the Salesloft application, the Chrome Extension in Gmail, and the Chrome
Extension in your CRM, as well as Salesloft Connect for Outlook (Windows Desktop, Mac, and Office 365 Online).
Next: Send Emails from Gmail — How to use Lofting to send and track emails from your Gmail inbox
Related: Make and Receive Calls Using the Salesloft Connect Dialer— How to use the Dialer across your Chrome browser
Related: Book Meetings in Salesloft — How to schedule meetings that log to Salesloft and Salesforce