The Screen Settings determine what fields are visible to users and what fields are required when new records are created.
To access the Screen Settings, hover over Workspaces in the Salesloft top menu. A dropdown menu will appear. Select Deals. From there, select the Admin tab to go to the Deals Admin Settings. You will land on the Screen Settings.
Things to Note: The Admin tab is only visible to Salesloft Admins.
In this article, you will learn what each tab within the Screen Settings is and its use case, including:
Looking for information on the Goal Settings? Check out the Manage Goal Settings article.
When making a call or logging a note for a Contact, Account, or Opportunity, which fields should your team see regarding that object?
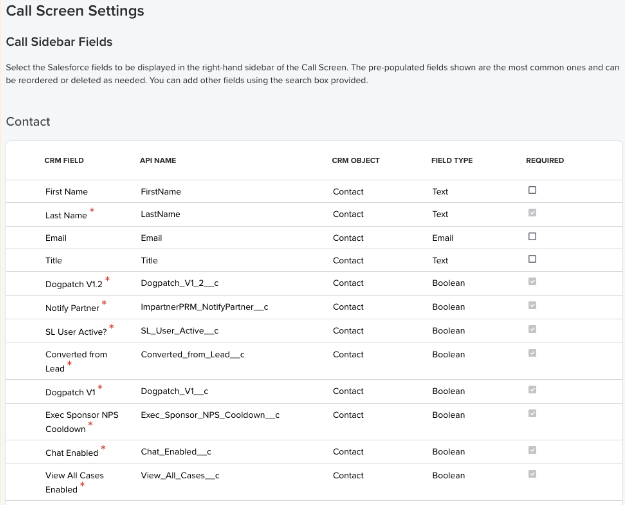
The Call Screen Settings allow you to select the Salesforce fields that will display in the right-hand sidebar of the Call Screen.
Things to Note: Team members access the Call Screen by clicking "New Note." Here, they can leave notes related to that Salesforce object.
The Call Sidebar Fields are displayed in tables based on the different Salesforce objects. Each table shows pre-populated fields on the different rows. These fields are the most common fields from Salesforce. Each field contains the following data:
- CRM Field
- API Name
- CRM Object
- Field Type
Things to Note: Picklists will display the number of available options. Hover over the number to view the picklist items.
You can perform the following actions on the Call Screen Settings page:
- Reorder fields: The fields can be reordered by clicking the left side of the row and dragging the field up or down in the list.
- Make a field required: Click the box under the required column to mandate that field must be completed before a note is wrapped up.
- Delete a field: To remove a field from the view, go to the right side of the field row and click the X.
- Add a field: Use the search box provided to add a field. Type the name of a field to populate the search or scroll through the dropdown menu to find a field. Select the field from the search to add it to the list.
The Call Note Settings can update an Opportunity description based on the text that is added to a new note in Deals.
First, decide which fields are the most important when a user adds a note to Salesforce. Based on the fields you would like updated from a Note, use the search box provided to add a field. Type the name of a field to populate the search or scroll through the dropdown menu to find a field. Select the field from the search to add it to the list.
The text for the new note can be pushed to a field in Salesforce.
Users can create a new Salesforce object when they click New Record. The CRM Object Creation Settings decide which fields should be required if a new record is created.
Things to Note: If a field is required in Salesforce, make sure it is also marked as required fields in the CRM Object Creation list.
The CRM Object Creation tab is broken down into tables based on the Salesforce objects—Contacts, Accounts, and Opportunities.
You can perform the following actions on the CRM Object Creation tab:
- Reorder fields: The fields can be reordered by clicking the left side of the row and dragging the field up or down in the list.
- Make a field required: Click the box under the required column to mandate that field must be completed before a note is wrapped up.
- Delete a field: To remove a field from the view, go to the right side of the field row and click the X.
- Add a field: Use the search box provided to add a field. Type the name of a field to populate the search or scroll through the dropdown menu to find a field. Select the field from the search to add it to the list.
The Closed Lost Reason tab is where you can set fields that must be updated if an Opportunity is updated to "Closed Lost."
For example, if your team has a picklist of reasons an Opportunity was lost, you may want to require that users select one of those options. This way you are sure your team's data is being kept up-to-date. Later on you can create reports with the most common Closed Lost reason.
When a Closed Lost reason field is added, the field will be presented to the user anytime they transition an Opportunity to a Closed Lost stage.
If no Closed Lost reason fields are provided, then no additional action will be required by the user.
To add a Closed Lost reason, use the Add fields search box provided to add a field. Type the name of a field to populate the search or scroll through the dropdown menu to find a field. Select the field from the search to add it to the list.
The Summary Screen Settings include the following:
- Activity Logging
- Opportunity Creation
- Deal Status
- Stakeholders