Salesloft's Automation Rules take care of the repetitive tasks that threaten to dominate your team's work day. Automation Rules fire based on certain criteria set by team admins.
Using Automation Rules alongside your personalized sales engagement allows your reps to focus their energy on prospective customers, rather than menial tasks.
You will create, manage, edit, and enhance your team's Automation Rules from the Automation Rules page located under your admin Data Settings.
In this article, we will walk through the ins and outs of managing your team's Automation Rules, including:
If you experience any technical issues or sync errors, check out our Automation Rule Troubleshooting article.
Things to Know About Automation Rules
Testing Automation Rules: When creating a new rule for the first time, we recommend setting criteria that restricts the rule to a specific owner (typically yourself) for testing purposes. This allows you to try the rule without impacting your entire team’s data. You can do this by adding criteria stating “Salesloft Owner equals (Your Name).”
Automation Rule Order: The order of Automation Rules determines the order in which Salesloft will evaluate the rules per trigger event. The first first Automation Rule in this order with matching criteria will fire and no following rules will be evaluated. As an example, if there are two Automation Rules both triggered by Person Updates, if the first Automation Rule fires, the second Automation Rule will not fire, even if the criteria are met in the trigger event.
Automation Rule Timing and Retroactivity
How long does it take for an automation rule to run? Automation rules in Salesloft run on a scheduled cycle, typically within a few minutes of the triggering condition being met. Processing time may vary based on queue volume and the complexity of the rule. Rules do not run instantaneously — there may be a short delay between the trigger event and the action being executed.
If a rule does not appear to have run, check the following:
- Confirm the triggering condition was met exactly as the rule requires
- Verify the person or record meets all filter criteria
- Check that the rule is active and not paused
Do edits to automation rules apply retroactively? No. Changes to an automation rule apply only to records that meet the trigger condition after the edit is saved. Records that already triggered the rule before the edit are not reprocessed. If you need to apply updated rule logic to existing records, you will need to re-trigger the condition manually or create a separate rule to handle those records.
Before editing a live automation rule, consider duplicating it first. This lets you test the updated logic without affecting your active rule.
View Automation Rule Logs
Once your Automation Rules begin to run, you can track activity from the Automation Rules Logs.
Now, if you are first starting with Salesloft Automation, this link won’t do you much good. But after you’ve activated Automation Rules, you can view all the activity that has occurred.
You can view the entire list of Automation Rule logs by clicking the blue View Rule Logs link on the Automation Rules page.
You can also view a filtered view of the look by selecting the View Logs button from one of the following locations:
To learn more about the Automation Rule Logs, check out the Automation Rule Logs article.
View Changes History
Changes or edits to automation rules should occur if your team has updated data information, like a new field that needs to be completed. As a team admin, you can edit automation rules to reflect your team’s processes.
When edits are made to a rule, any changes will be logged into the rule’s Changes History. The Changes History helps you analyze any changes that have been made to an individual rule. You can use this information to compare how efficient an automation rule performs. Also, the Changes History can be used to troubleshoot automation rules.
For example, let’s say your team has an automation rule that removes People from a Cadence when the Status field is updated to “Complete”. Your leadership team makes the decision to update the status options in your CRM from “Complete” to “Closed.” The change is made in your CRM and a Salesloft Admin, Ashley, makes an update to the rule in Salesloft. Unfortunately, Ashley typed “Closes” instead of “Closed,” so the rule never fires.
A few days later, your team realizes People are no longer being removed from Cadences automatically. You can access the automation rule Changes History and see Ashley’s most recent change to the Remove People from a Cadence rule. Upon noticing the typo, you can update the rule, so the automation rule will fire.
To view the full Changes History, follow these steps:
- Go to your Settings.
- Navigate to the Automation Rules settings page under the Data Settings section.
- Filter your list of rules, if necessary.
- You have two options to view the Changes History from the Automation Rules page:
- To view the Changes only: Open the Automation Rule Actions by clicking the … found on the right side of the Automation rule list item. In the dropdown menu, select Changes History.
- To view and make edits to the rule: Select the name of the rule you want to view. You will be directed to the Edit Automation Rule page for that rule.
- Click Changes History in the upper right corner of the page. The Rule Changes History window will appear where you can see any rule changes.
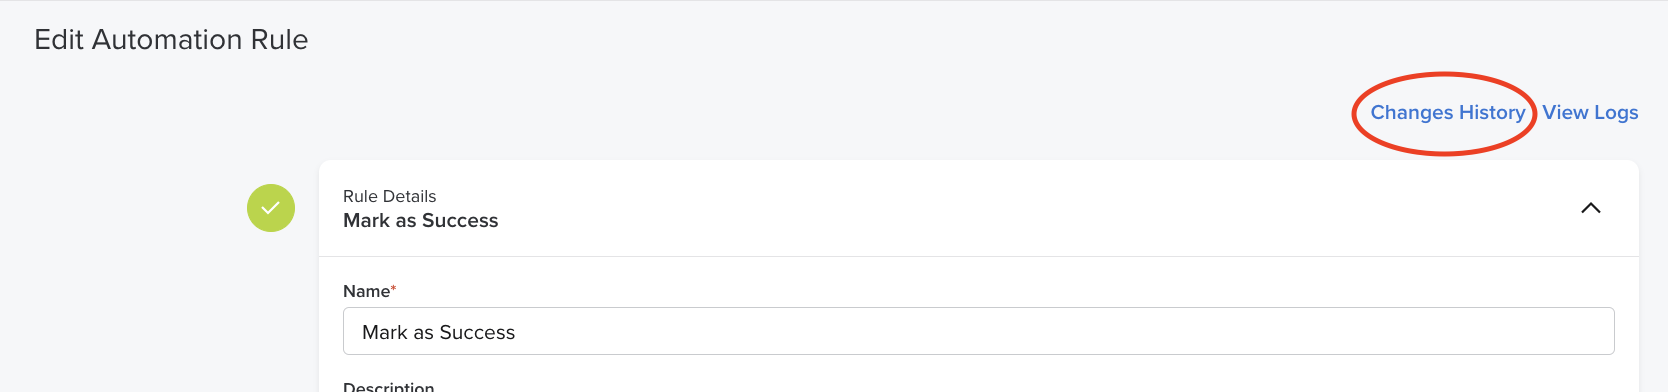
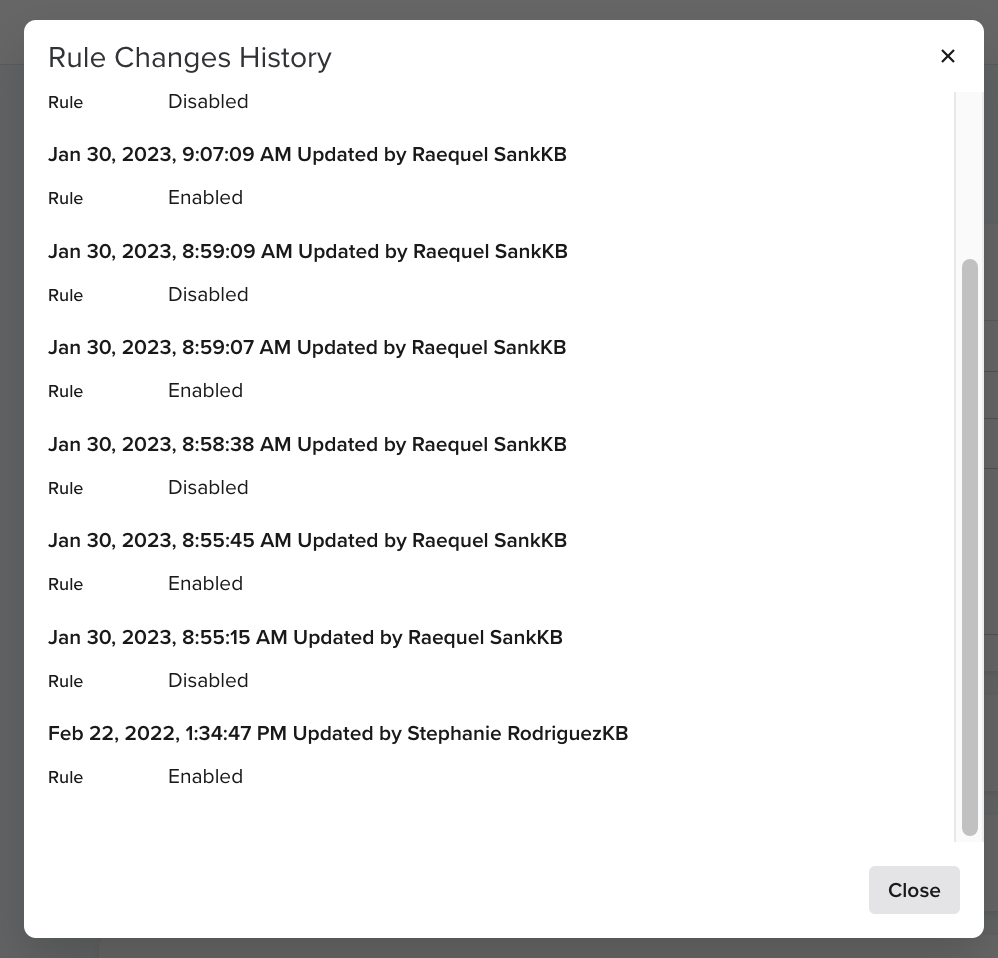
Inside the Rule Changes History window, you can see any and every edit that was made to the rule, including the details saved when the rule was originally created. Rules appear chronologically starting with the most recent. If the rule has been edited many times, you can scroll inside the window to view all of the changes made.
Each change shown in the Changes History will include the following:
- Date and time of the change
- Salesloft user that performed the change
- List of changes made. These details will only include the items that were changed. For example, the original rule will include Rule Name, Trigger, Criteria, Action, and the Rule status, since all of those settings are configured when creating a new rule. Rule changes may only include one field, like Criteria or status, depending on what aspects of the rule was changed.
Add a New Automation Rule
Clicking the Create New Rule button will allow you to add new Automation Rules for your team.
For a full walkthrough of how to create new Automation Rules, check out the Create a New Automation Rule article.
Filter and Search Automation Rules
Automation Rule's filter and search functionalities allow you to find certain rules within your listview. This is particularly beneficial when you need to verify whether a certain type of rule has been previously created or to quickly identify a rule that is misfiring and needs additional troubleshooting.
The filters appear as individual buttons when you can select your filter option from a dropdown. You will find the filters on the Automation Rules page above the Automation Rule List View. The following filters are available:
- Status: Filters by whether the rule is enabled (active and running) or disabled (inactive).
- Active
- Inactive
- All Rules (default)
- +Add Filter: Filter Automation Rules by:
- Action
- Created At
- Created By
- Last Updated
- Trigger
- Updated By
You can also search the rules listed in your Automation Rule List View to find a specific rule by name. Type in the word or phrase included in the rule name and hit Enter. Your list view will update to only show the items that fit your searched term.
The Automation Rule List View
A list of the Automation Rules you've created takes up the majority of the Automation Rules page. Here you can see a full breakdown of the rules you have created and manage which rules are currently active.
In your Automation Rule list, each itemized rule contains the following details:
- Grab and Move Rule option: Reorder your rule from the list view.
- Active/Inactive Button: The toggle button turns your Automation Rule on/off. Switching the toggle to active means when the automation event occurs, the activity will trigger.
- Numerical Order of Rule: The number next to your Rule Name lets you know where the rule falls in order.
- Rule Name: Each time you create a rule, you will give it a unique name so you know that rule’s purpose. The rule name is a clickable, blue link. Click the name to edit the rule.
- Action: Any actions that take place due the rule are listed under the rule name. These actions are determined when creating a rule.
- Trigger: The rule field type is listed directly under the rule name. The rule field type determines "when" a rule will trigger.
- Last Updated: Shows when and which Salesloft user last updated/ enabled/ disabled the automation rule.
- Automation Rule List Actions
Automation Rule Warning Icon
There may be times when you see a yellow exclamation point icon next to your Automation Rule name inside the Automation Rule List View. This icon, known as the warning icon, is an indicator that your rule will not fire.
The warning icon may appear next to an automation rule due to one of the following reasons:
- Incomplete Configuration: This label indicates that the automation rule is missing required attributes. For automation rules labeled Incomplete Configuration, the Enable Automation Rule toggle will be inactive.
- Blocked Rules: This rule is blocked because it shares the same criteria with another rule or the criteria in the rule is ordered in a way that will not fire. Let's walk through some examples of each of those:
- Automation Rule 1 contains "Criteria A" and "Criteria B." Automation Rule 2 which contains the same criteria "Criteria B" as the Automation Rule 1 but has a different value for it. Automation Rule 2 will not fire since that same information fired with Rule 1.
- Order of Rule and broader criteria: Rule will fire if it has broader criteria and it is placed on the top of the list.
You can hover over the icon to learn why the rule will not fire. The warning icon hover information contains:
- An explanation text for why the rule won't work.
- A link to this Salesloft Knowledge Base article
- A link that leads to the “Create/Edit Automation Rule page” of the rule that blocks the current rule in the new browser tab.
When a warning icon occurs, you can take the follow options to correct the error and make sure your rule fires:
- How to fix Incomplete Configuration: Enable your automation rule with all of the necessary criteria.
- How to correct a blocked rule: Reorder the rules on the list or change the criteria of the needed rule. Once blocked rule has no more blockers info icon is not displayed.
Automation Rule Page Actions
Clicking the ellipsis located on the right side of the Automation Rule panel will open additional actions you can take with your Automation Rule.
The available Automation Rule page actions include:
- Reorder Options: Edit the order of the rules in the Automation Rule list.
- Edit: Make changes to existing rules by selecting Edit.
- Copy: Automation Rules can differ from the slightest criteria. Rather than creating a new rule every single time, you can Copy existing Automation Rules. Once copied, edit the rule to fit your specific criteria, and save.
- View Logs: Takes you to the Automation Rule Logs page, filtered by the specific rule you have selected.
- Changes History: Opens record of edits made to the automation rule.
- Delete: For out-of-date or incorrect rules, delete them permanently from your Automation Rule list by clicking Delete.
Reorder Automation Rules
When your Automation Rules begin to trigger, they fire in their listed order. This means that if you have an important rule at the end of your list, another rule that is ahead in the list may keep your rule from firing.
Simply put, the order of your Automation Rules matters.
Which is why Salesloft gives you control over your list of Automation Rules. You can move rules up, down, straight to the top, or to the bottom of the list.
Use the numbers in your Automation Rule List View to confirm the order of your Automation Rule. Then, if your important rules are firing later in the list, use one of the following methods to rearrange your Automation rules.
Things to Note: Inactive rules will appear in your list view without a number. They are displayed in the order they were created, but will not fire.
Grab and Move Automation Rule
You can easily alter the order of your rules by moving or dragging an Automation Rule to its preferred spot.
To drag and move an Automation Rule, follow these steps:
- Find the Handle (six dots located to the left of the Rule Name). Your cursor will switch to a hand icon when you move to the step handle.
- Click on the step handle.
- Drag to your desired location and let go. A notification will confirm that the rule order has been updated at the top of the page.
Automation Rule Page Action - Reorder Options
The second option is to use the Actions menu to rearrange your rules. This option is particularly useful if you want to swap the order of two rules only or if you want to move a rule from the bottom of the list to the top (or vice versa).
To reorder your Automation Rules from the Page Actions drop down menu, follow these instructions:
- Under your Team Settings, navigate to your Automation Rules.
- Find the Automation Rule you would like to move.
- Select the ellipsis (...) on the right side of the Automation Rule's row.
- From the dropdown menu, choose which direction you would like the Automation Rule to move.
Common Automation Rules
There are certain Automation Rules that are commonly implemented by Salesloft users. Check out our Common Automation Rules and Use Cases article as you start building the rules for your team.