If you're just getting started with automation, you are probably wondering, "What Automation Rules should I put in place?" As you can see from our List of Automation Rule Triggers article, there are a lot of different rules that you can add to maximize your team's productivity.
The recommended best practice when it comes to Automation Rules is to craft rules based on your team's specific use case. Still, there are certain Automation Rules that are commonly implemented by Salesloft users.
Things to Note: We’re expanding our collection of automation ideas in the Champions Hub. Check out our first best practice: Skip Call and Email Steps When No Contact Info Exists. Also, stay tuned as we continue adding more automation rule-related best practices to the Champions Hub.
Use this list of common Automation Rules as you start building the rules for your team:
Importing Leads or Contacts from your CRM
To engage with anyone from Salesloft and log their activity, that individual must be imported into Salesloft. If your lead and contact data already exists in Salesforce, the best course of action is pull those records to Salesloft so you can start running your activities.
While you can create and import a list of people on your own, Automation Rules allow you to import leads or contacts from SFDC to Salesloft and add them to a cadence based on specific criteria.
Things to Note:
- This setup works for both Lead and Contact records in SFDC, but they must be built as separate rules using the respective triggers.
- Any fields used in the criteria must be mapped in Field Configurations
Common Use Cases
- Add inbound leads to an immediate follow up cadence.
- Leverage fields on Lead or Contact record to add people to active cadences based on your criteria.
Building an Inbound Leads Rule
- Navigate to the Settings, then select Automation Rules under Data.
- From the Automation Rules page, click Create New Rule.
- Name your rule, ex: "Inbound Leads", "Import Leads".
- From the Trigger dropdown, select CRM Data Sync, then When a Lead is not found in Salesloft.
- From the Criteria dropdown, select the following (Things to Note: Your criteria fields will depend on your field mapping, so names may be different):
- Select And to match all of the criteria in the group
- First Name > is not null
- Click the '+' button to add criteria.
- Last Name > is not null
- Email Address (Email) > is not null
- From the Action dropdown, choose Create Person.
- Click + Add Action, then Add to Cadence.
- Pick the Cadence you want to add the People to.
- Click Save.
- Things to Note: If you would like the Automation Rule to go into effect immediately, click the Use the Enable rule after saving toggle before saving. When the toggle area is blue, the setting is on.
Add People to Nurture Cadences
Manage a person’s journey through various stages of the sales cycle (like "working", "nurture", etc.) by automating movement from one cadence to the next.
Things to Note:
- Make sure cadence settings include a stage change for “When a person finishes this cadence.” That will be needed to trigger the stage criteria.
- The persona criteria can be swapped out with any field they use to target and personalize, or removed altogether if they do not get that granular.
Common Use Cases
- When a person finishes an active outbound cadence with no engagement, move them to a specialized nurture cadence that matches their segment, persona, or other criteria.
- When a person doesn’t engage with hyper-personalized cadence content, move them to an automated email cadence.
Building a Nurture Cadence Rule
- Navigate to the Settings, then select Automation Rules under Data.
- From the Automation tab in your Team Settings, click Create New Rule.
- Name your rule, ex: "Move to Nurture Cadence".
- From the Trigger dropdown, select Person Updates, then When a Person changes in Salesloft.
- From the Criteria dropdown, choose one the following (Things to Note: Your criteria fields will depend on your field mapping, so names may be different):
- And to match all of the criteria in the group:
- Person Stage > equals > "Stage name" (i.e. "Nurture")
- Click the '+' button to add criteria.
- Persona > equals > "Title"
- Or to match any criteria in the group:
- Person Stage > is set
- Click the '+' button to add criteria.
- Person Stage > has changed
- From the Action dropdown, choose Add to Cadence.
- Pick the Cadence you want to add the People to.
- Click Save.
- Things to Note: If you would like the Automation Rule to go into effect immediately, click the Use the Enable rule after saving toggle before saving. When the toggle area is blue, the setting is on.
Account-Based Automation Rules
For teams using Account-Based selling models, there could be a bunch of routine operations that sellers are required to do manually to support the data hygiene on the level of Accounts and People at the Accounts.
Specific use cases of these manual updates may include:
- When Account stage is set to “Not Qualified”, update all Peoples' stage to “Not Qualified” as well.
- When opportunity is closed and account is marked as “Customer”, update related contacts as “Customer” as well.
- When success is logged for one Person at Account, update all other People at this Account to reflect their stage.
- When the Account is updated and it meets specific criteria—add all People at this Account to a Cadence.
In order to build these style of automation rules, you can select the following actions inside rule based triggers:
- Add Tags to Account: Automation rule will tag Account record with the specified tag
- Add Tags to All People at Account: Automation rule will tag People related to the Account with the specified tag
- Set Fields on All People at Account:Automation rule will set specified fields to all People related to an Account
- Add all People at Account to Cadence: Automation rule will add all People related to an Account to the specified Cadence
Hot Lead Cadences
A Hot Lead Cadence comes into play with your high priority People and Accounts. When a Person registers multiple views or clicks on a cadence email, add them to a High Priority cadence for immediate follow up.
Hot Leads in Salesloft can be used to act fast when a Person interacts with company-related content. With the Hot Leads feature, Salesloft also created a specific automation rule trigger in response to Hot Leads.
Things to Note:
- Recommend limiting this rule to specific cadences to prevent it from firing for anyone who opens or clicks Lofted emails.
- Using “AND” vs “OR” can make a big difference on View and Click criteria, so make sure customers pay attention to that.
- Marking the destination cadence “High Priority” is a good way to get it to the top of a rep’s cadence to do list.
Common Use Case
When a person clicks a link from a nurture cadence email, add them to a simultaneous “Call only” cadence for a rep follow up with 3-4 phone calls over the next two days. The goal is to catch a prospect while they’re interested.
Building a Hot Leads Cadence Rule
- Navigate to the Settings, then select Automation Rules under Data.
- From the Automation tab in your Settings, click Create New Rule.
- Name your rule, ex: "Hot Leads".
- From the Trigger dropdown, select Engagement, then When a Hot Lead is Created.
- Add Criteria, if necessary. (Things to Note: Your criteria fields will depend on your field mapping, so names may be different)
- From the Action dropdown, select Add to Cadence, then choose your high priority Cadence.
- Things to Note: Hot Leads are a temporary label, so if you would like to designate People who have been a Hot Lead, we recommend selecting the + Action in the Automation Rule and Add Tags to Person. Add a tag for Hot Leads to be added whenever a Hot Lead is created.
- Click Save.
- Things to Note: If you would like the Automation Rule to go into effect immediately, click the Use the Enable rule after saving toggle before saving. When the toggle area is blue, the setting is on.
Building a Similar Hot Leads Cadence Rule
If your team does now use Salesloft's Hot Leads feature, but would like an automation rule that uses similar criteria, follow these steps:
- Navigate to the Settings, then select Automation Rules under Data.
- From the Automation tab in your Settings, click Create New Rule.
- Name your rule, ex: "Hot Leads".
- From the Trigger dropdown, select Engagement, then When stats for an email change.
- From the Criteria dropdown, choose one of the following (Things to Note: Your criteria fields will depend on your field mapping, so names may be different):
- And:
- Person Active Cadences > includes > (name of nurture or most used cadence)
- Or:
- View Count > exceeds > 2
- Things to Note: Click the '+' button to add criteria.
- Click Count > exceeds > 2
- From the Action dropdown, select Add to Cadence, then choose your high priority cadence.
- Click Save.
- Things to Note: If you would like the Automation Rule to go into effect immediately, click the Use the Enable rule after saving toggle before saving. When the toggle area is blue, the setting is on.
Updating Fields with Validation Rules
Some fields in your CRM may require data in an additional field—or dependent field. Salesloft does not currently support validation rules, which can cause syncing to your CRM to fail when a dependent field is involved. To accommodate this, admins can create automation rules to update a custom field in Salesloft that corresponds with the dependent field in the CRM.
Common Use Case
Wherever a dependent field is required in your CRM in order to save or change an original field value. (Ex. A lead or contact’s Status is changed and a second (dependent) field for Status Reason is required in order to save the change.)
Things to Note:
- Admins will need to create a custom field in Salesloft for “Lead Status”
- Create a custom field in Salesloft that serves as a hybrid field, with each combination of values having its own picklist value. This field doesn’t need to be synced back to Salesforce. Many teams just use Person Stage as their hybrid field since it's easy for users to update on a person record.
- Best practice for creating the hybrid stage values would be to use something like “Disqualified - [Reason]” where [Reason] exactly matches each option in their picklist.
- If the team has multiple Status Reasons (e.g. Bad fit, Bad timing, No longer at company, etc.) they will want to create a separate stage and automation rule for each item on that list.
- Just like your “Lead Status” picklist, the values entered for “Lead Status Reason” in Salesloft must exactly match the value in the dependent picklist for that field. That includes spacing, capitalization, hyphens, etc. Otherwise, the sync will fail.
Building a Rule to Update Dependent Fields
Things to Note: In this example, before a lead status can be updated to "Disqualified," a "Lead Status Reason" must be entered into the dependent field.
- Navigate to the Settings, then select Automation Rules under Data.
- From the Automation tab in your Settings, click Create New Rule.
- Name your rule, ex: "Disqualified Status - Bad Fit".
- From the Trigger dropdown, select Person Updates, then When a Person changes in Salesloft.
- From the Criteria dropdown, select the following: (Things to Note: Your criteria fields will depend on your field mapping, so names may be different):
- Select And to match all of the criteria in the group
- Select Person Stage > equals > Disqualified Status - Bad Fit
- From the Action dropdown, select Set Person Fields.
- Click + Add Field, then select the following:
- Status set to Disqualified
- Click + Add Field again and add: Lead Status Reason set to Bad Fit (or the appropriate data entry for your team).
- Click + Action again and select Remove Person from all Cadences.
- Click Save.
- Things to Note: If you would like the Automation Rule to go into effect immediately, click the Use the Enable rule after saving toggle before saving. When the toggle area is blue, the setting is on.
Rules from Disposition & Sentiments
When a call is logged with a certain disposition or sentiment, update the person’s stage accordingly.
Things to Note:
- Dispositions and Sentiments can be customized by an admin or user with the assigned permissions from Settings.
- A rule like this can be used in conjunction with others to manage the prospect journey from active cadence to nurture cadence to hot lead cadence if they engage with nurture cadence content.
Common Use Cases
- A rep connects with a prospect who is interested, but would not like to take a meeting at this time. Instead of marking them Disqualified, you can update their stage to Nurture and have them automatically added to a nurture cadence to keep the lead warm.
- A rep connects with a prospect and disqualifies them, so would like to automatically remove from all cadences once the call is logged.
Building a Rule to Update based on Dispositions & Sentiments
- Navigate to the Settings, then select Automation Rules under Data.
- From the Automation tab in your Settings, click Create New Rule.
- Name your rule, ex "Call Sentiment > Cadence".
- From the Trigger dropdown, select Engagement, then When a Call is logged for a Person.
- From the Criteria dropdown, select the following: (Things to Note: Your criteria fields will depend on your field mapping, so names may be different):
- Select And to match all of the criteria in the group
- Select Disposition > equal > Connected
- Things to Note: Click the '+' button to add criteria.
- Select Sentiment > equal > Timeline 6-12 months
- From the Action dropdown, select the following:
- Add to Cadence > choose the appropriate Cadence.
- Things to Note: Click the '+' button to add an action.
- Select Set Person Fields.
- Click + Add Field.
- Person Stage > Working.
- Click Save.
- Things to Note: If you would like the Automation Rule to go into effect immediately, click the Use the Enable rule after saving toggle before saving. When the toggle area is blue, the setting is on.
GDPR Compliance: Automatically Add EU Residents to a GDPR Specific Cadence
In addition to the vendor compliance in Salesloft's Privacy Settings, automation can help manage the way your reps communicate with European contacts.
Building a GDPR Cadence Rule
Before you can create the rule, complete the following:
- Speak with your Security and Legal team about your company's GDPR settings.
- Map a EU Resident Salesloft field to a Salesforce field. Your Salesforce admin will need to create a Salesforce field. We recommend creating a checkbox field that will designate "GDPR Compliance."
- Create Salesforce automation: since your prospects are coming directly from Salesforce lists, your Salesforce admin can build automations in SFDC that will check the GDPR compliance box on the lead/contact if it meets one of the following criteria:
- Country (on the contact): Austria, Belgium, Bulgaria, Croatia, Cyprus, Czech Republic, Denmark, Estonia, Finland, France, Germany, Greece, Hungary, Iceland, Ireland, Italy, Latvia, Liechtenstein, Lithuania, Luxembourg, Malta, Netherlands, Norway, Poland, Portugal, Romania, Slovakia, Slovenia, Spain, Sweden, Switzerland, United Kingdom
- Phone Number Starts with: +43, +32, +359, +385, +357, +420, +45, +372, +358, +33, +350, +49, +30, +36, +354, +353, +39, +371, +423, +370, +352, +356, +31+, 47, +48, +351, +40, +421, +386, +34, +46, +44, +355,+376, +374, +994, +375, +387, +298, +995, +983, +389, +373, +377, +382, +7, +378, +381, +41, +90, +380
Once everything is set up on the Salesforce end, create a new Automation Rule that will check for this GDPR compliance box when a lead/contact is added to a Cadence. If the box is checked, it will remove them from the Cadence and add them into the GDPR team Cadence as a holding bucket.
Matching Salesloft Owner to Salesforce Owner
These rules ensure Salesloft Owners on People and Accounts remain consistent with changes made to the Lead, Contact, or Account Owner fields in your CRM.
Things to Note: Owner CRM Id should be mapped before creating this rule.
Common Use Cases
There will likely come a time when you will need to update the owner for prospects in Salesloft, be it another rep has left the company, territories have shifted etc. Doing this manually in both Salesforce and Salesloft can be cumbersome or impractical. In that case, it’s suggested to create a rule to match the Salesloft owner to whatever the Salesforce owner may be.
For Person Updates: Building a Rule to Update Salesloft Owner when Salesforce Owner changes
- Navigate to the Settings, then select Automation Rules under Data.
- From the Automation Rules page, click Create New Rule.
- Name your rule, ex: “Match Salesloft owner to Salesforce owner”.
- From the Trigger dropdown, select Person Updates, then When a Person changes in Salesloft.
- From the Criteria dropdown, select the following (Things to Note: Your criteria fields will depend on your field mapping, so names may be different) :
- Select Or to match any criteria in the group
- Owner CRM ID > has changed
- Click the '+' button to add criteria.
- Owner CRM ID > is set
- From the Action dropdown, choose Set Salesloft Owner to CRM Owner.
- Click Save.
- Things to Note: If you would like the Automation Rule to go into effect immediately, click the Use the Enable rule after saving toggle before saving. When the toggle area is blue, the setting is on.
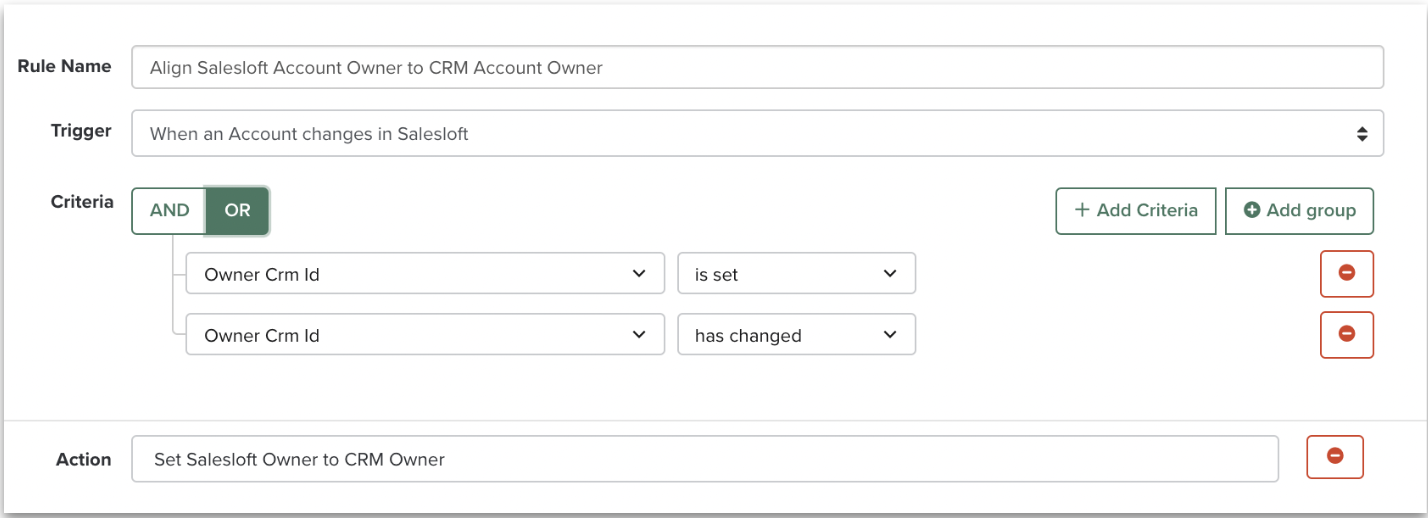
For Account Updates: Building a Rule to Update Salesloft Owner when Salesforce Owner changes
- Navigate to the Settings, then select Automation Rules under Data.
- From the Automation Rules page, click Create New Rule.
- Name your rule, ex: “Match Salesloft owner to Salesforce owner”.
- From the Trigger dropdown, select Account Change, then When an Account changes in Salesloft.
- From the Criteria dropdown, select the following (Things to Note: Your criteria fields will depend on your field mapping, so names may be different) :
- Select Or to match any criteria in the group
- Owner CRM ID > has changed
- Click the '+' button to add criteria.
- Owner CRM ID > is set
- From the Action dropdown, choose Set Salesloft Owner to CRM Owner.
- Click Save.
- Things to Note: If you would like the Automation Rule to go into effect immediately, click the Use the Enable rule after saving toggle before saving. When the toggle area is blue, the setting is on.