Salesloft's Deals provides an up-to-date view of your sales pipeline that allows your team to manage and accelerate all of their opportunities during the sales cycle.
In order to set your team up for success within Deals, a Salesloft admin needs to configure deals settings and create standard views in Deals.
Before your team can leverageDeals, you will need to configure Deals in your Salesloft instance to sync your team’s Salesforce data into Salesloft.
Things to Note:
Salesforce is required to leverage Deals.
Salesloft Deals is available for the Advanced and Premier Salesloft packages.
In this article, we will walk through each configure Deals for your team, including:
- Select Your Team’s CRM Type
- Connect to Your Salesforce
- Enable Salesforce Sync
- Configure Amount Field
- Configure Dashboards
- Configure Deal Gaps
- Share Dashboards
- Deals User Onboarding Steps
Deals works exclusively with Salesforce CRM. Before you even visit the Deals area of the Salesloft platform, you need to confirm your team’s CRM type is Salesforce.
So, the first step to setting up Deals is to set the teamwide CRM type to Salesforce inside your CRM Sync Settings.
Once Salesforce is selected as your team’s CRM type, you can go to the Deals page in the Salesloft platform.
Things to Note: If your team selects an alternative CRM type, Deals will not be visible in the Salesloft navigation.
As an admin visiting Deals for the first time, you will see the Deals Setup and Configuration page. This checklist contains the most important configuration steps for an admin to perform in Deals.
The first step listed on the Deals Setup and Configuration page is to connect to your personal Salesforce account. This connection between the Salesloft admin and your Salesforce instance must exist before opportunity data can sync between the two systems.
Select the Connect Salesforce button on the Deals Setup and Configuration page. Follow the prompts to Connect to your Salesforce Account.
Things to Note:
- The ‘Connect to Salesforce’ step is also included in the Select your team’s CRM Type and Salesloft User Startup Checklist so this step may already be complete.
- If you're not an admin but are still being directed to the Deals Admin Configuration Page, check out our troubleshooting article.

Now that the initial connection is complete, the next step in setting up Deals is to enable Salesforce Sync.
Salesforce Sync allows a bidirectional connection between Salesloft and Salesforce by which data is shared between the two platforms.
Things to Note: The Enable Salesforce Sync step is required before moving on to Configure Amount Fields. This step may take up to one hour to complete.

Once Salesforce Sync is enabled, you need to Configure the Amount Field.
The Amount Field controls when Salesloft syncs your Deal’s specific data. The list of amount fields is pulled from Salesforce and includes any currency field you have set up on the Opportunity Object.
Things to Note: Step 2 (Enable Salesforce Sync) allows Salesloft to pull the Amount Field options from Salesforce. Amount Fields will not display in the list until step 2 is complete.
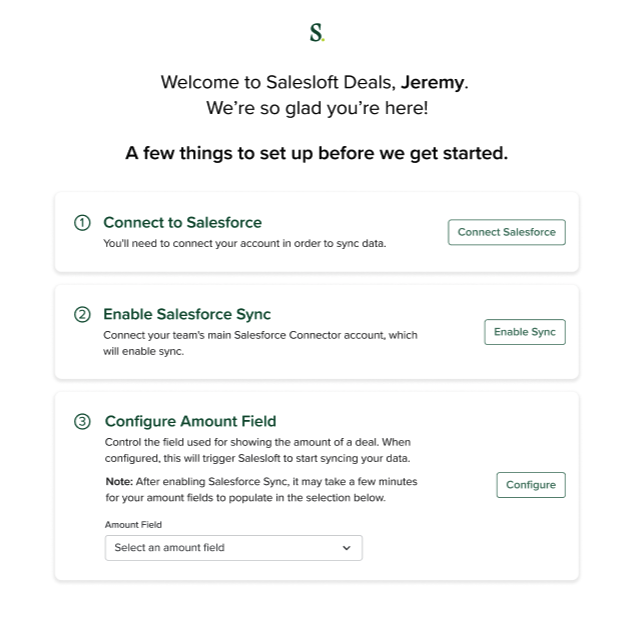
To configure the Amount Field, follow these steps:
- In the Configure Amount Field box, select the desired Amount Field to be used for indicating a Deal’s amount in Salesloft.
- Click Configure to complete setup.
- This completed the configuration steps. You will be directed inside of Deals to the Pipeline view where you can set up your team’s experience.
In the event you receive a Cannot Locate Amount Field message, contact Salesloft Support. The team may need to confirm your Deals access is enabled.
Now that your data is syncing and configured, it’s time to create Pipeline Dashboards.
Your Pipeline Dashboards act as the motherboard within Deals. The Pipeline Dashboard tabulates all of your Deals. It's highly customizable and offers a variety of insights that paint a clear picture into how your sales are progressing.
Since the dashboard is highly customizable, we suggest creating standard dashboards that your team can leverage from day 1 in Deals. These dashboards should share the most pertinent information to your business and your sales reps.
To learn more about configuring the Pipeline Dashboard, check out the Pipeline Dashboard Overview article.
Deal Gaps are the data points that could negatively impact your Deals.
These gaps are a great way to identify leading indicators of pipeline health. When Deal Gaps are set, they assign color-coded numbers to notify you of whether your Deal is healthy or not.
To create Deal Gaps, check out our Manage Deal Gaps article. Once your Deals Gaps are created, make sure to include the Deal Gaps column to your dashboards, so the team can identify gaps whenever they review their pipeline.
Once you have finished creating your dashboard views you can share them with your whole team or individual teammates so everyone has access to the right sets of data.
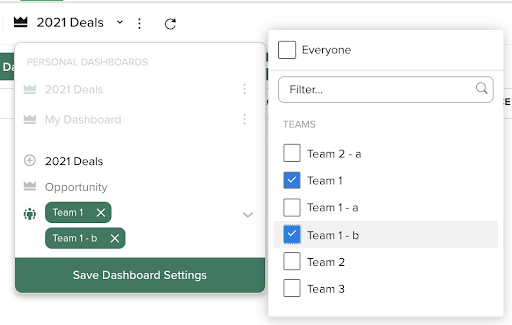
To edit the Sharing Settings of a Dashboard, follow these steps:
- Select the three vertical dots to the right of the Dashboard Title. The Dashboard Actions menu will appear.
- Click Edit Sharing. This will open the Personal Dashboard menu to the Share with Team Setting.
- Enter a team member's name or click Everyone to share with your whole team.
- Click Save Dashboard Settings. An icon signifying that the Dashboard has been shared will appear to the right of the Dashboard title.
Deals is configured and ready for action! Now it’s time to introduce Deals to your team so they can begin efficiently managing their pipeline.
Share the following steps with your Deals users so they can quickly get up and running with Deals.
Connect to Salesforce
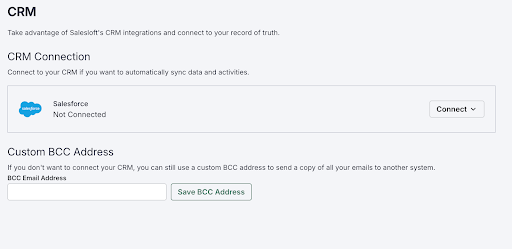
Once the team admin has finished configuring Deals, each user will need to connect their Salesloft account to Salesforce before they can utilize Deals.
Navigate to settings by clicking the profile icon in the top right corner of the screen and select settings and then select CRM. Click the Connect button and then select Connect to Salesforce to connect your Salesloft account to Salesforce.
Train on Existing Dashboards
After you have connected to Salesforce, it’s time to familiarize yourself with the Pipeline Dashboard.
The Pipeline Dashboard tabulates all of your Deals. It's highly customizable and offers a variety of insights that paint a clear picture into how your sales are progressing.
To access the Pipeline Dashboard, hover over Workspaces in the Salesloft top menu. A dropdown menu will appear. Select Deals. By default, you will be directed to the Pipeline tab. The Dashboards are available under the Pipeline tab.
Your admin and leaders may have already created standard dashboards that will be shared with you.
To learn more about the Pipeline Dashboard, check out the Pipeline Dashboard Overview article.
Learn the Deal View Page to Manage Individual Opportunities
Deal View provides a simple, streamlined view of everything that matters when managing a deal.
To access the Deal View, go to the Pipeline tab. There you can select between the Pipeline View and the Deal view in the upper left corner. You can also select an individual Deal from the Pipeline view.
To learn more about the Deal View page, check out the Deal View Overview article.