Dialing a prospect from an area code that is local to them increases the chances that they will take the call, which gives your team more opportunities to connect, book qualified demos, and close deals! Salesloft’s LocalDial allows users to make calls from a phone number that contains the same area code you're calling into, increasing your call connection rate by up to 400%!
For information on LocalDial payments and pricing, check out our Dialer Pricing Guide .
In this article, you will learn how to set up LocalDial for your team, including:
Before your team can reap the benefits of LocalDial, you have to flip the switch and authorize LocalDial for your individual users.
Things to Note: If you would like to enable International LocalDial (LocalDial to areas outside the United States), the setup involves some additional steps. Please reach out to Salesloft Support for further assistance.
To enable LocalDial for your team, follow the instructions listed below:
1. Go to your Settings. Select Dialer under the Communication category. Then click the LocalDial tab at the top of the Dialer Settings page.
2. If this is the first time you are accessing LocalDial, click the green Agree to Terms of Use and Activate button. This will agree to the billing terms and activate LocalDial.
3. Scroll down to the LocalDial Users list.
4. By default, the LocalDial Users list shows users who LocalDial has been enabled for. To enable LocalDial for a user, click the Disable tab. This will list the users who do not have access to LocalDial.
5. Find the name of the user you would like to enable LocalDial for, then click the toggle area beneath the Settings column. Once you click the toggle area, the person’s name will be removed from the Disabled list and added to the Enabled list.
- Things to Note: After you've enabled LocalDial for your team, each user will need to click the LocalDial button found an the top of the Dialer to turn on LocalDial before making their call. When the Dialer is open, users can hover over the LocalDial icon to confirm if the feature is enabled or disabled.
Disabling LocalDial for a team member revokes LocalDial access for that individual user. There is a difference between disabling LocalDial and turning LocalDial off. Disabling LocalDial means the user cannot use the LocalDial feature at all.
If a user decides they do not want to use LocalDial when calling, they can turn off LocalDial in their Dialer by clicking the icon prior to placing the call. Turning off LocalDial will make their assigned number appear.
When you would like to disable LocalDial functionality, you will disable LocalDial for that team member. To disable LocalDial for a team member, follow these steps:
- Go to your Settings. Select Dialer under the Communication category. Then clicl the LocalDial tab at the top of the Dialer Settings page.
- Scroll down to the LocalDial Users list. By default, the LocalDial Users list shows Enabled users.
- Find the team member's name and click the toggle area to disable LocalDial. Once you click the toggle, the person will be removed from the Enabled list and added to the Disabled list.
Things to Note:
- Your team will still be charged for LocalDial after a user is disabled.
- To stop further charges, you will need to release the LocalDial Number for the entire team. Releasing the numbers also means you will not be charged for those numbers. Please contact our support team so they can release area codes you don't want to use.
Your team will accumulate provisioned phone numbers for each area code they call into when they use LocalDial. You can view a list of numbers by going to your Dialer Settings under the LocalDial tab. Scroll to find LocalDial Numbers. Here you will see the total number of LocalDial numbers your team has used.
Best practice tip: Review your LocalDial numbers to see your most commonly used area codes. Then you can cut your dialer cost by whitelisting those areas.
Things to Note: If you decide to whitelist area codes after using LocalDial, contact our support team so they can release any area codes you don't want to use (releasing the number also means you will not be charged for that number).
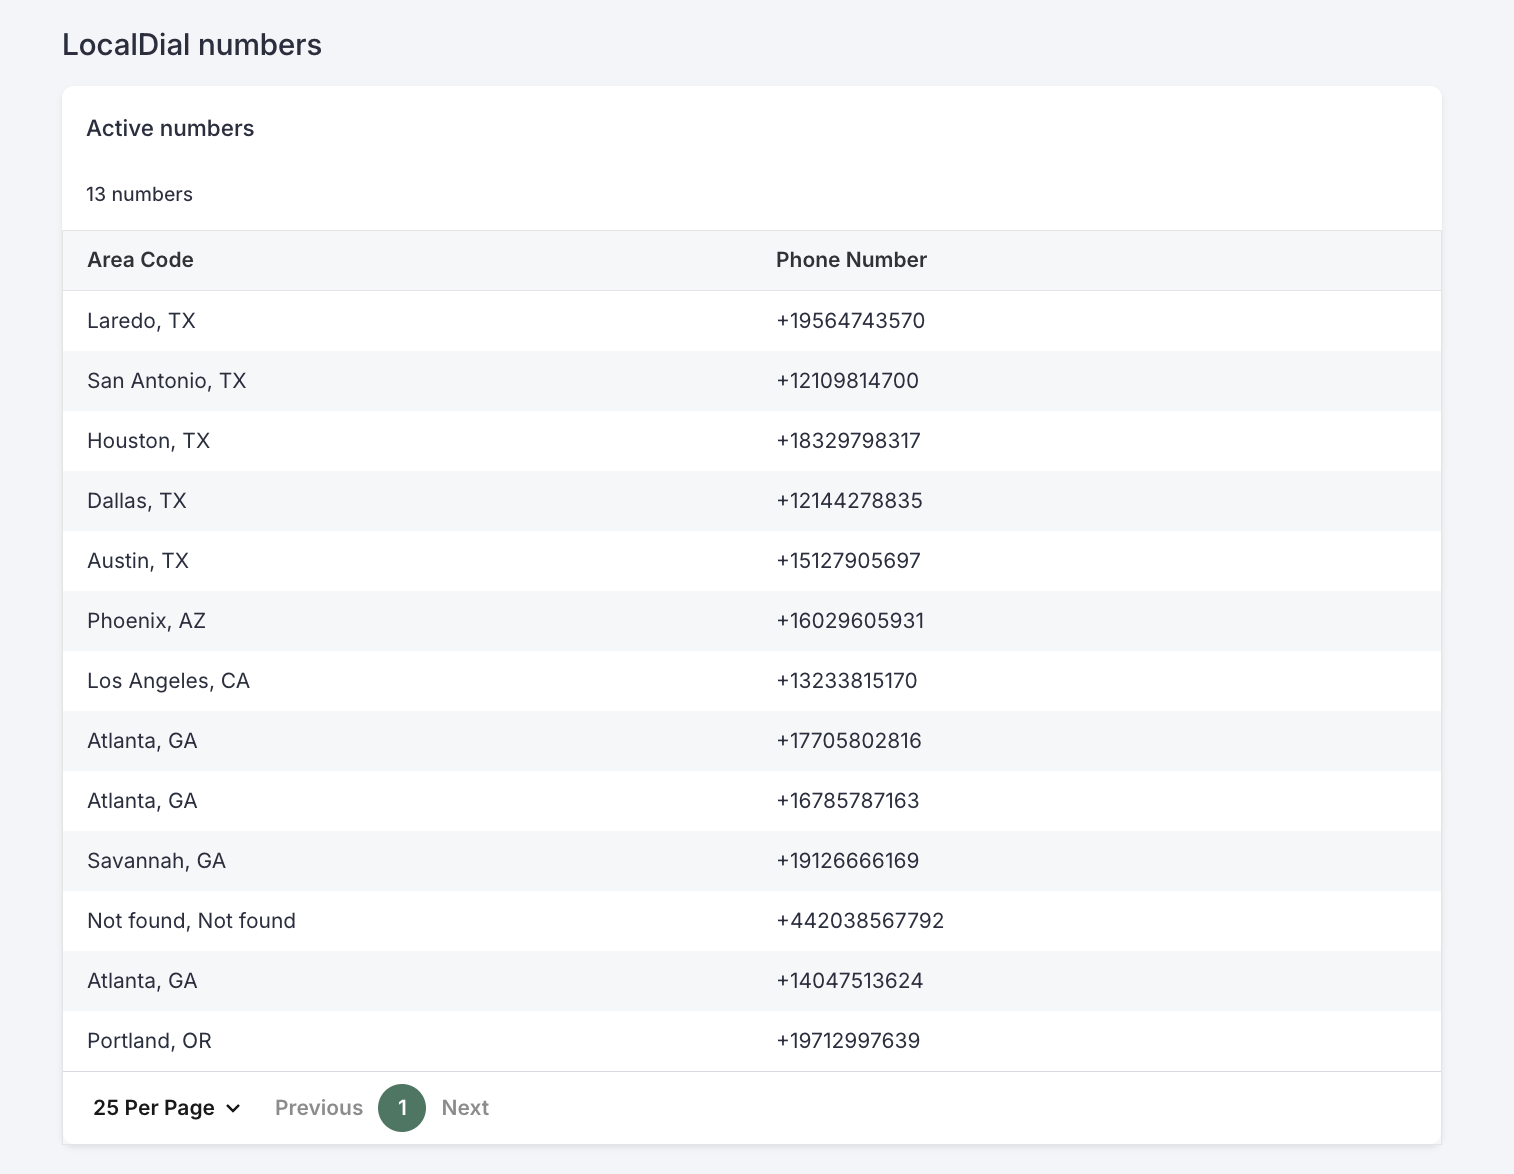
Each time you call a new area code using LocalDial, you provision an additional number which can cost your team more in the long run.
Many major metropolitan areas have multiple area codes. Seriously, New York has at least three, Atlanta has three, Los Angeles has at least four...you get the point.
To keep your invoiced dialer costs in check, you can whitelist specific area codes. This will prevent LocalDial from purchasing a number for any area code that is not whitelisted.
Things to Note: If a single area code for a major metropolitan area has multiple area codes, that area code will apply whenever that city is called, regardless of the area code of the person being called. For example, if you whitelist the Atlanta area code “404” and call a number with the Atlanta area code “770,” your “404” phone number will apply.
To whitelist numbers for your team:
- Go to your settings, then select Dialer under the Communication category.
- Click the LocalDial tab.
- From the Whitelist An Area Code section, click Edit. The Edit button will turn into a text box.
- Enter your preferred area codes in the text box, then click the check icon.
- Once an area code has been whitelisted, it will appear under Whitelisted Area Codes.
Things to Note: To delete a whitelisted area code, navigate to the Whitelisted Area Codes list, find the area code you would like to remove, and click the trash can icon.