As a Salesloft admin, you have specific privileges to set up and manage your team's access to the Dialer. You can provision and manage phone numbers from the Dialer Settings, which can be found in your Settings under the Communication section.
In this article, you will learn about the components of the Dialer Settings, including:
The Dialer Settings include other tabs to manage various team-wide Dialer components. For more information, check out the following articles.
- Before you set up the Team Dialer, you must create a Trust Hub Profile and be approved before you can access the Salesloft Dialer. Trust Hub allows you to verify your business for the STIR/SHAKEN regulation and ensures compliant communication, reduces the risk of calls being labeled as SPAM, and improves SMS delivery reliability.
- Things to Note: Only US/domestic outbound dialer and SMS traffic from Salesloft (Twilio) purchased numbers require Trust Hub. International customers with no US numbers assigned do not need Trust Hub.
To learn more about Trust Hub registration, check out our Manage Trust Hub article. You can also check out our STIR/SHAKEN Regulations Guide to learn more about the STIR/SHAKEN regulation.
Salesloft allows your team to make outbound calls from multiple places, one of those being the Dialer Keypad.
The Dialer Keypad is enabled by default for anyone who has access to the Dialer. As an admin, however, you can disable the Dialer Keypad to manage how your team makes outbound calls inside Salesloft.
Things to Note: Disabling the Dialer Keypad removes the Dialer icon from the top navigation panel. With the Dialer Keypad disabled, your team will only be able to make outbound calls from the Person or Account Profile Page.
To access and manage the Dialer Keypad setting, follow these steps:
- Go to your settings.
- Select Dialer under the Communication category. You will land on the General tab.
- From the General tab, find the Dialer Keypad section. Click the toggle to configure the Dialer Keypad setting:
- When the toggle area is blue, the Dialer Keypad setting is enabled and your team will have access to the Dialer Keypad.
- When the toggle area is gray, Dialer Keypad setting is disabled. This means that your team will only be able to make outbound calls from the Person or Account Profile Page.
- Once you’ve configured the Dialer Keypad setting, you will see a visual confirmation in the Dialer Keypad section.

Figure 1: Dialer Keypad setting enabled.
In order to use the Dialer, an admin needs to assign a provisioned phone number to each user. Provisioned numbers are supplied from Salesloft’s third-party provider, Twilio. You are allowed to provision as many phone numbers as the total number of Salesloft users you have (i.e., if you have 10 users, you may provision up to 10 phone numbers).
Things to Note: Salesloft defaults to United States local phone numbers. Check out our Knowledge Base article for instructions to Provision an International Number.
To provision phone numbers, follow these steps:
- Go to your settings.
- Select Dialer under the Communication category.
- If you have not previously agreed to the Terms of Service provided on the Billing Authorization prompt, click Agree to Account Billing and Activate Dialer to continue.
- Click the Phone Numbers tab.
- Scroll to the Provision Numbers section, then click Provision. The Provision Numbers window will appear.
- From the Provision Numbers window, enter the area code you would prefer for the phone number you would like to provision. For example, if you are located in Atlanta you may want to assign your users a “404” provisioned number.
- Once you begin typing, a list of available phone numbers should appear. Select the phone number(s) you would like to provision, then hit Save.
- Things to Note: If numbers do not appear, phone numbers from that area code may be unavailable. Enter an alternative area code and click + Search Again.
- Confirm that you would like to provision the number.
- After you select a phone number, the number will appear in the Unassigned Numbers column within your Dialer Settings. Numbers will remain in this section until they are assigned to a specific user.
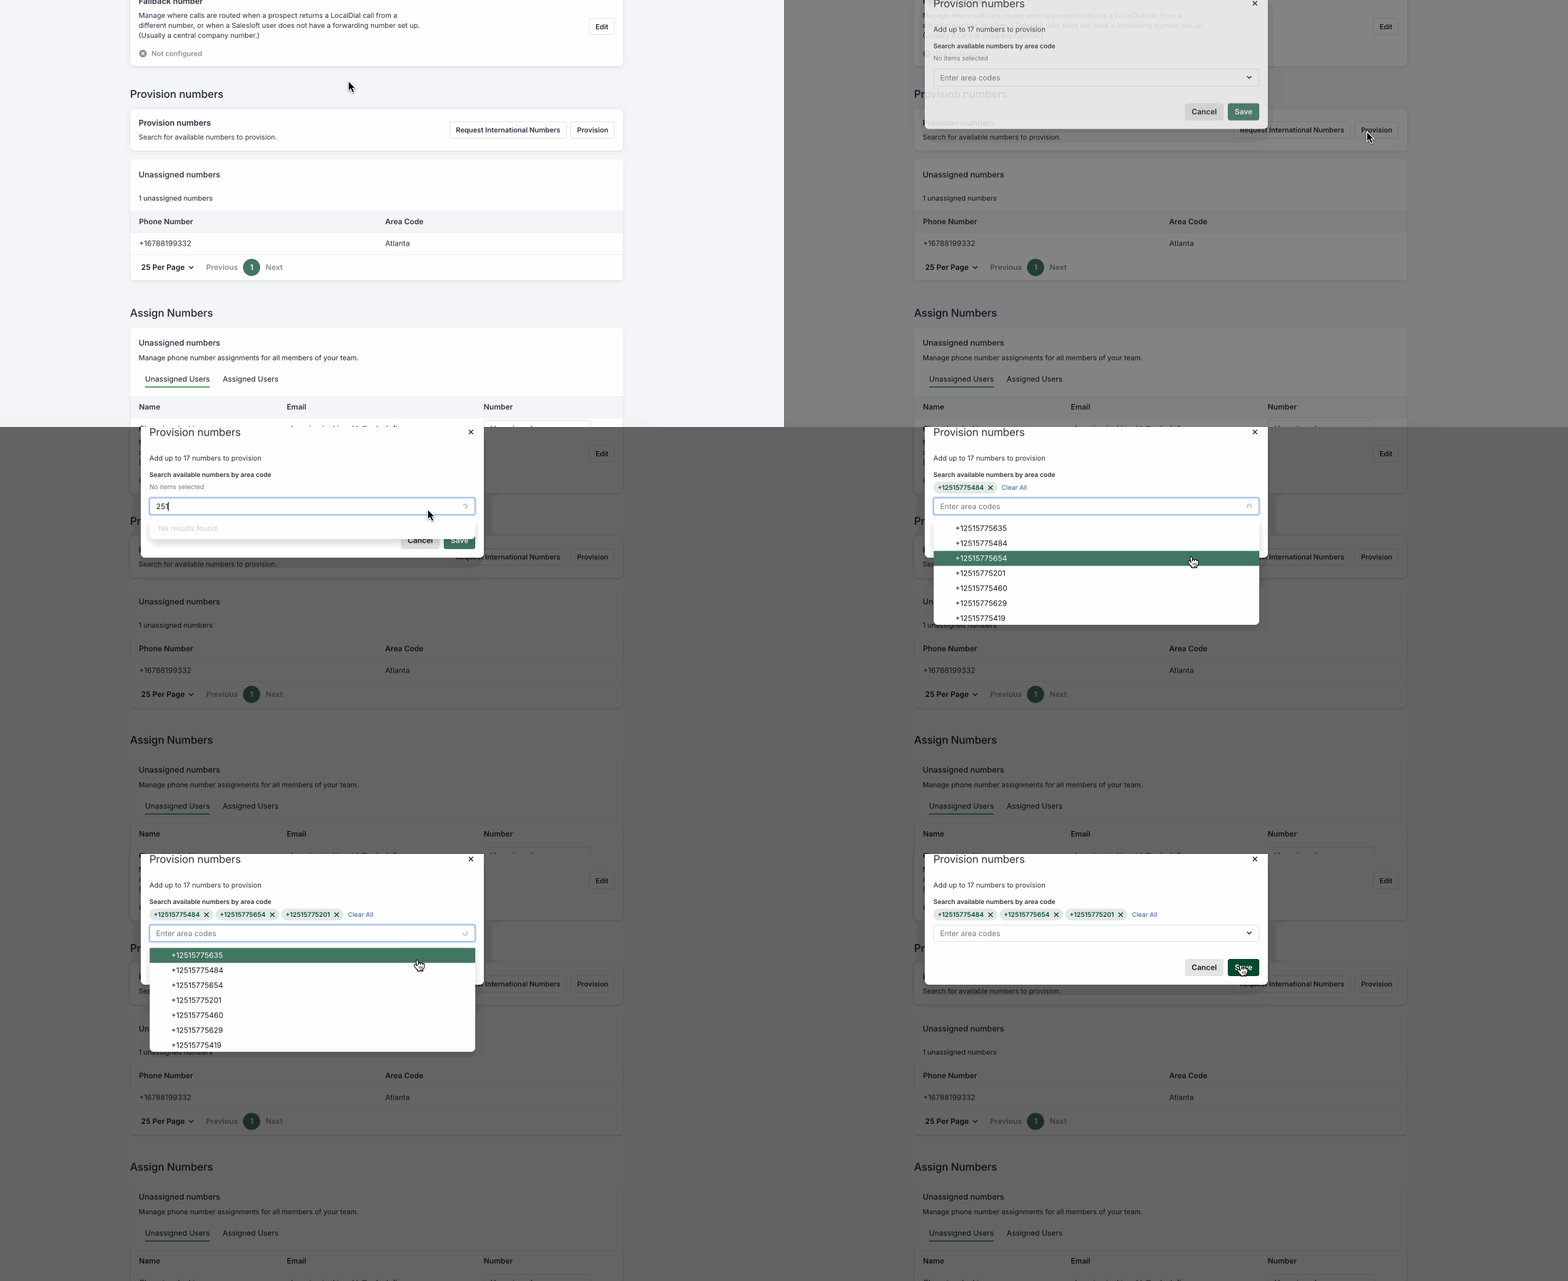
Figure 2: Provision a phone number.
Once you have provisioned the phone numbers for your team, you need to actually assign those numbers to individual users.
A list of your team members who have not been assigned phone numbers will be listed under Unassigned Users. If a user is listed in the Unassigned Users section, they do not have access to the Dialer.
Once you select a phone number for a user (aka, assign them a phone number), the user's name will appear under the Assigned Numbers column.
To assign a phone number to a user, follow these steps:
- Go to your settings.
- Select Dialer under the Communication category.
- Click the Phone Numbers tab.
- Scroll to the Assign Numbers section.
- Use the list of Unassigned Users to find the name of the individual you would like to assign a phone number to.
- Click the dropdown under the number column and pick a number for the user.
- The provisioned number that you assign to a user will appear in the user's Phone Settings as their Assigned Number.
Figure 3: Assign a phone number to a user.
Inbound Calls Default to Voicemail
When you create a new user and assign them a phone number, their Inbound Call Setting will default to Voicemail. This means that any unanswered inbound calls will go to voicemail.
For more information about the Inbound Call Settings, check out the Set Up the Dialer article. To learn more about receiving voicemails, check out the Voicemail Recordings article.
Admins can remove, or unassign, a number from a user. Why would you want to unassign a number from a user? Here are a couple of common reasons for removing a user's number:
- The user takes on a new territory: If you originally assigned a phone number for a specific state or region, and then alter where your rep is calling into, you may want to unassign their current number.
- The user leaves your organization: Businesses are constantly changing. If a user goes onto a different role or leaves your company, they no longer need their assigned number. Plus, once you unassign the number, you can assign it to a new hire that fills the role.
To remove a number, follow these steps:
- Go to your settings.
- Select Dialer under the Communication category.
- Click the Phone Numbers tab.
- Scroll to the Assign Numbers section.
- Click Assigned Users to see a list of users who have been assigned numbers.
- Find the user whose number you would like to un-assign.
- Click the dropdown under the number column , then click Unassigned.
- The user's name will now appear under Unassigned Users while the phone number will show up under Unassigned Numbers.
Figure 4: Unassign a phone number.
Each Salesloft user sets up a forwarding number so they can receive callbacks from people they have reached out to using the Dialer. But sometimes users forget or neglect to add their forwarding number.
This is where the fallback number comes to the rescue. By entering a fallback number under the Team Dialer Settings, returned calls that cannot find a forwarding number will still be directed to your company.
To set your fallback number, enter your preferred number in the dialogue box under Fallback Number and hit enter. As a Salesloft best practice, use a central line, like the front desk, as your fallback number.
Figure 5: Set a teamwide fallback number.
Drop-In Voicemail Recordings allow you to insert pre-recorded voicemails in your prospects voicemail box. Salesloft Admins have the ability to disable the Drop-In Voicemail feature. Disabling Drop-In Voicemail Recordings prevents users from leaving Drop-in Voicemails, which allows you to stay compliant if your organization or region has rules that may advise against using Drop-In Voicemail Recordings.
This is a teamwide setting so it can only be enabled or disabled for the whole team, not individual users.
Drop-In Voicemail Recordings are enabled by default. To disable Drop-in Voicemail Recordings, click on the Drop-In Voicemail Recordings toggle. When the setting is grey, the feature is disabled.
The CSV Bulk Number Assignment setting allows you to assign multiple phone numbers at once via a CSV upload. When you use this setting, Salesloft provides a template that the CSV should follow. Once a properly formatted CSV is uploaded, Salesloft will assign phone numbers to users on your team and move unassigned phone numbers to the appropriate tab. If SMS is enabled, Salesloft will also add phone numbers to the A2P and TrustHub registration queue.
To upload a CSV and assign phone numbers in bulk, follow these steps:
- Go to the Team Dialer Settings: Go to your settings, then select Dialer under the Communication category.
- Find the CSV Bulk Number Assignment Setting: Click the Phone Numbers tab, then scroll down to the CSV Bulk Number Assignment setting.
- Ensure your CSV file follows the template: Click Edit. An Upload CSV window will appear. Review the template to ensure your CSV file complies. You can also download the template and complete the fields.
- Upload your CSV: Click Choose CSV and upload your file.
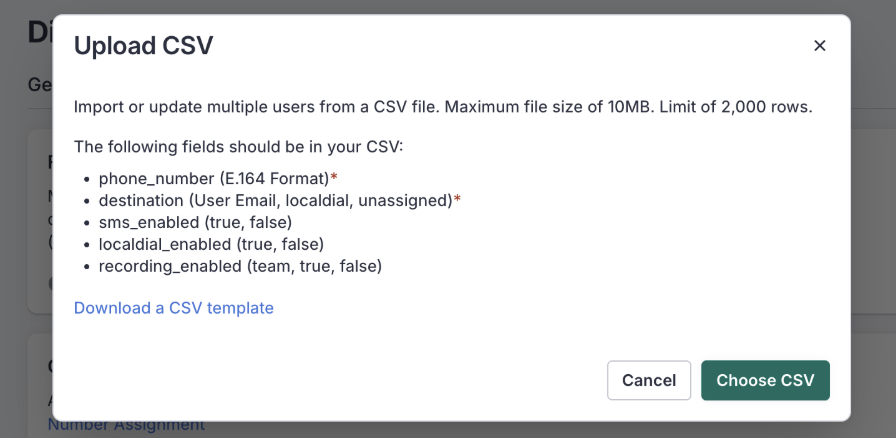
Figure 6: Upload a CSV to assign phone numbers in bulk.
Once you’ve uploaded your CSV, you can view your upload’s progress by clicking the View Imports button.

Figure 7: CSV Bulk Number Assignment setting.
Salesloft lets admins control who within their organization can view Dialer call recordings. This setting, found alongside your other call recording controls, determines whether a recording can be seen only by the rep who made the call, by that rep's group and any child groups, or by anyone on the team.
Things to Note:
- This setting governs Dialer call recordings only; it does not affect Conversations (CI) recordings, which are managed separately. The recording owner can always view their own recordings, regardless of which visibility tier is selected.
- There is no per-user or per-recording override of this setting; it applies uniformly across the team. Within the Group/Child Groups tier, access is governed by group membership alone, not by role (such as manager versus rep).
- Call recording visibility works in tandem with a separate download recordings permission, which controls whether a user can download recordings in Salesloft. This permission is enabled for both admins and users by default.
There are three visibility tiers to choose from:
- Owned by Individual Users Only: Only the rep who made the call can view their own recordings. This tier is best suited for organizations in regulated industries (such as financial services, healthcare, or legal) that need to limit recording access strictly to the call owner.
- Owned by Users in Their Group/Child Groups Only: The recording owner and members of the owner's assigned group, including any child groups beneath it, can view the recording. This tier allows managers to coach within their pod and reps to review teammates' calls without exposing recordings outside the relevant team. This tier requires that users be assigned to Groups; if your team has not yet configured Groups, do so under Settings > Groups before selecting this tier.
- Owned by Anyone: Any authenticated user on the team can view any recording. This is the default setting and preserves open peer learning across the full team.
To set your call recording visibility, follow these steps:
- Go to your Salesloft team Dialer Settings: Click your initials in the upper right corner of the page and click Settings. From the Settings, find and select Dialer under the Communication category. In the Dialer settings, click the Call Recordings tab.
- Enable "Require authentication when sharing": Turn on Requires Authentication, if it isn't already enabled. This setting must be on for call recording visibility to be enforced.
- Open the Call Recordings Editor: Scroll to the Call recordings visibility section and click Edit.
- Select your team's visibility tier: Select the visibility tier that matches your organization's policy.
- Complete: Click Save.
The setting applies immediately to all recordings, including historical ones, so let your team know before switching to a more restrictive tier. Users who try to access a recording outside their permitted visibility will see a clear permissions error rather than a generic failure. This control also extends to recordings shared via link: anyone outside the permitted visibility tier who follows a direct recording URL will be blocked in the same way.
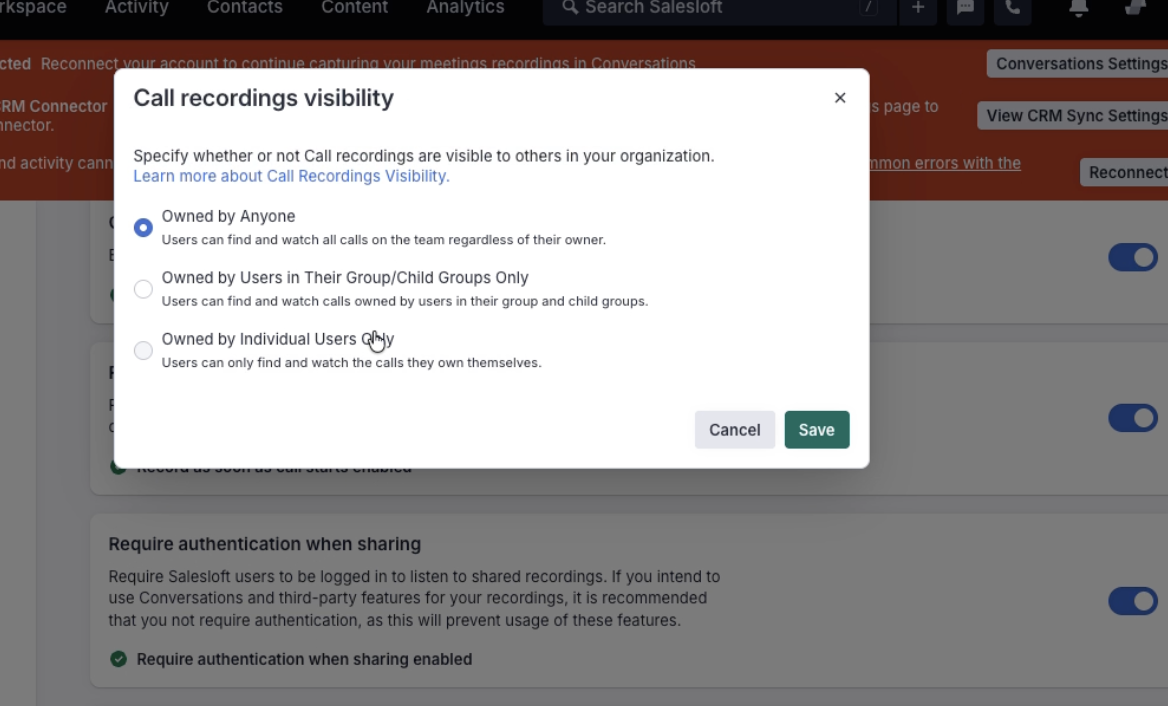
Figure 8: Call Recording Visibility Settings