Cadences come in all shapes and sizes, but your most common question is likely going to be "what works best in a Cadence?" One common methodology that's proven successful is executing different channel steps back-to-back, like calling a prospect and immediately following with an email or sending an email in conjunction with connecting on LinkedIn.
Salesloft's Multi-Touch Cadence workflows allow you to put this method into action.
In this article, we will walk through Multi-Touch Cadence workflows setup and execution. This article includes:
- You must have a Salesloft account with permission to edit Cadences. Admins have these permissions by default.
- Multi-touch refers to multiple touchpoints that occur in the same day of a cadence. An example is a call and an email being sent the same day. This requires special configuration by clicking the three dots in a cadence step and enabling multi-touch.
- You cannot use Multi-Touch with automated email steps.
- Very important note – If/When you edit a Cadence to include Multi-Touch steps: If there are People currently running in a Cadence, and you edit the Cadence to include Multi-Touch steps, the steps will not apply to People already in the Cadence. For this change to occur, you will need to re-add them to that Cadence step.
Multi-Touch Cadences are set up from the Cadence Overview page. You can set Multi-Touch for Phone, Email, Other, or Integration steps.
When you have steps that need to be executed back to back on the same day, they must be marked as Multi-touch. When it is marked as Multi-touch, the step will be due immediately after the previous step.
To set up Multi-Touch Cadences, follow these steps:
- Access the Cadence Overview Page: Go to the Cadences page and select an existing Cadence or create a new one. You will land on the Cadence Overview page.
- Identify the Multi-Touch Steps: Locate the steps you want to include in the Multi-Touch group. These steps should be scheduled for the same day in the Cadence.
- Things to Note: The first step in a multi-touch grouping should not have the ‘Multi-touch checkbox checked.
- Edit the Steps: Click Edit Step above each step you want to include in the Multi-Touch group (starting with the second step of the day). In the Edit Step module, check the Multi-touch checkbox.
- Click Save: When the Multi-touch checkbox is selected, a Multi-touch flag will also appear on the Cadence Overview Page. This way you can quickly see Multi-Touch groupings that have been set up.
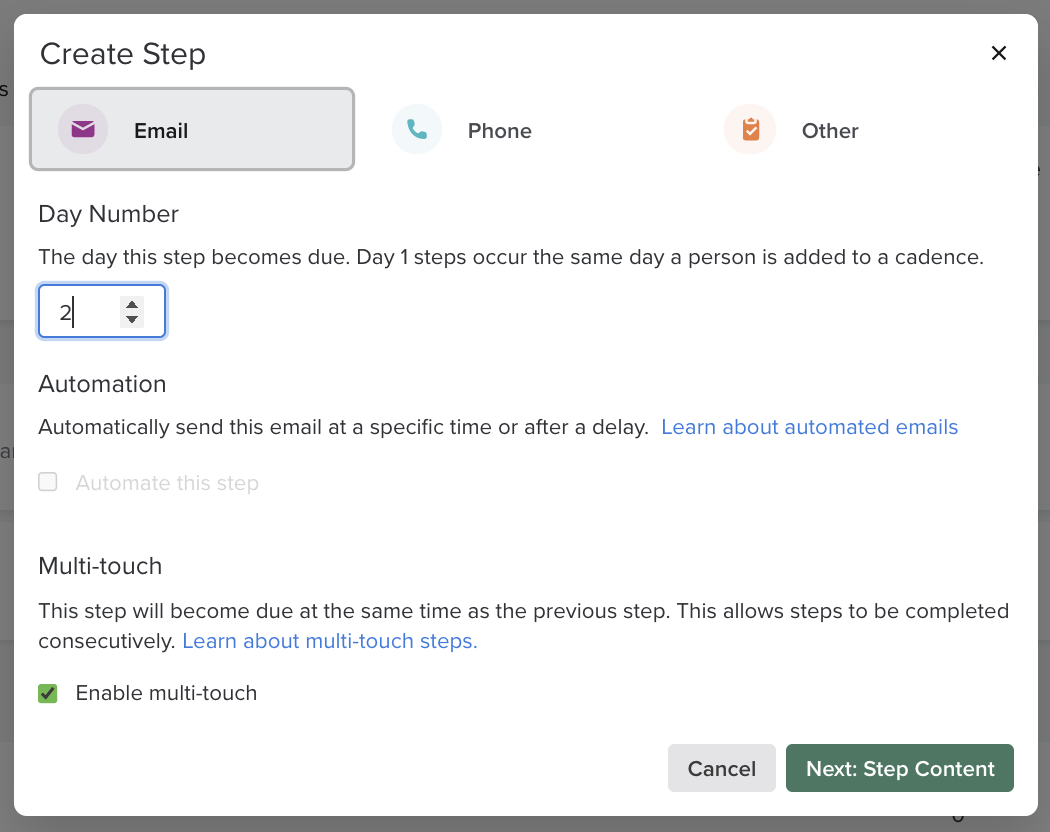
Figure 1: Create Step and Enable Multi-touch
Enable Multi-Touch Instructions
Multi-Touch Cadence Workflows create back-to-back steps in your cadence process. These steps are usually added during the initial Cadence creation process.
If you would like to add Multi-Touch steps to an existing Cadence, you can edit the Cadence to add the Multi-touch tags and perform back-to-back actions.
To edit the step, go to the Cadence Overview page, select Edit Step, and check the Multi-touch box in the edit step module.
Alternatively, you can remove multi-touch from a step so that the actions are not suggested right after the other. This action is useful if you would like to move a step to a different day. To remove multi-touch, go to Edit Step. This time, you will uncheck the Mutli-touch option.
Follow these instructions to run Multi-touch steps for People currently on a Cadence:
- From the Cadence Overview, go to the Cadence People Page.
- Select all of the People in the Cadence.
- On the top row, select Cadence Actions (rocket ship) and choose Move to Step.
- Re-add to the Cadence and Cadence step they are currently on, or the step that starts the Multi-Touch steps. This selection will trigger the Cadence action to read the multi-touch behavior.
When the Multi-touch checkbox is selected, a Multi-touch flag will also appear on the Cadence Overview Page. This way you can quickly see Multi-Touch groupings that have been setup.
Figure 2: Multi-touch as seen on Cadence Overview Page
The Person Activities Panel on the Person Profile page (and the Account Profile Page Activities Panel) will show all multi-touch steps in the Upcoming Actions.
Whenever a Multi-Touch step’s date is updated, all Multi-Touch step action’s dates are updated as well.
If Multi-Touch steps are removed from Cadence, all Multi-Touch steps are removed from the upcoming view.
Figure 3: Multi-touch as seen on the Person Activities Panel
The Cadence People Tab will have labels to show when a Person is running Multi-Touch steps.
Figure 4: Multi-touch as seen on Cadence People Tab
Example of Multi-Touch Cadences
Now that we've walked through how to set up and run Multi-Touch Cadences, you may be bursting at the seams to put them into action, but slightly overwhelmed at the possibilities.
Here are some example Multi-Touch Cadences to help get you started:
- New Rep Introduction: This Cadence depends on sending emails paired with LinkedIn steps to help introduce a new rep to the Account.
Figure 5: New Rep Introduction Cadence Example
- Pilot Engagement: This Cadence depends on sending emails paired with Other steps, like research or admin work.
Figure 6: Pilot Engagement Cadence Example
- Run Multi-Touch steps.
- Experiment with different combinations of steps to find what works best for your sales process.
- Utilize the Cadence Focus Zone or Rhythm Sidebar to efficiently manage and run your Multi-Touch Cadences.
- Check out more Cadence Best Practices.