We understand that poor call quality or audio issues can have a negative effect on your sales. To ensure that our Dialer is delivering top of line call quality and helping you reach your sales goals, we’ve provided alerts, notifications, and feedback within the Salesloft Dialer.
Below, we’ve listed some common issues and alerts that you may encounter with the Dialer, along with some tips and resources to help you troubleshoot, including:
The Salesloft Dialer operates via Voice over IP (aka VOIP). Due to VOIP's technology, there are specific network requirements that you or your IT team can set up to make sure that the Dialer maintains a strong connection while your sales team makes their calls.
We highly recommend following the QoS Setup and Dialer Network Requirements guide prior to your team's initial use of the Dialer. This guide will start you off with the most solid network possible.
If Pass Through Calls are not working, the call audio will come through your computer rather than redirecting to your alternative phone line.
This issue is likely due to a Salesloft Dialer reset that has disabled Pass Through. To correct this, you will need to toggle ON the pass through option again in the Dialer. The instructions below will walk you through enabling Pass Through:
2. Click the Dial Pad button in the upper right corner:
3. Click the Pass Through button to toggle ON. If Pass Through is turned on, the button will turn green and will show Call Pass Through Enabled when you hover over it.
Once you’ve done that, call pass through will be enabled again.
The checklist below will walk you through the steps to manage call interference.
- Close all unnecessary applications: Unused or unnecessary applications can slow down your device and take up the CPU you need in order to make your call.
- Turn off as many connected devices to the Wi-Fi as possible: Cell phones or other devices may suck up bandwidth.
- Close unused tabs or use a tab’s suspension extension.
- Set system updates or OS upgrades to process in the night: Look at the frequency of virus updates and scans. Middle of the day scans eat up CPU and bandwidth, interfering with call quality. Do not make calls during any kind of upgrade process.
Inbound calls require a Chrome notification to function properly. If you are hearing the phone ring via your desktop but do not see the inbound notification, we recommend checking that notifications are enabled for your Chrome Settings.
Once you have ensured that notifications are enabled for your Chrome Settings, the checklist below will walk you through some troubleshooting steps that we recommend to enable inbound call notifications.
1. Confirm your Chrome Notification settings
Things to Note: These steps work for all operating systems:
- Open a Chrome web browser.
- From the top right of the screen, click the three vertical dots. Go to Settings.
- On the left-side navigation, select Security and Privacy. Then, under the Security and Privacy section, click Site Settings.
- Click Notifications.
- Here you can choose to block or allow notifications. Turn on the toggle to Allow: Turn on sites can ask to send notifications.
2. Accept Inbound Calls
- Navigate to your Personal Settings and select Calls from the menu options.
- Verify that Accept Inbound Calling is turned ON.
3. Check that your passthrough number is set up
Things to Note: Your passthrough number cannot be your Salesloft number. If your passthrough number is your Salesloft number, you may hear the call ringing with no notification or you may see multiple windows pop up when trying to answer a call.
4. Check whether you are using the most recent version of Chrome
- Click the three vertical dots in the upper right corner of your web browser to open your Chrome settings.
- Use your mouse to hover over Help, then select About Google Chrome from the menu options.
- The About Chrome section will show you the version of Chrome that you are using.
5. Turn off Do Not Disturb & Enable Notifications for your Operating System (OS)
Your operating system may require additional steps to allow Chrome notifications to appear from your browser. Once you have followed the previous steps, we recommend checking that Do Not Disturb is turned off and that you have notifications enabled.
The instructions below will walk you through the steps to turn off Do Not Disturb and enable notifications based on your operating system.
Mac
Mac users can turn off Do Not Disturb and enable both Google Chrome apps to allow notifications by following the steps below:
- Click on the Apple icon in the upper right corner of your computer screen, then select System Preferences.
- Select Notifications & Focus.
- From the menu options on the left, select Google Chrome.
- Use the toggle to Allow Notifications. When the toggle area is blue, notifications have been turned on.
- Choose Banners as the Google Chrome alert style.
- Go back to the menu options and select Google Chrome 2.
- Use the toggle to Allow Notifications and choose Alerts as the Google Chrome 2 alert style.
- Select Focus from the top of the screen and be sure that the Do Not Disturb toggle is not highlighted.
For a visual guide to checking your Mac settings, check out this
Mac Notifications video.
Windows
You can use the checklist below as a guide to make sure that Do Not Disturb/focus assist is turned off, and that notifications are enabled.
- From your Windows Desktop, click on the Windows button in the bottom left corner.
- Click the gear shift icon to open your settings.
- Select the System icon on the Settings screen.
- Choose Notifications & Actions from the left side menu.
- Scroll down to Get notifications from these senders and find the Google Chrome icon.
- Toggle the Google Chrome button on to enable notifications.
- Open system notifications and check that Do Not Disturb is turned off.
- Make sure that focus assist is turned off.
6. Turn off camera when testing inbound notifications over Zoom
Now that you've checked your notification settings, it's time to test your inbound notifications.
Things to Note: When testing your inbound notifications, we recommend that you do not test over a video conferencing app, like Zoom, as the screen sharing feature may block notifications.
If the call pop-up is not appearing, your computer’s Do Not Disturb settings may be enabled. If Do Not Disturb is enabled, most computers will block notifications like inbound call notifications from Salesloft.
The settings will differ based on the operating systems of your Mac or PC. The instructions below will walk you through the steps to enable notifications:
Enable Notifications in Google Chrome for Windows 10
Windows 10 may require additional steps to enable Chrome notifications. If you have downloaded the Chrome extension and set your notifications, but still aren't receiving notifications, follow these steps:
- From your Windows Desktop, click on the Windows button in the bottom left corner.
- Type the word “Notifications”.
- Choose Notifications & Actions from the left side menu.
- Under Notification & Actions, toggle the button on to enable notifications.
- Scroll down to Get notifications from these senders and find the Google Chrome icon.
- Toggle the Google Chrome button on to enable notifications.
- Select Focus assist and be sure it is set to off.
Enable Notifications in Google Chrome for Mac
Mac users may need to enable Chrome notifications in your System Preferences. If you have downloaded the Chrome extension and set your notifications in Salesloft, but still aren't receiving notifications, follow these steps:
- Click on the Apple icon in the upper left corner of your computer screen, then select System Preferences.
- Select Notifications.
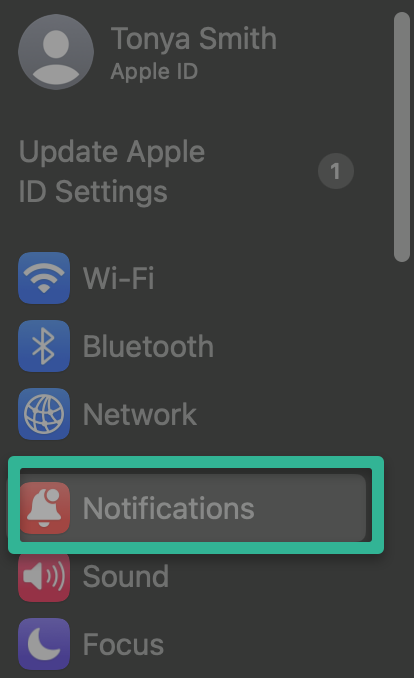
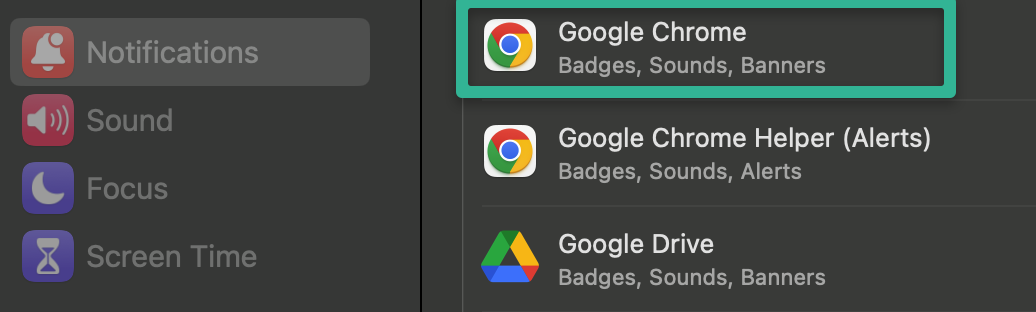
- From the menu options on the right, select Google Chrome.
- Flip the toggle to the right to enable notifications.
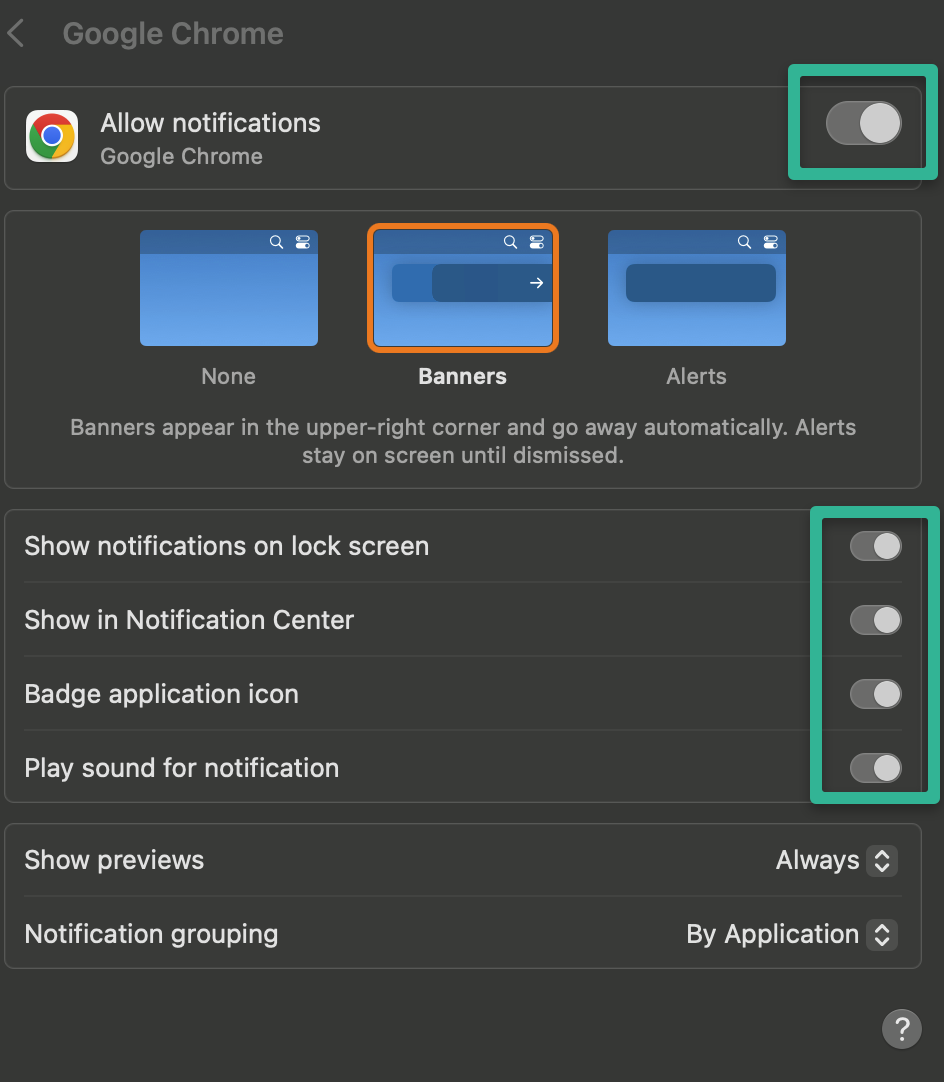
- Choose Banners as the Google Chrome alert style.
- From the menu options on the right, select Google Chrome Helper (Alerts).
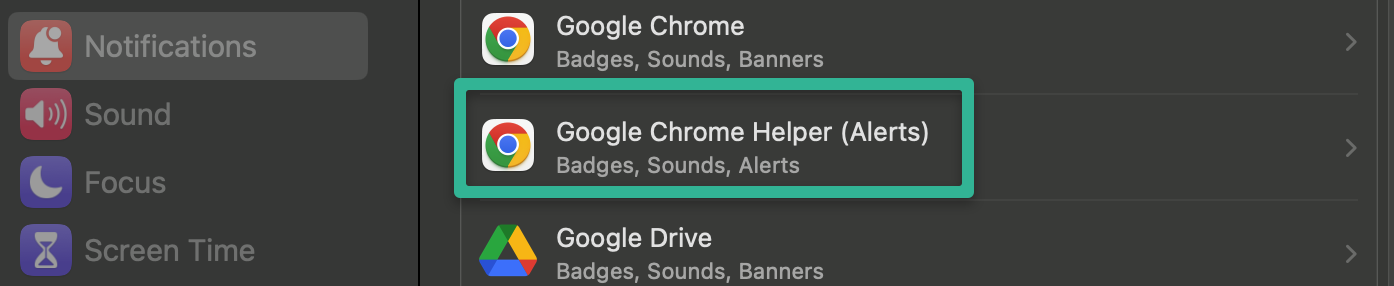
- Flip the toggle to the right to enable notifications.
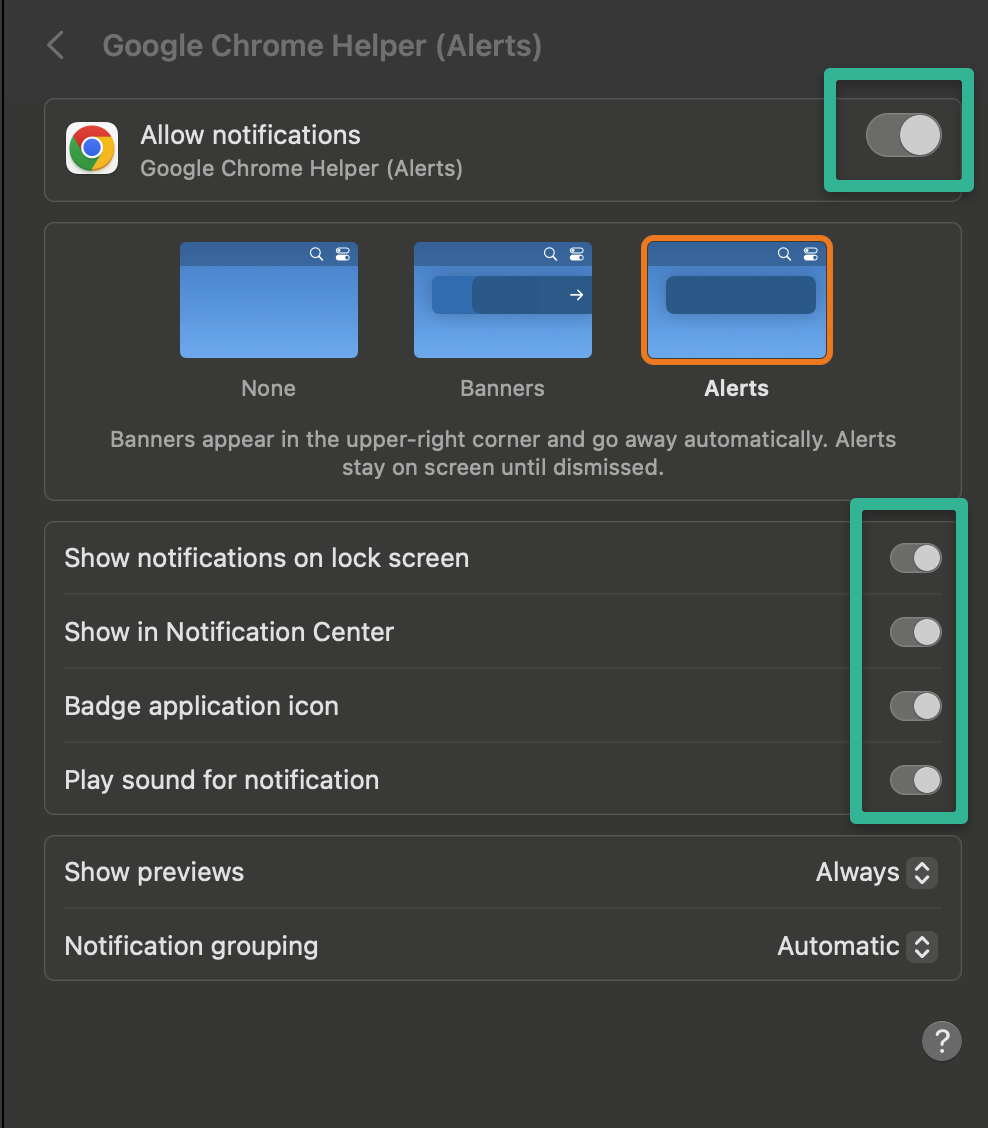
- Select Focus and be sure the Focus Status is set to off.
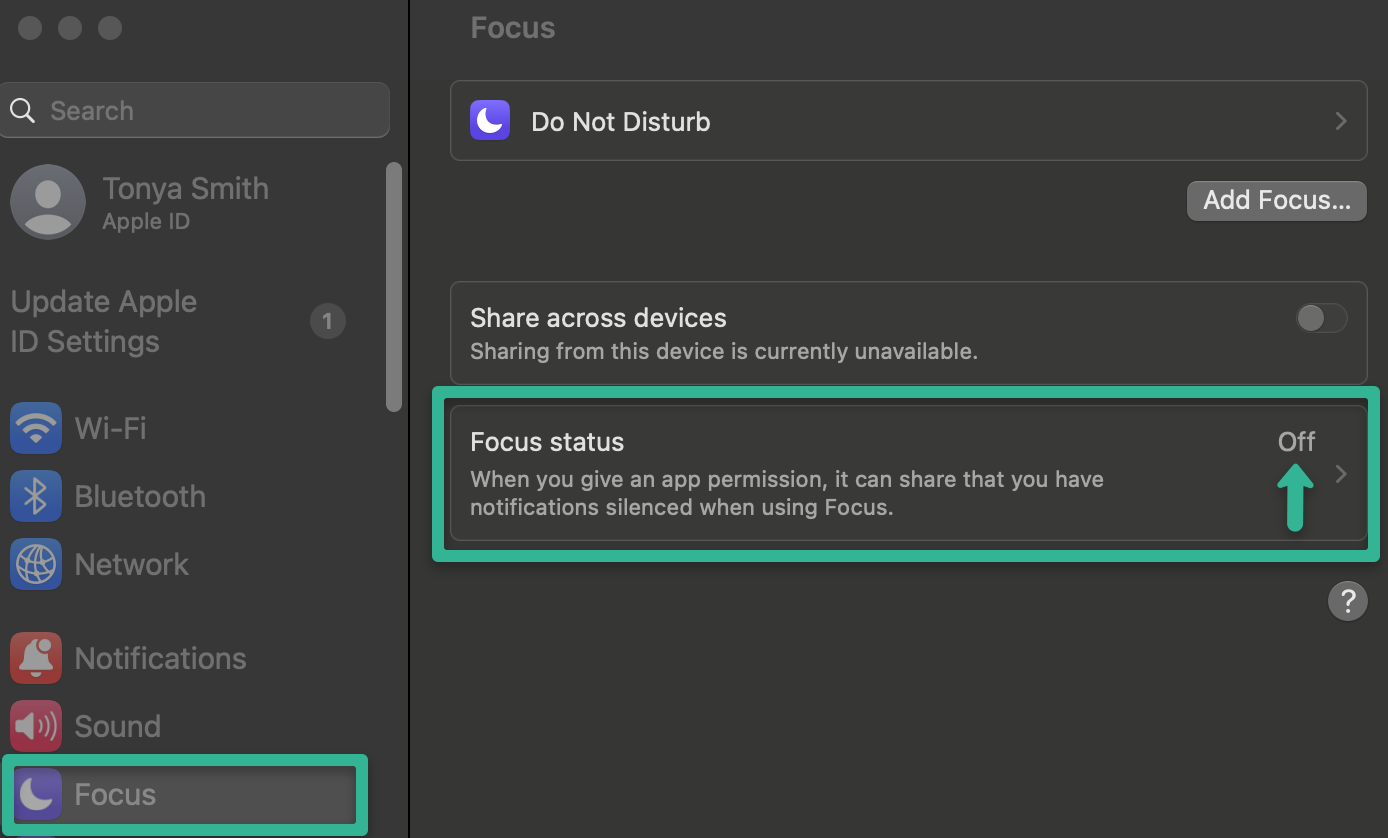
For more information, check out this Do Not Disturb article, as well as this support article on Focus assist.
A noisy environment can negatively impact your team's calls. Teams may suggest more closed office spaces or noise cancelling headsets, but those options can be pricey and difficult to come by.
If there is background noise during calls, you can adjust your computer settings to reduce the noise that is picked up by your microphone and headset. The instructions below will walk you through how to configure noise reduction:
Things to Note: MacOS has a known issue where users experience crackling audio as a result of having multiple applications/browsers using audio.
For a Mac OSX
- Open System Preferences.
- Click the Sound Icon.
- Select the Input tab.
- Check the box for Ambient Noise Reduction.
- Move the Input Volume dial up and down, until you find the right balance of sound volume that minimizes background noise.
For Windows 10, 8, and 7
- Click Start to open your computer settings.
- Select Control Panel from the menu options.
- Click Hardware & Sound.
- Click Sound, then click Recording.
- Right-click on the microphone bar and select Properties.
- Click the Levels tab, and navigate to the Microphone Boost tool.
- Move the microphone tool all the way down, then move the microphone dial all the way up.
- Click the Enhancements tab.
- Check the following boxes: Noise Suppression and Acoustic Echo Cancellation.
- Press OK.
- Test the noise, then go back to the Recording menu and listen to the device. Once you’re done, click OK.
If you find you are missing calls due to your phone not ringing, there's a few different settings you can check. The instructions below will walk you through what to check to make sure your phone is ringing:
Mute
Check if your cell phone is set to mute. If so, take it off of mute to make sure you hear it ring. This is a setting on your personal phone, not within Salesloft.
Inbound Call Options
It is possible your Inbound Call Options settings are making it so your phone does not ring when a call comes through the Salesloft Mobile App. Follow these steps to check:
- Click your profile icon in the upper right corner to access Settings.
- Navigate to Calls.
- Locate Inbound Call Settings.
- Underneath Inbound Call Options check if you have it set to Send to Voicemail. If your Inbound Call Options are set to Send to Voicemail, it is expected that your phone will not ring if a call comes through the Salesloft Mobile App. Adjust this setting to the Send to Forwarding Number option and enter your phone number if you would like your phone to ring when a call comes through.