Stages are the Salesloft equivalent to Salesforce's status fields on the Lead, Contact, Account, or Opportunity level.
If stages are kept up-to-date, users can accurately filter people and accounts in Salesloft based off of their stage. From there, the rep can take the stage-appropriate action to engage that prospect.
You can edit and manage your team's stages to best fit your needs and make them your own. Most teams set their stages to mimic their sales process, using stages like "Prospect," "Open," "Closed," etc. to show where a Person is in your sales cycle.
Things to Note: Stage Settings were previously managed in the Stages Settings tab. The functionality has been transferred to the Field Configuration settings. Stages are set up and managed from the Field Configuration. While going through the initial Field Configuration, you can set up and manage your team’s Stage values when you map the field to CRM. The various stages can be added or removed by managing the picklist associated with the Stage field.
You can set Stages for the following objects:
- People: Define the stage settings for an individual person in Salesloft. Similar to your CRM Lead or Contact status, the People Stages are meant to help you determine where a Person is within your sales cycle.
- Accounts: Define the Stage settings for Accounts as a whole (versus just the individual person). By keeping the Account Stages up to date, you can easily filter and sort by a Stage and find out where an Account is within the sales cycle, giving you further visibility into where to focus your efforts.
- Opportunities: Define the stage settings at the Opportunity level. By keeping the Opportunity Stages up to date, you can easily track the progress of an Opportunity through the sales cycle.
In this article, you will learn how to view and manage your team's Stages, including:
Stages act as the status options for your Salesloft record. When you map the Salesloft stage, you can create a picklist of stage options. Picklists allow your users to select stages from a predetermined list.
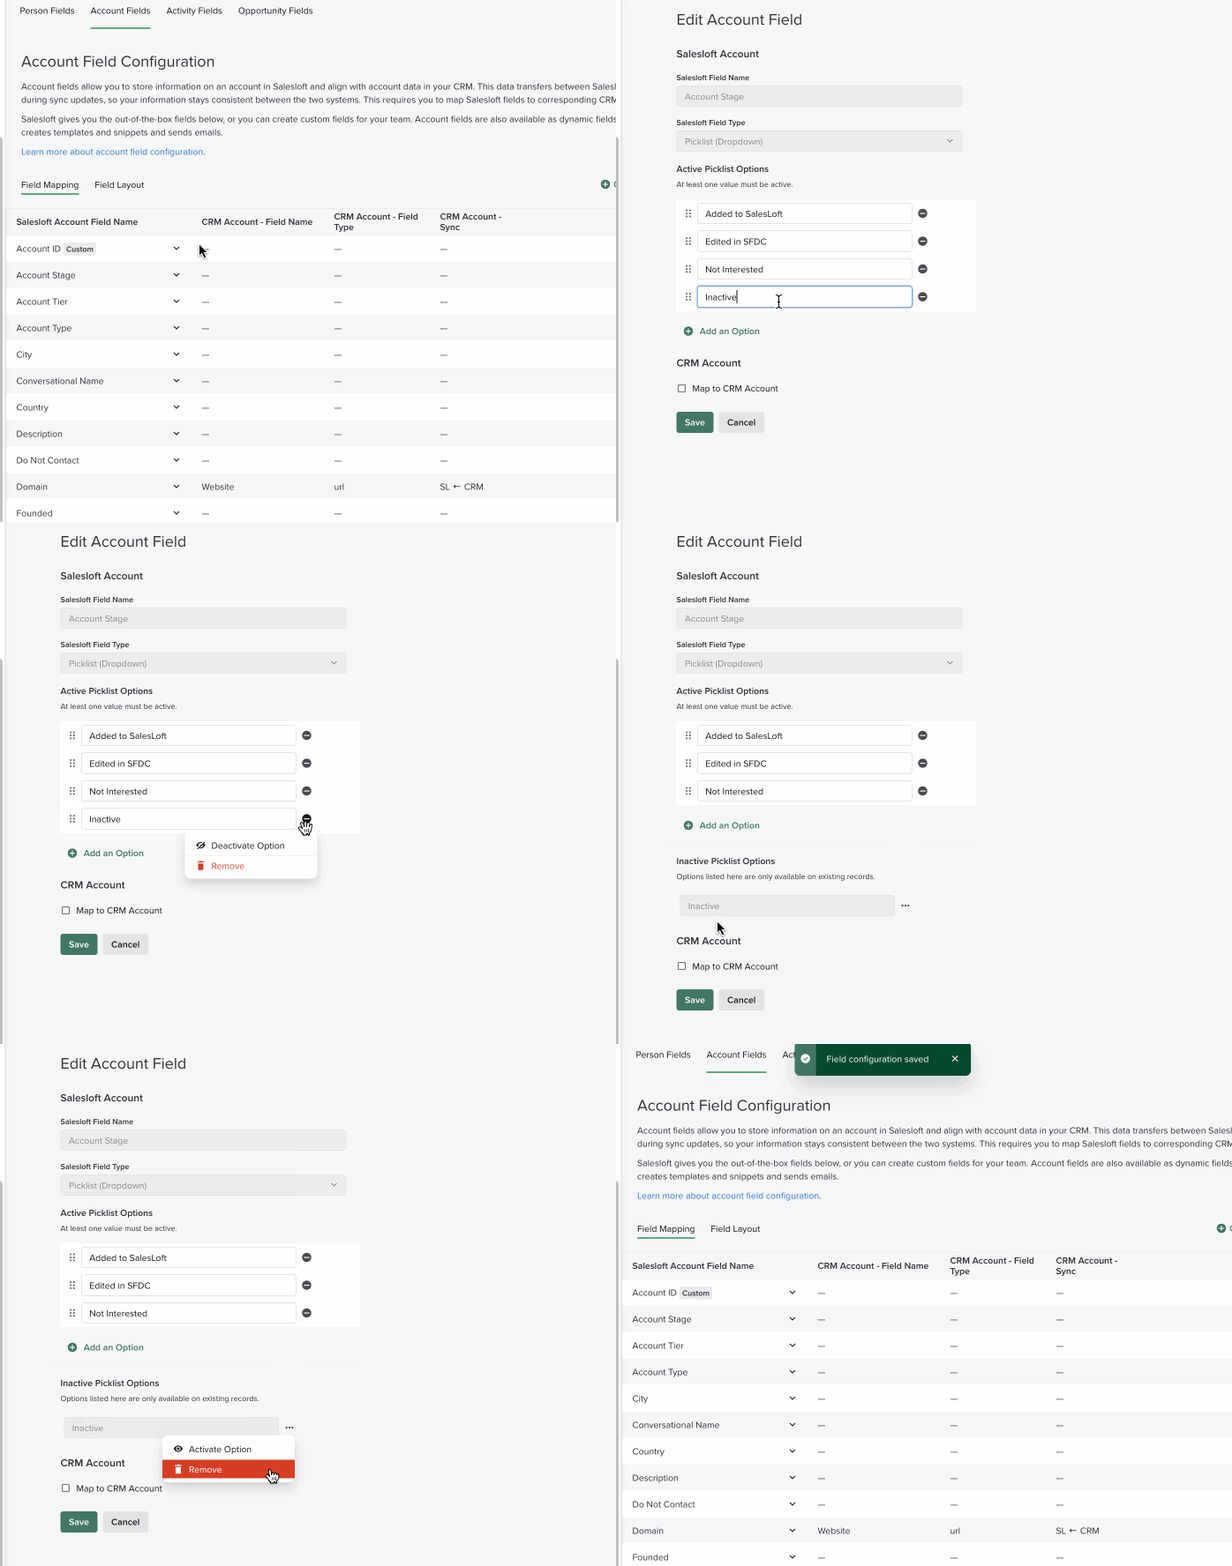
Follow these steps to add a picklist option. For our example, we will add a picklist to an Opportunity Stage:
- Go to Settings and then the Field Configuration Settings.
- Navigate to your preferred object, for example the Account Stages tab.
- In the table, beside Stage, click the dropdown arrow.
- Click Edit Field. You will be directed to the Edit Field page. The Salesloft Field Name will be set to Stage name and the Salesloft Field Type will be Picklist.
- Find the Active Picklist Options. Click + Add an Option. An additional text box for a picklist option will appear.
- Enter the picklist option name you want in the Name field.
- Scroll down and click Save.
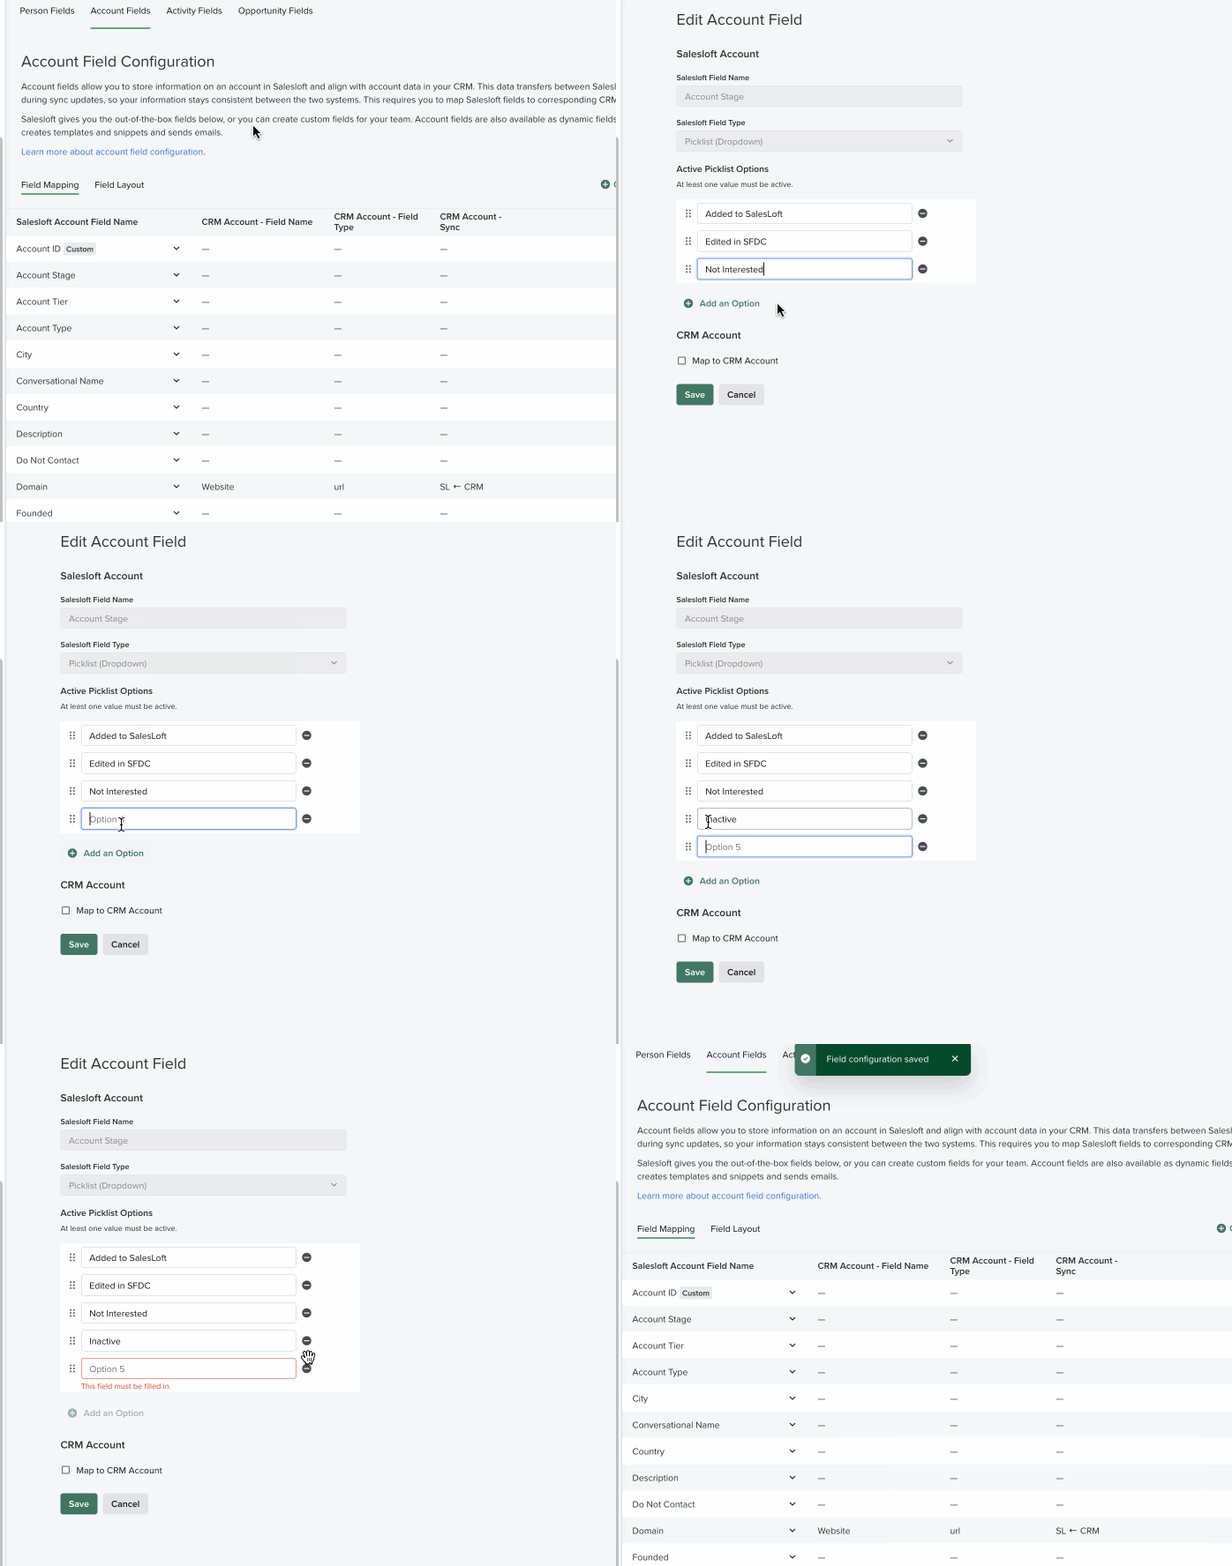
If Salesloft receives an Opportunity Stage from the CRM that has not already been created, the system will create that Stage automatically and set it as inactive.
Things to Note: Inactive picklist options for Stages will behave the same as inactive picklist options on custom fields: inactive values can be accepted via CRM Sync but cannot be selected when manually editing a record in Salesloft.
These additional stages may be an oversight or a recent update. Since they are added to the “inactive” list, you can quickly “activate” them so they are valid picklist Stage options.
To move a Stage from inactive to active in your picklist, follow these steps.
- In your Field Configuration Settings, go to the Stage field of your preferred object. For this example, we will show an Opportunity Field.
- Scroll on the Edit Opportunity Field page to find the Inactive Picklist Options. All of the options will be grayed out, meaning you cannot edit the text when they are in the inactive state. Scroll through the list to find the option you would like to activate.
- Select the … to the right side of the inactive option.
- Click Activate Option. The name will move to the bottom of the Active Picklist options. You can edit the name (not recommended) and move the option within the picklist order.
Whether your sales process changes or you realized there was a typo in your reporting (it happens), there may come a time when you need to remove a stage option.
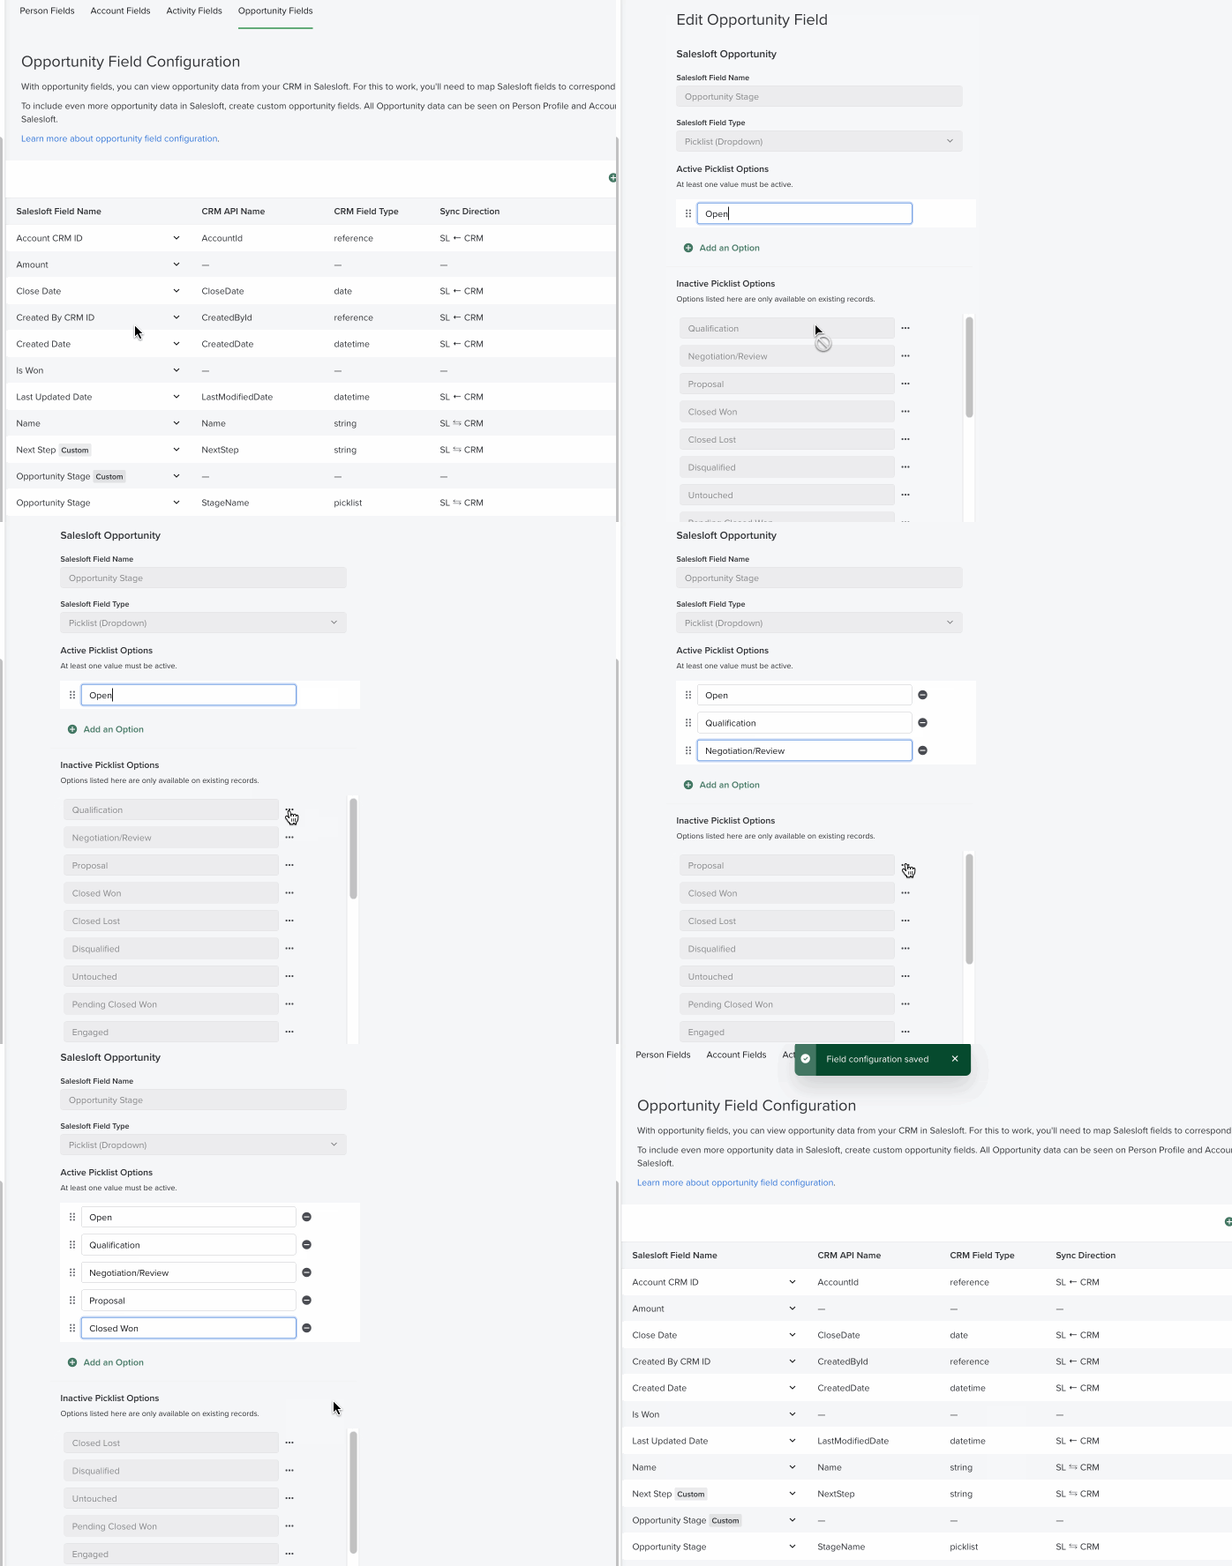
There are two ways to remove picklist stage options:
- Deactivate: (Recommended) The stage will no longer appear in the active picklist options, but is still visible in the Inactive picklist options list and visible in reporting.
- Remove: Deletes the option entirely.
Things to Note: Picklist items must be saved to be deactivated or removed.
Follow these steps to deactivate or remove a picklist option. For our example, we will use an Opportunity Stage:
- Go to your Field Configuration and select the object type.
- In the table, beside Stage, click the dropdown arrow.
- Click Edit Field.
- Find the Active picklist option and click the minus icon on the right side of the option. A dropdown will appear.
- Select one of the following options:
- Deactivate Option: The option will instantly move to the Inactive Picklist options list.
- Remove: Deletes the option. You also have the option to Remove picklist options from the Inactive Picklist.
- Click Save.