Salesloft offers flexible record creation methods and settings to fit your unique workflow and data management needs, supporting strategies ranging from CRM as the source of truth to allowing record creation from any user workspace.People creation enables direct communication and activity tracking, while Accounts provide essential organizational context for a complete view of all company engagement and deals.
This article details all available options for creating Person and Account records in Salesloft. The article includes:
Before you create records in Salesloft, there are certain fields are absolutely necessary to ensure successful Person and Account creation.
Salesloft Default Required Fields:
- A Person record requires either a valid Email Address OR a partial Name and a Phone Number.
- An Account record requires a Name and a Domain (Website). For CRM-connected Accounts missing a website, the domain will be automatically populated using the CRM Account ID + .com to ensure no accounts fail to be created when Contacts are created.
Salesloft Admins (or Roles with Manage Field Configuration permission) can designate additional fields as required for manual record creation (both in-app and via the Chrome Extension). To ensure data integrity, configure fallback values for required information. These values are automatically applied when records are created from external sources like third-party integrations or CSV imports, preventing missing data.
Salesloft offers several flexible ways to create Person records, accommodating various workflows and integration needs.
CRM Integration (Manual Imports)
After users connect to their CRM in their personal settings, they can manually import records from the CRM (Salesforce, Dynamics, or HubSpot) directly using the Salesloft Connect Chrome Extension.
To leverage the CRM integration for manual imports, Admins will configure the following Settings:
- Allow Importing from CRM (On by default): If disabled at the organization-wide level, the individual role setting below will be ignored. To import from CRM, access General Settings, then select Import from CRM.
- Enable CRM Import by Role (On by default): From Settings, select Roles, then [Role Name], and finally CRM Import.
Once the admin setup is complete, end user must complete the following:
- Connect Salesloft to your CRM
- Download the Google Chrome Extension
CRM Integration (Automated Imports)
Admins (or Roles with Manage Automation Rules and Manage Scheduled Imports permissions) have flexible automated options for record creation. They can create records in bulk or, for a more controlled approach, gradually create records over time using specific criteria.
Scheduled Imports
Admins can create Scheduled Imports (2,000 records max and Salesforce only) to automate the recurring import of People (Leads/Contacts) from Salesforce reports into Salesloft, enabling them to be added directly to Cadences without requiring a record update. To set schedule imports, go to the Settings menu, navigate to Scheduled Import, then select New Schedule. The report must already exist in Salesforce
Automation Rules
Admins can create Lead and/or Contact rules to automate the creation of records that meet specific criteria. For instance, you could create all CRM records where the Contact Owner (Owner CRM ID) is a Salesloft User.
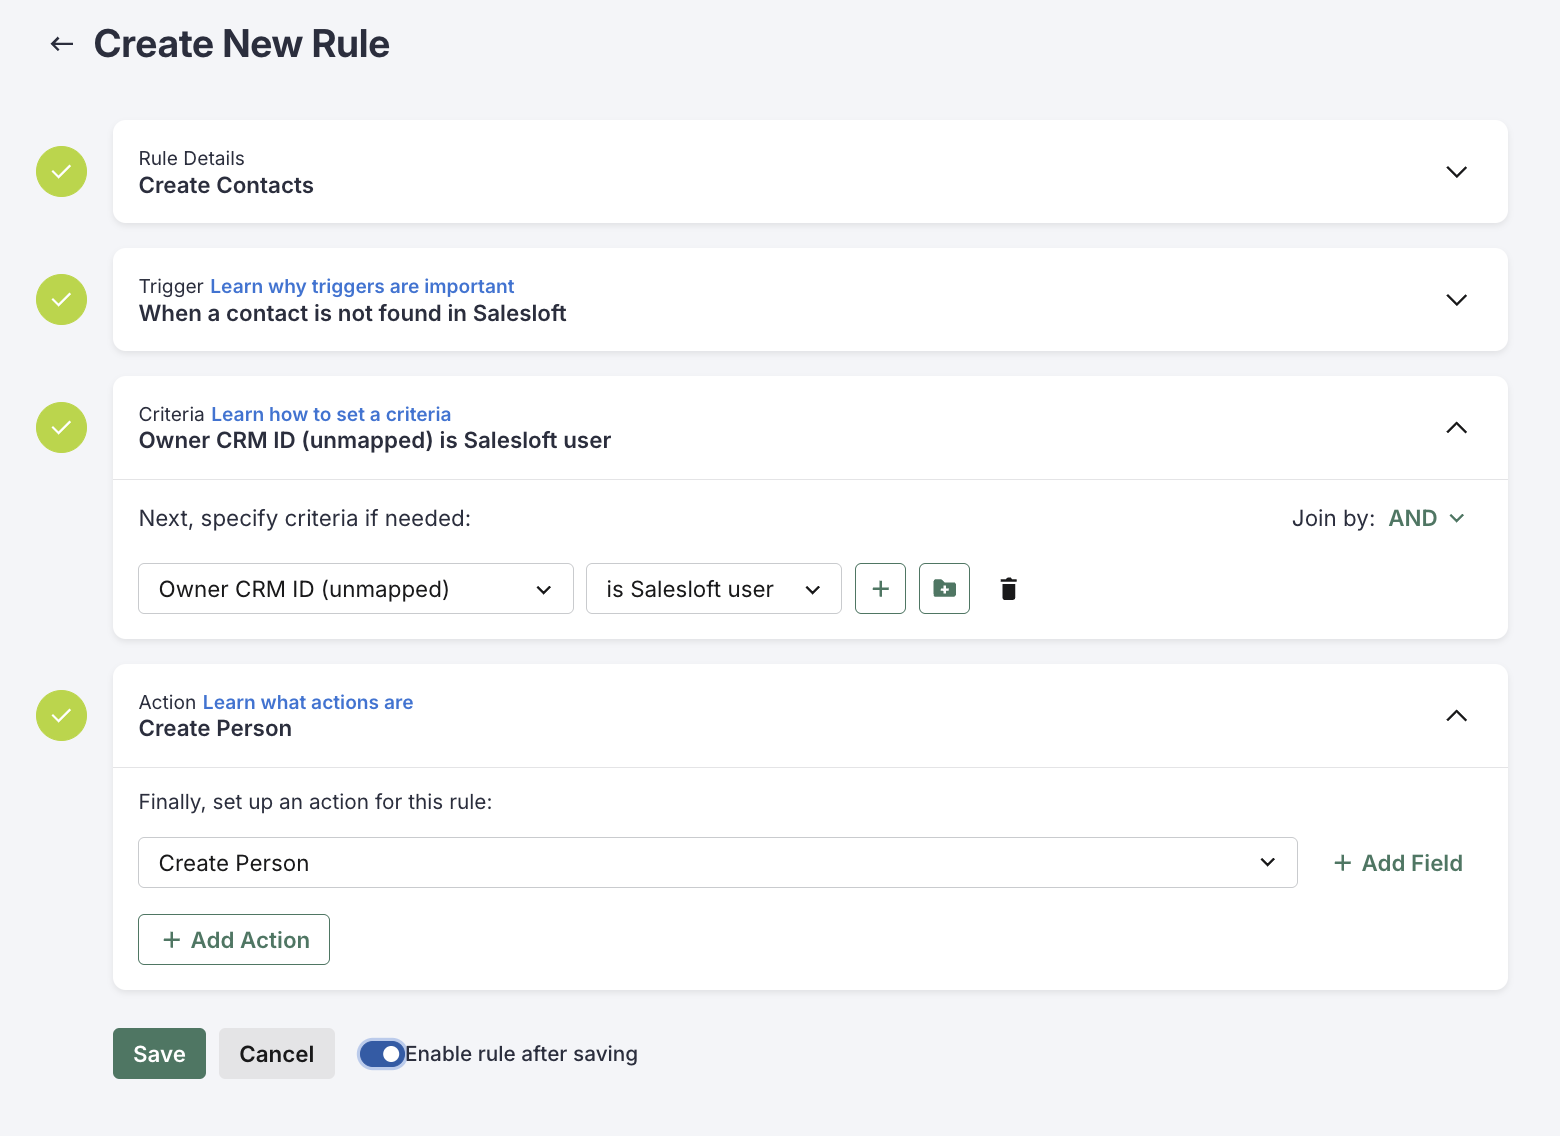
Figure 1: Automation Rule Example - Contact Owner (Owner CRM ID) is a Salesloft User
Access Automation Rules under Settings, then select Create New Rule, and set the Trigger to CRM Data Sync.
Automation Rules will automatically trigger when the Lead or Contact is updated and the criteria of the rule are met. To trigger bulk record creation without the record being updated in the CRM, you can manually initiate bulk record creation via Manually Sync from CRM to create all matching CRM records.
Before initiating bulk record creation via Automation Rules or Scheduled Imports, we strongly recommend:
- Add users to Salesloft so records can be correctly assigned upon creation. Without this step, all new records will default to the CRM integration user as the owner.
- Create ownership alignment rules for accurate Person and Account assignment, which will mirror your CRM Lead, Contact, and Account owner fields. To set ownership alignment rules, navigate to Settings, then CRM Sync, and finally Sync Management. From there, select "Manually sync from CRM" and choose either Contact or Lead data.
- Things to Note: This process will consume CRM API calls (1 call when creating a new Lead or Contact record, plus an additional call if the linked CRM Account doesn't already exist).
Email and Meeting Activity
When a user Lofts an email or calendar invitation via Outlook or Gmail to recipients not yet present in Salesloft, new Person records can be automatically created using the recipient or invitee’s email address.
The following settings must be enabled for this to occur:
- Create When Lofting (On by default): This setting enables the automatic creation of the first person on an email or calendar invite when “Lofted” from Outlook or Gmail. To enable this setting, navigate to Roles in your Settings, select the specific role name, and then choose "Create When Lofting."
- Enable Auto Person Capture (On by default): This is separate from ‘Create When Lofting’ and it controls the automatic creation of additional people on emails or invites. For users to leverage Auto Person Capture, the 'Create When Lofting' permission must be enabled at the role level. To manage Auto Person Capture, go to your Settings, select General Settings, then Auto Person Capture.
Manual Creation (In-App or via Chrome Extension)
Users can directly create new Person records in-app or through the Chrome Extension by selecting the "Create People" option and entering the required field data.
The following settings must be enabled for this to occur:
- Allow Manual Imports (On by default): To set up manual imports, go to Settings, General Settings, and make sure the Import Manually option is selected.
- Enable Create People by Role (On by default): To confirm this permission is enabled, go to Roles Settings find the Role Name and search for the Create People permission.
CSV Import
Person records can be created through the import of CSV files.
The following settings must be enabled for this to occur:
- Allow CSC Imports (On by default): If disabled at the organization-wide level, the individual role setting below will be ignored. To set up CSV imports, go to Settings, General Settings, and make sure the Import from CSV option is selected.
- Enable CSV Imports by Role: (On by default) To confirm this permission is enabled, Go to Roles Settings find the Role Name and search for the CSV Imports permission.
Third-Party Integrations & API
Person records can also be created seamlessly through integrations with external platforms like Salesloft Connect Chrome Extension Playbook (IntKB), Lusha, Cognism, etc. or via the Salesloft public API. Configuration varies by provider, so reference the integration partner documentation for record creation details.
The following settings must be enabled for this to occur:
- Enable Create People by Role: (On by default) To confirm this permission is enabled, Go to Roles Settings find the Role Name and search for the Create People permission.
Salesloft provides several ways to create Account records, often tying into how Person records are generated or allowing for direct creation.
Creation from Person
[Most Common] Depending on your Account Management Settings, Account records can be automatically created when a Person is created via CRM (Imports, Automation Rules, or Scheduled Imports), Manual Creation, CSV, Third-Party Integrations (API) or, directly from Outlook/Gmail.
The following settings must be enabled for this to occur:
- Check Account Management Settings (By default, Accounts are only created when Contacts are imported from the CRM): Account Management Settings can be accessed under Settings.
- Enable Create Accounts by Role (On by default): To confirm this permission is enabled, go to Roles Settings find the Role Name and search for the Create Accounts permission.
- Enable Import Accounts from CRM by Role: (On by default) To confirm this permission is enabled, go to Roles Settings find the Role Name and search for the Import Accounts from CRM permission.
Manual Creation (In-App)
Users can directly create new Account records in-app by selecting the "Create Account" option and entering the necessary data.
Things to Note: Accounts created via this method will not be linked to the CRM.
The following settings must be enabled for this to occur:
- Enable Create Accounts by Role (On by default): To confirm this permission is enabled, go to Roles Settings find the Role Name and search for the Create Accounts permission.
CRM Integration
Once users connect to their CRM in personal settings, they can manually import account records directly via the Salesloft Connect Chrome Extension.
Things to Note: Importing Contacts from the CRM automatically creates the linked Account, removing the need for separate account imports.
The following settings must be enabled for this to occur:
- Enable Create Accounts by Role (On by default): To confirm this permission is enabled, go to Roles Settings find the Role Name and search for the Create Accounts permission.
- Admin Settings:
- Allow CRM Imports (On by default): To set up CRM imports, go to Settings, General Settings, and make sure the Import from CRM option is selected.
- Enable Import Accounts from CRM by Role (On by default): To confirm this permission is enabled, go to Roles Settings find the Role Name and search for the Import Accounts from CRM permission.
- End-User Settings:
- Connect to Your Personal CRM: Go to Settings, select CRM, and Connect to your CRM.
Third-Party Integrations & API
Account records can also be created through integrations with external platforms like ZoomInfo, Lusha, Cognism, etc. or via the Salesloft public API. Configuration varies by provider, so reference the integration partner documentation for record creation details. Accounts created via this method will not be linked to the CRM.
The following settings must be enabled for this to occur:
- Enable Import Accounts from CRM by Role (On by default): To confirm this permission is enabled, go to Roles Settings find the Role Name and search for the Import Accounts from CRM permission.
For Person records created outside of direct CRM imports, the system automatically attempts to link them to the CRM by matching email addresses.
If no match is found, the record stays unlinked unless Lead or Contact creation Automation Rules are enabled or a user manually creates a CRM record.
Team admins may enable the following settings to allow Person record linking:
- Configure People Linking Logic: (On by default) Salesloft defaults to linking records to the Contact object, falling back to Lead if a Contact isn't found. When multiple CRM records share the same email, linking logic prioritizes the first selected object, then will link to the most recently updated record within that object. To enable this setting, go to Settings, select CRM Sync. In the CRM Settings, find Linking People and select the [Object Selection].
- Enable the Manage Leads or Contacts Permission by Role: (OFF by default): This allows users to link an unlinked Person record to an existing CRM Lead or Contact, or to create a new CRM record if one doesn't already exist. To enable this permission, access Settings, then navigate to Roles, and select the Role Name. From there, choose either Manage Leads or Manage Contacts.
For Account records created outside of direct CRM imports, they will remain unlinked unless a user manually links them from the account page using the 'Link to CRM' option.
Q: Why are CRM records owned by an admin instead of the user who initiated them?
A: All Salesloft users must be mapped to their CRM Username for correct CRM Owner assignment, and the Owner CRM ID field must be mapped bi-directionally on the Lead or Contact object to set the Salesloft Owner as the CRM Owner upon Lead or Contact creation.
Links: