CRM Sync is the simplest and most reliable way to keep the data between your CRM and Salesloft entirely up-to-date. The sync works in near real-time, and administrators have the ability to decide which application “wins” when syncing each field.
In this article, we will walk through:
Your company must have one of the following CRM editions:
- Salesforce Professional edition with REST API access
- Salesforce Enterprise edition
- Salesforce Unlimited edition
- Microsoft Dynamics 365.
The Main CRM Connector is the designated user account Salesloft uses to manage all CRM sync activities. This user handles updates for Leads, Contacts, Accounts, and Opportunities, and it continuously polls your CRM to detect changes on synced records.
To function properly, this user must have the following permissions:
- Lead: “read,” “edit,” “create”
- Contact: “read,” “edit,” “create”
- Activity: “read,” “edit,” “create”
- Account: “read,” “edit”
- Opportunity: “read,” “edit”
- Field Accessibility:
- Read Access: Unidirectional Fields (CRM > Salesloft)
- Read & Write Access: Bi-directional Fields & Unidirectional Fields (Salesloft > CRM)
For Dynamics
The Main CRM Connector user must have the following sharing settings and permissions:
- Read Access: The connector user must have Organization-wide Read Access for all records (Leads, Contacts, Accounts, and Opportunities). If the connector user cannot view all records, the sync will fail.
- Read/Write Access: The connector user must have Read/Write Access for any entity that should be updated or created by Salesloft. Salesloft can create Activities, Leads, and Contacts in Dynamics. However, this functionality is not enabled by default and requires additional configuration.
For Salesforce
The Main CRM Connector user requires the following permissions to ensure a smooth data sync:
- Read Access: We recommend giving the connector user Organization-wide Read Access for all Leads, Contacts, Accounts, and Opportunities. However, if you need to limit access, the user only needs read access to the specific records you want to sync with Salesloft.
- Read/Write Access: The connector user must have Read/Write Access for any record that Salesloft will be creating or updating. Salesloft can create Activities, Leads, Contacts, Accounts, and Opportunities in Salesforce. However, this functionality is not enabled by default and requires additional configuration.
- API Permission Enabled: Verify that the user's profile in Salesforce has been granted the "API Enabled" permission. This is crucial as it allows the user to make API requests within your Salesforce organization. Lack of this permission will prevent the user from connecting their personal Salesforce account to send activities and could result in an error.
Things to Note:
- License & User Requirements: A "Salesforce Integration" license is compatible with the Main CRM Connector. To complete the setup, you must create and use a username and password for this user to authenticate the connection in Salesloft.
- Permissions for Field Mapping:
- Inbound Field Syncing: Requires only read access for the connector user.
- Outbound & Bi-Directional Field Syncing: Requires both read and write access.
- Be aware of your API limit. You only have a certain number of API Calls per day, based on your CRM edition and the number of seats. You can read more about how to find Salesforce API Call limits and how to change them here.
- If your organization enforces IP restrictions for connected apps, it's essential to ensure that Salesloft's IPs for your team’s specific region are correctly allowlisted within the user's profile. To learn more, check out the Salesloft Allowlist Domains and Public IP Address article.
- Salesforce has new security restrictions for third-party apps that may prevent you from connecting to Salesforce. For troubleshooting steps and more information on this issue, please refer to our Common Errors With the Salesforce Connected App article.
Sync Logs give you full visibility into all sync actions that are completed. You can access the bidirectional sync logs between Salesloft and your CRM on the Sync Management page by clicking this View Logs button in the top section.
Things to Note: The CRM sync logs can be accessed whether or not CRM Sync is enabled.;

Figure 1: CRM Sync logs
The CRM logs page shows the following information:
- Log ID number
- Timestamp
- Source
- Type
- Status of each sync action: If a sync status shows Fail, you can correct the error and click Retry to attempt the sync again.
- Error: Hover over the Error column to obtain the full text of the error:
- Object ID
- Object Details
Click any object to view the external record associated with the action. This will redirect you to the lead or contact pages in CRM or the Person record in Salesloft, depending on the sync rule.
To learn more about the Sync Logs, check out the View CRM Sync Logs article.
The CRM Sync setting determines if and how Salesloft syncs certain data with your CRM. The majority of other settings on this page are dependent on the CRM Sync setting being enabled.
Once CRM Sync is enabled, and you've mapped the necessary fields, data will flow between Salesloft and CRM to keep all of your information up-to-date. If any team member's CRM connection disconnects, their data will still sync between CRM and Salesloft through this CRM Sync.
The sync uses a CRM Sync to maintain the connection between the two platforms. This connection uses a team member's (usually an admin’s) CRM username to make all updates in both Salesloft and CRM on behalf of each Salesloft team member.
If no users have authenticated to the CRM from their personal settings, Sync cannot be enabled.
Things to Note: Activity logging relies on individual, user-specific connections.
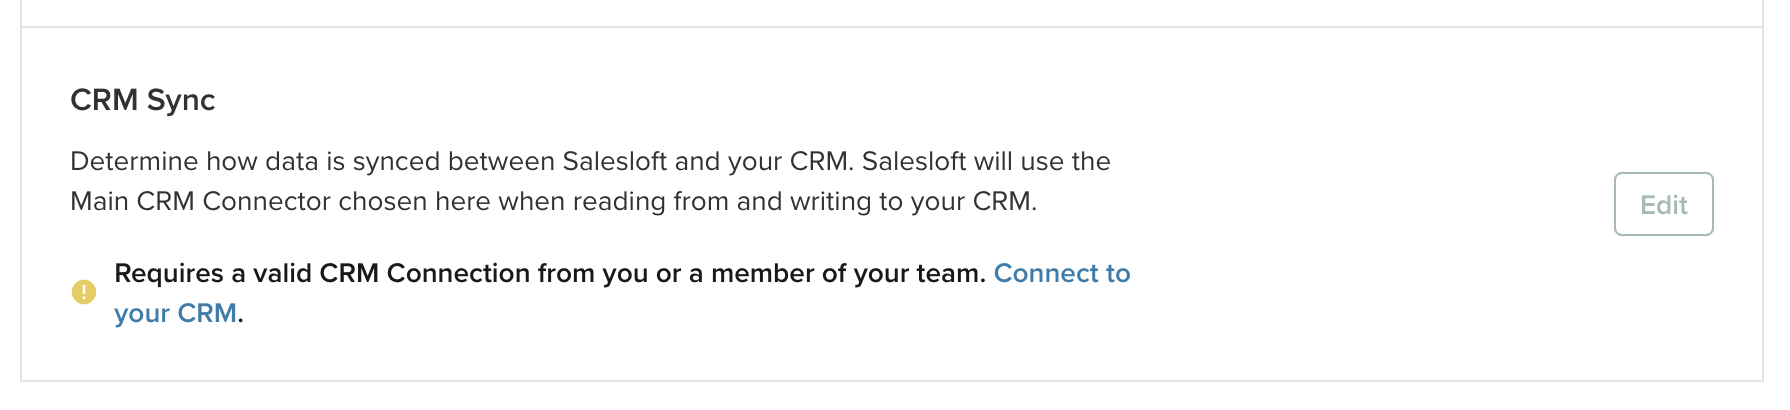
Figure 2: The CRM sync setting with no valid CRM connection
When at least one user is authenticated to the CRM, but CRM Sync is off, users will see Not Configured in CRM Sync box, indicating Sync is disabled.
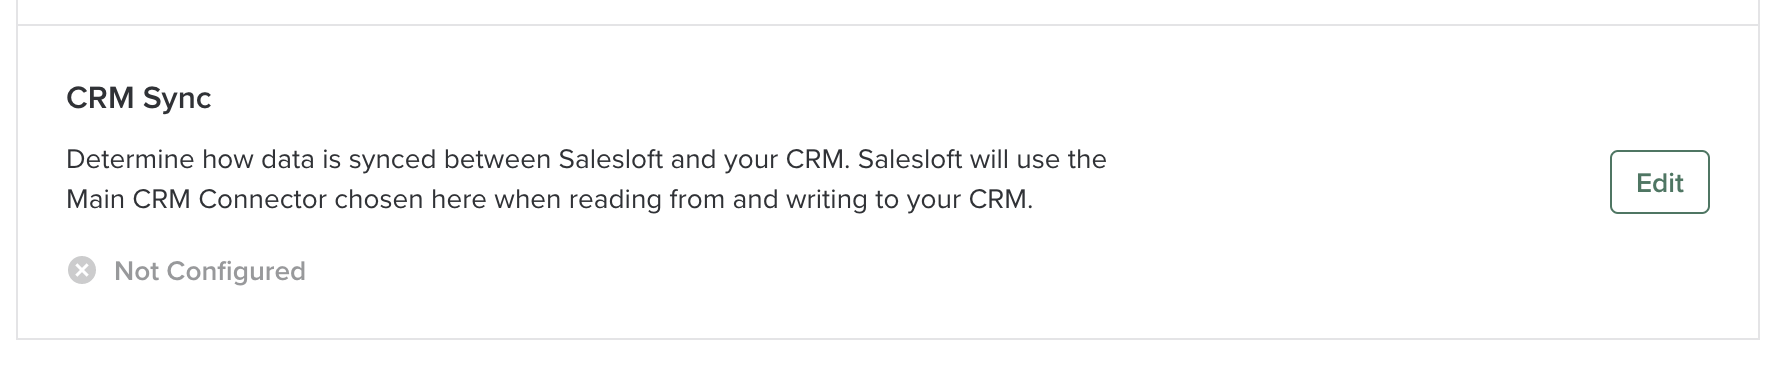
Figure 3: The CRM sync settings with no configuration
To enable CRM Sync, follow these steps:
- In Salesloft, click on your initials in the upper right corner and select Settings.
- Go to the CRM Sync Settings in the left-hand menu.
- Click on the Sync Management tab at the top.
- Find the CRM Sync section of the page. Click Edit. The Edit CRM Sync widget will appear.
- In the Edit CRM Sync widget, click the toggle to enable CRM Sync. The widget will expand to Select CRM Connector, which will be your team's Main Connector used for CRM Sync.
- Click the drop-down menu and choose the Salesloft user you want to set as your Main CRM Connector. Typically, this will be you or the main admin on your account, as outlined in the requirements section above.
- Click Save to complete.
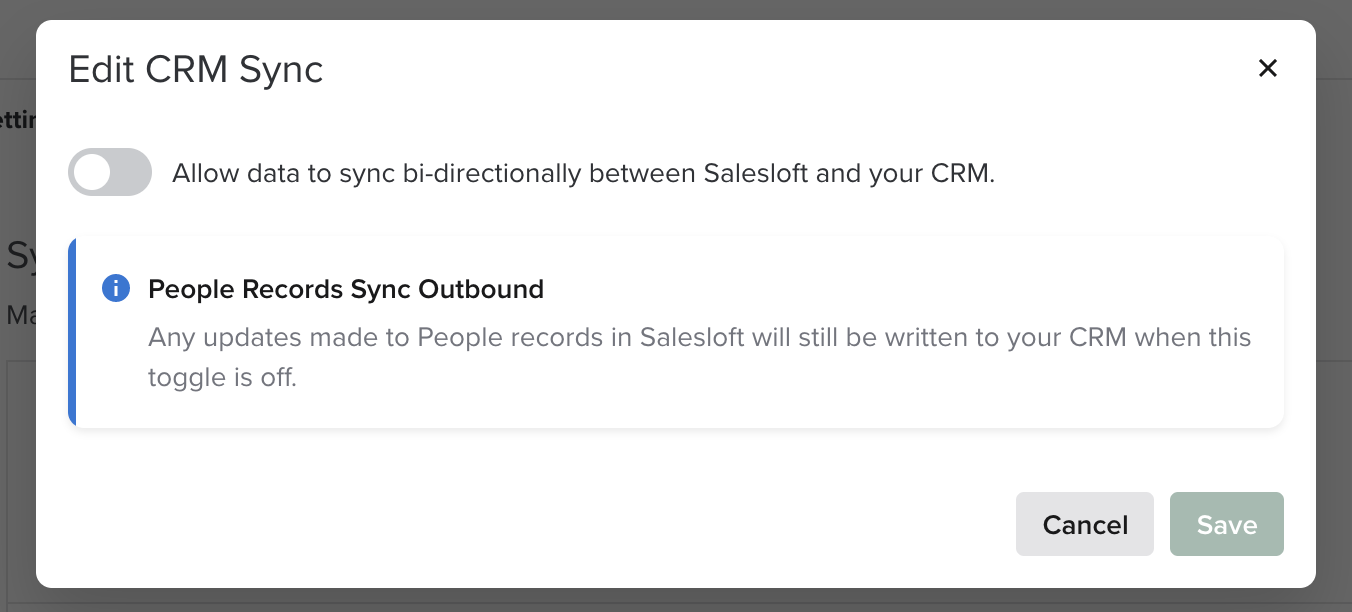
Figure 4: The Edit CRM sync widget
When CRM Sync is enabled and in a healthy state, a green check mark will appear on the page along with the Salesloft user acting as the main connector user. The CRM Sync window will also show the Connected CRM Organization and the date when the connection was established.
Things to note: Salesloft will pull in opportunities created in the last five years from the day the sync is enabled.
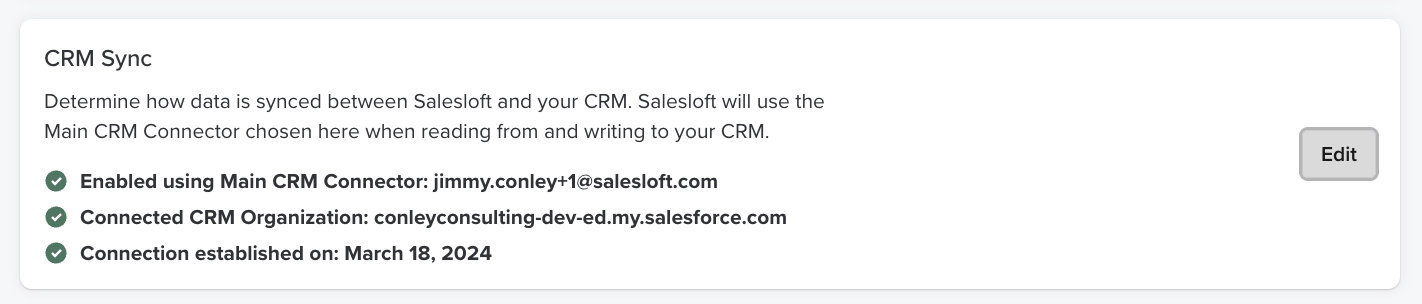
Figure 5: A completed CRM sync
The following components will also be visible on the page:
- CRM Sync Alert Contact
- Sync Frequency
- Recognize CRM Merges
- Recognize CRM Deletions
Figure 6: CRM sync components
Once Salesforce Sync has been enabled and you have configured the amount, Deals will start to sync the following objects:
- Complete history backload of object types: Account, OpportunityHistory, Opportunity, OpportunityContactRole, OpportunitySplit, OpportunityTeamMember, Contact, Lead, Event, Task, User, UserRole
- Lead - Last modified within 2 years, Event - created within 2 years, and Task - created within 2 years
Things to Note: Although the Deals CRM Sync and the Cadence CRM Sync seem alike, there are significant differences. Deals syncs everything the Main CRM Connector has access to, while Cadence only syncs with records directly imported from CRM.Deals reads data using the connector user to ensure a consistent view of the objects/custom fields, but all writes occur on behalf of the logged-in user so that Salesloft respects their permissions in Salesforce.
Salesloft Admins select a Salesloft account to be their team's Main CRM Connector to help with syncing fields on accounts, people and opportunities.
Things to Note: See the Requirements above for a list of recommended settings that must be applied to the user that is assigned as the Main CRM Connector.
When you set up CRM Sync for the first time, you will select a user as your Main CRM Connector. Once that setting has been enabled, you can verify the user by going to the CRM Sync settings and look for a green checkmark that designates Enabled using Main CRM Connector.

Figure 7: Highlighting the enabled Main CRM connector
If the user is disconnected from their CRM, you will see a red warning signal that means the Main CRM Connector is disconnected. This will also prompt the CRM Disconnect banner to appear at the top of any page in Salesloft.

Figure 8: The disconnected user warning signal
If you ever need to change which user is your Main CRM Connector, you may edit the user from the Main CRM Connector panel.
Follow these steps to update the Main CRM Connector:
- Go to your CRM Sync Settings in your Data Settings (Data > CRM Sync > Sync Management > CRM Sync), or by clicking View CRM Sync Settings from the Connection Lost for Main CRM Connector Error message.
- Under CRM Sync, click Edit. The Edit CRM Sync window will pop up.
- Once the CRM Sync modal is open, you will see a clear error message indicating who the main CRM connector was and that their CRM connection is no longer working. From here, you can still see if you need to personally re-establish your own connection and select a new main connector.
- Things to Note:
- Email addresses will be listed in alphabetical order.
- This list will only display active Salesloft users.
- If you do not see the user you want to select, it is because that user is not mapped in the User Management tab to their Salesforce email or that they are an inactive Salesloft account.
- To select a new Connector, use the dropdown and click a user's email address.
- Click Save.
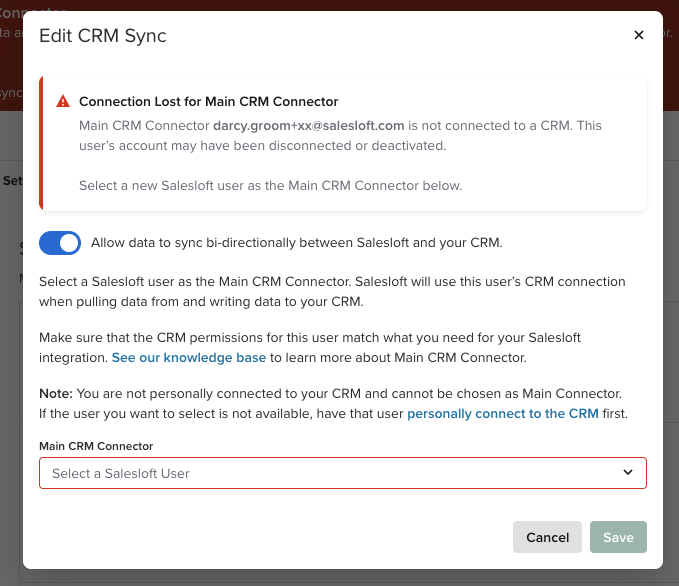
Figure 9: The Edit CRM setting with Connection Lost error message
If you close the modal without selecting a new main connector, an error icon will appear where in your CRM Sync. All related settings will be locked until a valid main CRM connection is established.
If an error occurs with your CRM sync, you will want to act fast to resolve the error (or risk missing some data). So, it's very important that the right person is notified if/when an error occurs.
The CRM Sync Alert Contact proactively notifies the correct admin within your organization. The following CRM Sync errors will prompt the alert:
- Picklist Value errors
- Picklist field errors
- API threshold limit is reached
If one of the aforementioned CRM Sync error occurs, the CRM Sync Alert Contact will receive an email every 48 hours until any issues are resolved.
Figure 10: API error with mapped fields message
By default, this will be the same email address of your Main CRM Connector. If you want to change the user who will be the CRM Sync Alert Contact, we recommend that you select the CRM Sync Alert Contact during your initial Salesloft configuration.
To select or edit a CRM Sync Alert Contact, follow these steps:
- In Salesloft, click on your initials and select Settings.
- Go to the CRM Sync Settings in the left-hand menu.
- Click on the Sync Management tab at the top of the page.
- Under CRM Sync Alert Contact, select Edit. A dropdown menu will appear where the edit button was previously.
- Enter an email address or scroll through the dropdown to find the user you would like to make the contact. Select their name.
- Click the checkmark to save.
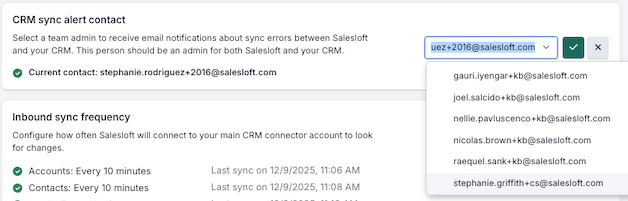
Figure 11: Selecting the CRM sync alert contact
After sync has been enabled you can view and edit your sync frequency. Your sync frequency controls how often Salesloft connects to your CRM instance, looks for changes, and updates field information through API calls.
Things to Note: The more frequently we connect to CRM, the more API calls we use. As mentioned at the start of setup, you only have a certain number of API Calls per day, based on your CRM edition and number of seats. To learn more, check out our Salesloft API Limits article
Since API calls are made to the objects mapped in your CRM field configuration, you can adjust how often Salesloft Sync will occur for each record type: Account, Leads, Contacts, and/or Opportunities and Custom Objects. You can set the sync frequency to once a minute, check every 5 minutes, or every 10 minutes. Our default sync time is set to check every 10 minutes.
The Sync Frequency panel will show the frequencies that have been set for your team along with the time of the last sync.
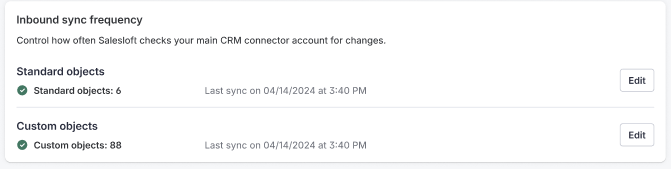
Figure 12: The Inbound sync frequency settings
To edit the frequency of any Standard objects, follow these steps:
- Go to the Sync Management tab inside your CRM Sync Settings.
- Find the Inbound Sync Frequency section of the page. Click Edit next to Standard Objects. The Edit Standard Object Inbound Sync Frequency window will appear.
- Things to Note: Sync Frequency will only appear when Sync is enabled. If you do not see the Frequency section, make sure Sync is enabled.
- In the Edit Standard Object Inbound Sync Frequency window, select the dropdown menu for the object you would like to update.
- Pick your frequency option. You can select one of the following:
- Every Minute
- Every 5 Minutes
- Every 10 Minutes
- Do Not Sync Opportunity Data - Select this option if you do not want any Opportunity Data to sync to Salesloft.
- Click Save. The frequency options you select will now appear in the Inbound sync Frequency section.
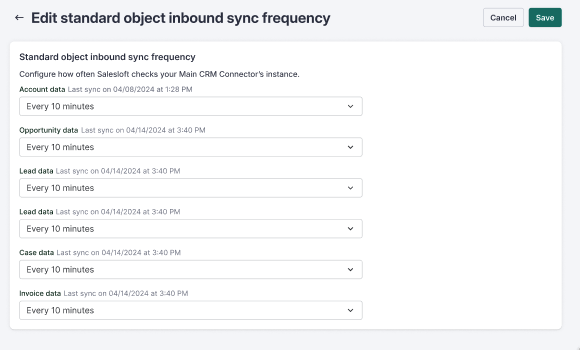
Figure 13: The edit standard inbound sync frequency settings
To edit the frequency of any Custom objects, follow these steps:
- Go to the Sync Management tab inside your CRM Sync Settings.
- Find the Inbound Sync Frequency section of the page. Click Edit next to Custom Objects. The Edit Custom Object Inbound Sync Frequency window will appear.
- Things to Note: Sync Frequency will only appear when Sync is enabled. If you do not see the Frequency section, make sure Sync is enabled.
- In the Edit Custom Object Inbound Sync Frequency window, select the dropdown menu for the object you would like to update.
- Pick your frequency option. You can select one of the following:
- Every Minute
- Every 5 Minutes
- Every 10 Minutes
- Do Not Sync Opportunity Data - Select this option if you do not want any Opportunity Data to sync to Salesloft.
- Click Save. The frequency options you select will now appear in the Inbound sync Frequency section.
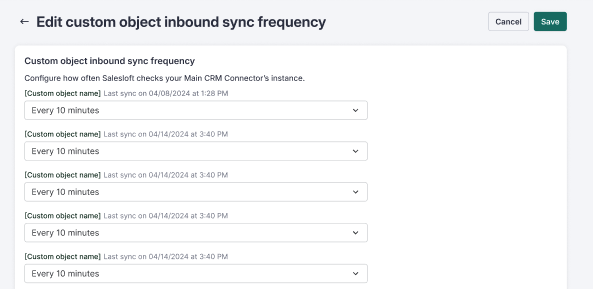
Figure 14: The edit custom object inbound sync frequency settings
The Manually Sync from CRM setting allows Admins to pull historical data from the CRM into Salesloft. This setting syncs account, contact, lead, and opportunity records from up to five years ago, giving you full context without relying only on new data moving forward.
Manual syncs help ensure that important historical information is available for reporting, engagement, and pipeline management.
To manually sync objects from your CRM, check out our Manually Sync from your CRM article.
The Recognize CRM Merges and Deletion settings determine whether Salesloft will recognize merges or deletions in the CRM and reconcile records in Salesloft accordingly.
Things to Note: These settings previously lived on the CRM Sync Settings tab. To learn more about setting up the CRM merge and Deletion Settings, check out the
CRM Mirroring: Recognize Salesforce Merges and Deletions article.
Shared Activity Syncing allows you to associate all People included in an email or meeting to the corresponding activity in your CRM.
Things to Note: If deactivated, Salesloft will associate all involved People to the activity, but only the primary contact in the CRM.
To enable Shared Activity Syncing, follow these steps:
- Open your settings, then select CRM Sync under the Data settings.
- Click the Sync Management tab at the top of the page.
- Scroll down to the Shared Activity Syncing setting.
- Click the toggle to turn the setting on. When the toggle area is blue, the setting is ON.
Want to know more about how shared activity syncing looks inside Salesloft and your CRM? Check out the Associate Multiple People with an Activity article.
Figure 15: the Shared Activity sync setting