While your CRM's Lead and Contact fields map to Salesloft Person fields, CRM Account fields map to Salesloft Accounts (same name, keeping it simple).
All Salesloft Account fields can be edited from the Account Profile Page. But in order to complete an import from your CRM into Salesloft or push data from Salesloft to your CRM (and vice versa), the Salesloft Account fields need to be mapped to the appropriate CRM Account fields.
To configure your Account fields, go to the Field Configuration Settings, then navigate to the Account Fields tab at the top of the page.
Things to Note:
- Salesloft requires two field values to create an Account in Salesloft. They are Account Name and Domain. Due to these requirements, you must map these fields if you would like CRM Accounts to be created in Salesloft.
- Salesloft does not assign default field mapping for CRM Sync. If you wish for information to sync between the two platforms, you must set the field mapping.
In this article, you will learn all about Account field configuration between Salesloft and your CRM, including:
Psst, new to Salesloft and want to make mapping easier? Start by Auto-Mapping Standard Salesforce Fields or Auto-Mapping Standard Dynamics Fields!
Let’s map those fields!
Person and Account field mapping use the same process with a slightly different layout. Your Salesloft Account column contains the standard Salesloft field name. To the right of the Salesloft Account field, you can edit the field mapping for default fields and view the CRM Account field information. You can also add custom fields to map to your CRM fields that do not exist in Salesloft.
Things to Note: Don't know which fields to map? Check out our Recommended Salesforce Fields or Recommended Dynamics Fields guide for ideas to get started.
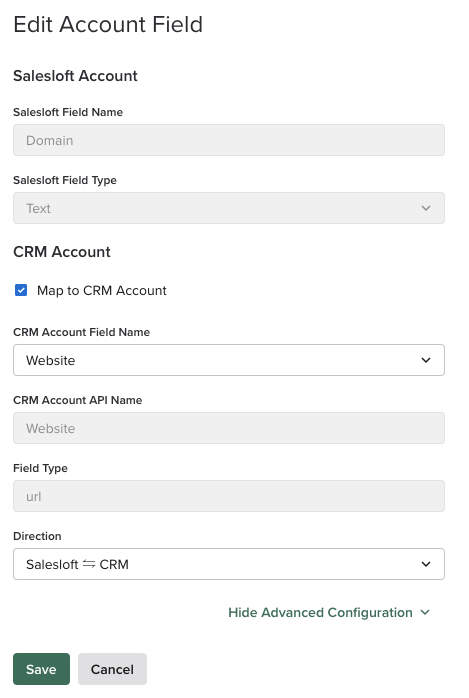
Follow the instructions below to map your fields. For this example, we will map the Domain Account field:
- Connect Salesloft to your CRM Main Connector account or a Salesforce Sandbox.
- Navigate to the Field Configuration Settings in your Settings.
- Go to the Account Fields tab.
- Scroll down the list of Salesloft Account Field Names and find Domain. When you map fields, if you cannot find the field name in your list, you will need to create a custom field.
- Click the arrow to the right of the Domain field and select Edit Field.
- Below CRM Account, check the box beside Map to CRM Account.
- Under CRM Field Name, find the CRM field you wish to map to. For the Domain example, we recommend you map the domain to the Website CRM Account Field Name. Once the CRM Field Name is selected, the CRM API Name and Field Type will populate.
- Set the Direction. The direction says how the field will be updated.
- Click Save.
- Repeat steps 4-9 for any additional fields you’d like to map, selecting the CRM field and the sync direction for each.
- Things to Note: Values for read-only fields can only be imported from your CRM and cannot be edited in Salesloft.
Account Tiers help segment sales strategies and allow companies to create focus around the most important Accounts. Team members who sort their steps by Tier can execute Account-based marketing strategies directly from the Salesloft platform.
As a team admin, you can view and manage the Account Tier values from the Field Configuration Settings. The field is listed under the Account Fields tab. Select the field to map and edit the values listed.
By default, Salesloft offers the following tier values:
Admins can change the Account Tier values by selecting Edit Field from the arrow icon on the Account Tier row. From the Edit Account Field window, you can:
- Edit an Account Tier Level: Change the name of an existing tier by editing the name in the text box.
- Add an Account Tier Level: Click Add Tier Level. Type in the name of the new tier and hit the enter key on your keyboard.
- Reorder Your Account Tier Levels: Grab the row by selecting the six dots to the right of the priority level name. Then, drag the row up or down.
- Remove an Account Tier Level: To delete a tier level, select the subtraction icon to the left of the priority level's name.
Once your changes have been made, click Save.
The standardized, "out-of-the-box" field names that exist for all Salesloft teams are known as default fields. However, we at Salesloft know that your team's use case may go beyond our default field names. So, Salesloft allows team admins to create your own custom fields in order to map and display record data.
You can create custom fields for each Lead, Contact, or Account field and set them to be mapped to and from your CRM. Any custom fields that are created can be used as dynamic tags.
To create a custom field, follow the instructions listed below:
- Navigate to the right side of your screen, and click the + Add Custom Field button.
- The New Custom Field Mapping box will appear. Fill in the name of your custom field in the Salesloft Field Name text box.
- Things to Note: To create a custom field in Salesloft, the name must meet the following criteria:
- Field only accepts use A-Z characters, dashes, underscores, and numbers 0-9
- Name cannot start with a dash, underscore, or digit (must start with letter)
- Check the Account box as the CRM Object.
- Use the CRM Field Name picklist to select a CRM field.
- Add extra options to the picklist as needed.
- Hit Save.
- Once you have added the custom field, you will see an asterisk next to the field name.
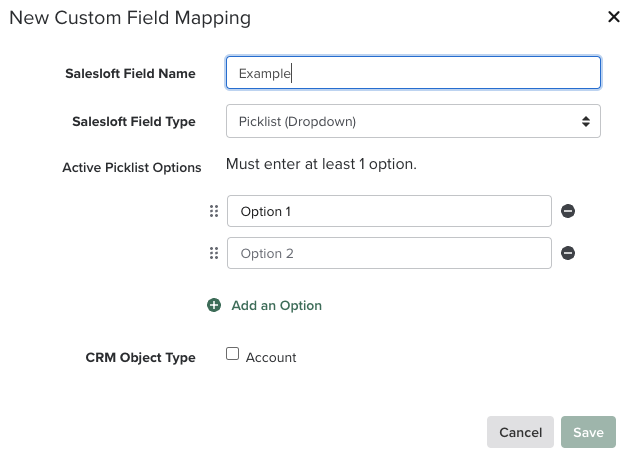
Custom field picklist on an Account allows users to select from a list of picklist options in Salesloft that have the same options as their CRM. Picklists let reps easily edit information about an Account. Having these type of feels available also grants managers and admins confidence that your reps are updating information accurately.
Things to Note:
- Admins, please make sure when you are mapping to a picklist field in your CRM that the options are the same in both systems. Otherwise, you will see sync errors related to the picklists being out of sync.
- You are able to utilize any custom picklist fields in an Automation Rule in the Criteria or Action fields. In order to utilize records to contain no value/-None-, you can select "Is Null" for the operation.
- While Salesforce allows both picklists and multi-picklists, multi-picklists will not function properly in Salesloft.
To learn more about picklists, check out our Create a Picklist article.
The Account Details panel found on the Account Profile Page includes fields that contain data in the Salesloft default order. Fields that do not contain data are separated by the Blank Fields section.
The Field Layout option allows you to set the order and visibility of fields inside the
Account Details. By customizing where fields appear in the Account Details on the Account’s Profile page, your team will be able to view the most important information all in one panel.
To reorder fields, go to your
Settings. Navigate to
Field Configuration, select
Account Fields, and then click
Field Layout.
In the
Field Layout tab, you can view all fields and their numerical order in the
Order column. Users have several options to change this order:
- Search for fields by name. This can help you quickly find a field that you would like to move to the top or last item in your list.
- Drag and drop the field rows to automatically change the number in the Order column.
- Set the new field’s position manually by editing its number directly in the Order column.
- Only numbers in the current field range are available. For example, if there are five fields, users cannot set a value greater than 5 and less than 1.
- Use the action menu, which is available on the right end of every row:
- Move to Top/Move to Bottom shifts the row to the first/last position in the list.
- Move Up/Move Down shifts the row by one position up or down respectively.
You can manage which fields are visible via toggle. By default, all custom fields are visible. If you do not wish to see a field, turn the toggle off.
Things to Note:
- Salesloft standard fields are always visible, and the toggle for them is always set to the on position and disabled.
- If you do not wish to view a standard field, reorder the field list so the field is listed towards the bottom of the details.
- Changing field visibility does not affect the order number. It hides the picked field from the UI in the Account Details tiles.
Let's say your team relies on a Phone Number field. You can take the following steps to reorder the field and set the visibility:
- As an admin, go to your Field Configuration Settings. In the Account Fields tab, select Field Layout.
- Search or scroll to find the Phone Number field you would like to move.
- Pick the order of the field by grabbing the field on the left hand side, or entering a number in the Order box.
- To save all changes made on the Field Layout tab, hit Publish. The new layout will be saved and applied for all team members. To restore the default field order, tap Reset Layout.
Once your Account Field Layout has been changed, you can confirm the new layout on any Account Profile Page.
Things to Note: Since you have ordered and selected the exact fields your team will view, users will see all field types as configured in the Field Layout. After you publish a field layout, users will no longer see the options to View or Hide Blank fields option on the Account Profile Page.