\Salesloft email offers the ability to execute your well-crafted sales messages at scale. This dynamic feature lets you manage your emails to optimize your sales process.
Whether you want to send out a templated email to multiple People from a sequential Cadence or personalize a message to engage a prospect, Salesloft takes your daunting email tasks and turns them into well-executed communication. But how can you get the most out of this vital sales tool?
In this article, you will learn how to send an email using Salesloft, including:
- You must connect your email account to Salesloft before sending emails.
- If sending a one-off email, ensure you have the correct Person record selected.
- All email recipients entered in the “To” field must be People records inside Salesloft. If the record does not exist in Salesloft, you will be prompted to create a Person.
- Sent emails are automatically logged to the activity timelines of all recipients listed in the "To" field.
- Salesloft will only track opens and clicks for the primary recipient (the first Person record listed in the “To” field).
- Autosaved messages will save content every three seconds while a message is being drafted. Only one message may be saved per Person.
- If you copy and paste text into the Salesloft email window, the change will not be saved until you click the space bar or some other key in the email window after the paste action.
For a quick overview of Sending an Email from Salesloft, check out the video below:
To send an email from Salesloft, follow these steps:
- Access the Email Compose Window: You can access the email window from several locations:
- From a Cadence: Cadences allow you to systematically send emails to People through a consistent process. Check out our Cadence-specific articles to learn more about how to Create a Cadence and run a Cadence email step.
- From a Person’s Profile Page: ending emails from a Person's Profile Page allows you to use the information in the profile to edit and personalize your email. There are a few options for composing an email within the Person Profile page:
- Person Quick Actions: Located directly under the Person’s name, select the email icon.
- Click the Email Address: From the Person Details and Contact Info panel, select the Person’s email address for the email window to appear.
- The Emails Activity Tab: From your Person Activities Panel located in the center of the Person Profile page, you will find an Email tab devoted specifically to emails sent to that individual. Access that tab and click + Compose Email in the upper right corner of the panel.
- From Deals Buying Group Panel: In a Deal view, click the ellipses (...) next to a stakeholder and select Email.
- Things to Note: The Stakeholder must have a Person record in Salesloft with an email address. If they do not exist as a Person, one-off actions will not appear. If they do not have an email address, the option to email will not appear.
- Enter the Recipient(s): When you select a Salesloft Person’s email address, they will be the first name entered in the “To” field by default. This Person is the "primary contact" of the email. You have the option to add additional emails to the thread:
- Additional People in the To Field: To add another additional People in the “To” field, type in the second email address.
- If the contact exists as a Person in Salesloft, select the name.
- If the contact does not exist, you will need to "Create Contact."
- CC/BCC: You may add email addressed to the CC/BCC. This is particularly beneficial when you would like to add team members or managers to the thread.
- Check the Subject Line: An email subject line is the short, introductory text displayed in an inbox. If you are using a cadence template for your email, the subject may already be entered. Read over and review your subject line before sending.
- Create Your Email: Draft your email message. This will be the actual content of your email. Type the email inside the email compose window or use the AI Email Assistant, templates, or snippets to insert content as needed.
- Choose Your Send Option:
- Send Immediately: Click the Send button to deliver the email right away.
- Schedule Send: Click the calendar icon next to the Send button.
- Set your desired date and time for the email to be sent.
- Choose the timezone (default based on the Person's contact info or select from the dropdown). The schedule send option also allows you to specify the timezone. Timezone is determined by the Person's contact info. When you schedule an email, you can use the default timezone or select a timezone from the dropdown menu.
- Click Schedule.
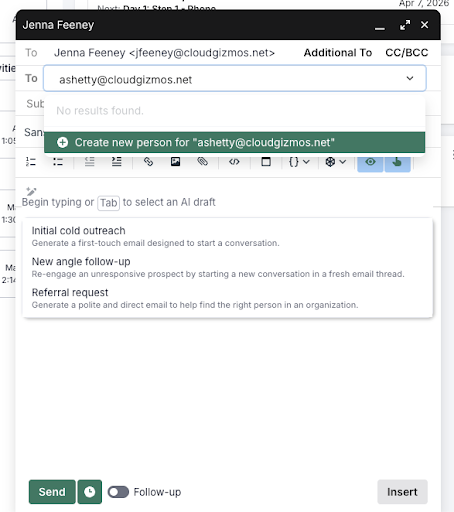
Figure 1: The email compose window
When you receive an email reply, it’s best to respond in a timely manner. You can send a follow-up email reply from the Activity Feeds on Salesloft profile pages.
Things to Note: If your sent email doesn’t appear in the Activity Feed immediately, check the Sent folder in your connected email account to confirm it was delivered successfully.
To send a follow-up email from the activity feed, follow these steps:
- Open a Person or Account Profile Page: Hover over the Contacts tab in the top navigation panel, then select People or Account. Click the name of a Person or Account. This will direct you to the Person or Account Profile Page.
- Find the email activity you want to follow up on: Click the Emails tab, then scroll through the list to find the email activity you want to follow up on.
- Click Reply: Hover over the email activity, then click the Reply button. An email composer window will open. The person's email address and the previous email thread will already be loaded.
- Send the Email: Write your new message. You can also insert a template. When you’re done, hit Send. Your email will be sent and automatically logged in the activity feed.
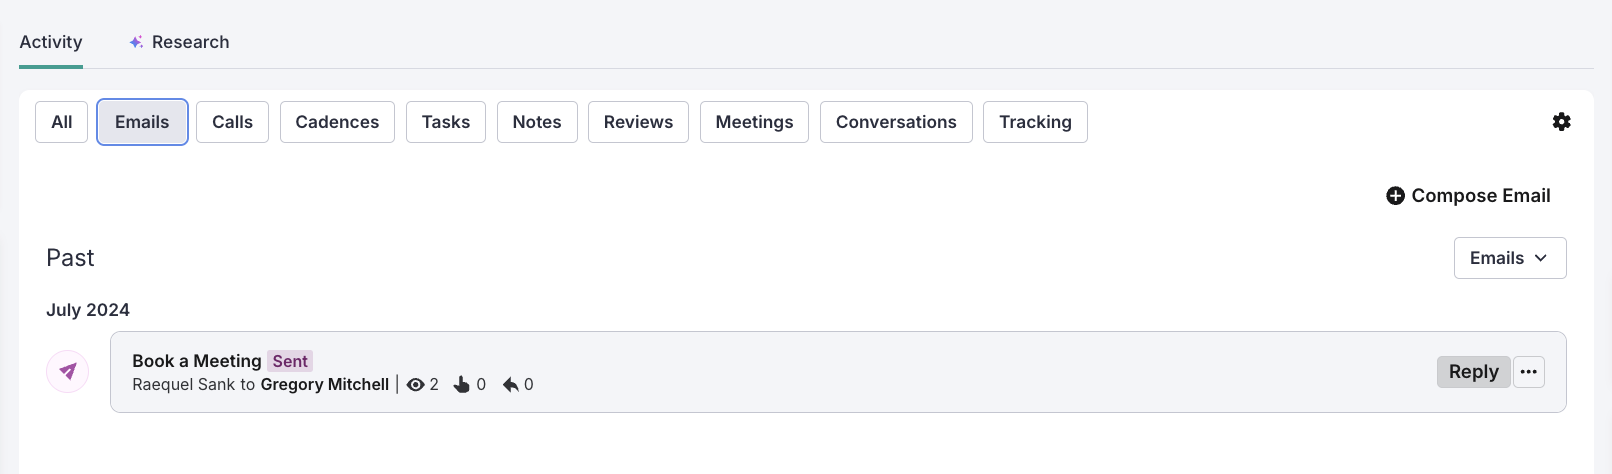
Figure 2: Send an email from the Person Profile Activity Feed.
When you create a one-off email from the People Page , Person Quick Actions, or the Cadence People Tab your message will auto-save. This means if you close the email compose window for any reason, the message content is still saved on the Person's record.
To create an autosaved message from the Person Profile Page, follow these steps:
- Navigate to Person Profile Page: Go to the Person Profile page either from the search bar in the top navigation or from the People tab.
- Access the Email Composer: Find the Person Quick Actions panel and click Email. The email compose window will open in the bottom right corner.
- Compose your message: After three seconds, you will see Saved (time) appear at the top of the compose window. When the message saves, a Saved icon will appear next to the Email Quick Action.
- Exit the Composer: Exit out of the window by clicking the X in the upper right corner to Save and Close. A notification will appear informing you that the message was saved.
Figure 3: Email Composer with a saved message
To recover an autosaved message, follow these steps:
1. Navigate to the Person Profile Page From the Person Profile page.
2. Select the Email Quick Action: In the Person Information Panel, click the email icon to open the Saved email.
Figure 4: The Email quick action button
3. Confirmation: A notification will pop up, informing you that the email message has been recovered. The email window will open in the bottom right corner.
Figure 5: Email Recovered notification
4. Send: Complete your email and click Send.
If you do not wish to save your email, click the trashcan icon in the bottom right corner of the email compose window to delete your message and close the window.
Figure 6: Email composer window showing the delete and close button
FAQ
Question: Why are the email timestamps different on the Activity Feed vs. Emails Page?
Answer: If you schedule an email to send the timestamp shown on the activity feed will differ from the timestamp seen on the Emails page. The activity feed shows the time when you, the user and sender of the email, clicked "Schedule" and initiated the activity. The Emails page logs when the email was actually sent.
Troubleshooting
Contact not found: If a contact isn't appearing in search, double-check the email spelling or use the "Add as Contact" prompt to create a new record.
To learn more about what’s included in the email window, check out the Salesloft Email Layouts.