You’ve taken your list and set your import in motion. Now you need to complete the import and finish adding all of those People into Salesloft. Let’s walk through the features and steps to complete your import.
In this article you will learn how to complete an import from the Complete Your Import page, including:
To complete an import you must:
The People in the import table are determined by the Lead/Contact CRM ID from the import, and the table is populated based on the Team’s field mappings. Regardless of the Report Type a User imports from, if only one valid Lead ID or Contact ID column is available, that column will automatically be used to import People.
If there are rows that have an invalid value or null value in the report for the selected ID column, the rows will be ignored and not shown on the Import Page.
1. Review the Complete Your Import Page
For mass imports, you will be redirected to the Complete Your Import page. On this page, you will see details of the import and be able to make changes to the listview.
Confirm the Name of Import. By default, your import name will be the date of the import. However, if you would like to rename the import for clarity, you may type the preferred name in the text box.
2. Address Import Errors
Import errors may happen due to certain reasons like import files containing invalid data, records missing required attributes, or duplicate records appearing in the import list.
If a list is imported and contains errors, the import error notification will explicitly show which records cannot be imported and the reason for the error. The error will appear at the top of the Complete Your Import page. You have the option to Hide Errors. Hiding the errors will ignore the notification warning and complete your import without the records that have errors. This may be a good idea for duplicates found in the same list.
Alternatively, if your errors include missing or invalid data, you can cancel the import, correct the information, and attempt to upload the import again. Hopefully, the errors will be corrected and you can complete your import with all the records included.
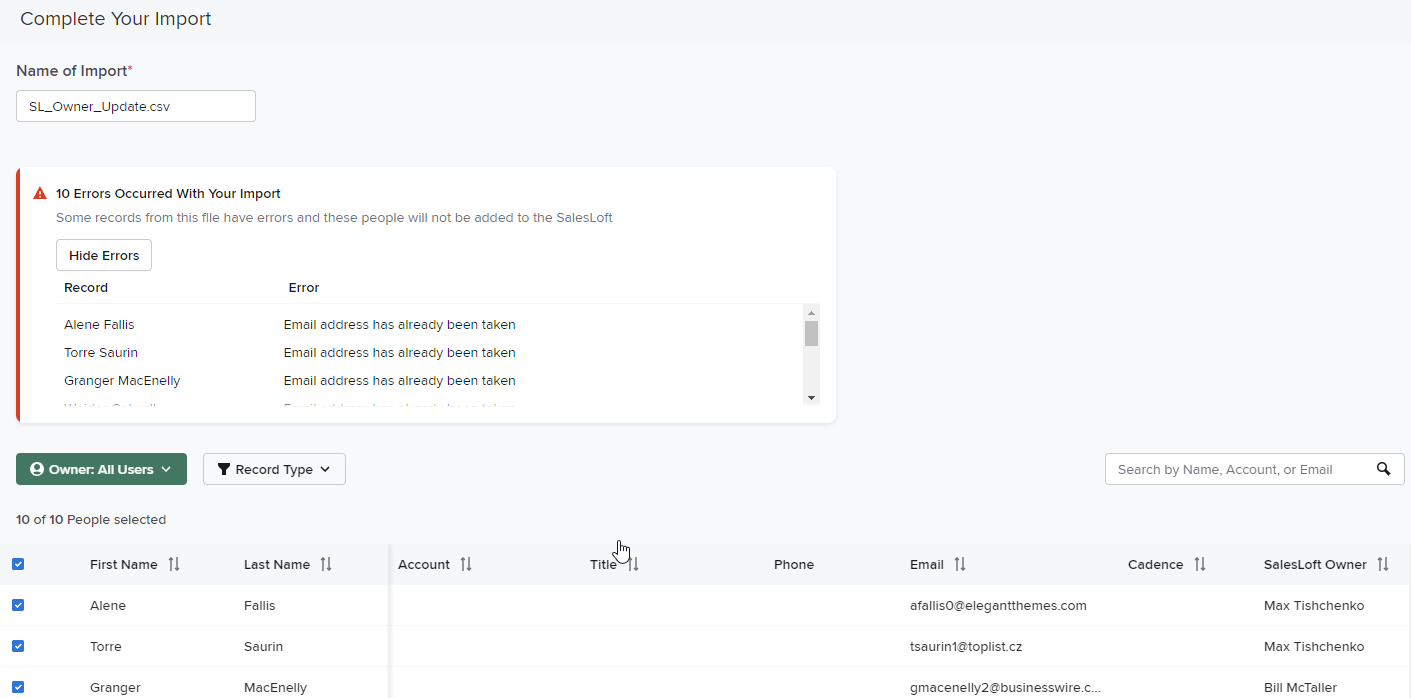
Figure 1: Example - Errors on Complete Your Import Page
3. Tag People (Optional)
At the bottom of the import page, use the Add Tags field to choose from existing tags or create your own. Type in the tag you want to use and hit enter.
Once you complete your import, the tag will apply to all People from that import list.

Figure 2: Add Tags from Complete Your Import Page
4. Select your Finish Import Option
Finish Your Import
Click Finish Import at the bottom of your import list to add the selected People to Salesloft. This will create Person records for each individual.
You can view the import at a later time by navigating to The People Page and filtering your People list by the import name.
Figure 3: "Finish Import" button
Finish Your Import and Add to a Cadence
Add the selected People from your import list to Salesloft and add them directly to a Cadence by hitting Finish Your Import and Add to a Cadence.
This allows you to take immediate action on the People from the list by dropping them into day one, step one of whatever Cadence you add them to.
Figure 4: "Finish Import and Add to Cadence" button
Finish Your Import and Add to a Cadence Specific Step
When importing a Person directly to a Cadence, you can select any Cadence step for that Person to begin within a Cadence.
To import a Person and add them to a specific Cadence step, follow these instructions:
- Click Import and Add to Cadence. The Add People to Cadence window will appear.
- From the Add People to Cadence window, search and select the Cadence you want to add the People to.
- On the Cadence row, select Show Steps. This reveals all of the individual steps within that Cadence, including variants.
- Select the step to highlight it.
- Click Add to Cadence. If a step is selected, the customer(s) will be added to the selected Cadence, at the selected step.
Figure 5: Finish Your Import and Add to a Cadence Specific Step
Add People Not on a Cadence
Sometimes when you import a batch list, there may be some contacts who have previously been imported into Salesloft and are currently running in Cadences. When this happens, Salesloft will give you the option to exclude the People who are already on Cadences in your import.
When you complete your import, select the Import and Add to Cadence option. Next, you will select the Cadence. If some People are already in the Cadence, you can complete your import by selecting from one of the following options:
- Cancel: Cancels the import action. Will take you back to the Complete your Import page.
- Add People Not on a Cadence: Imports the People who are not currently running in the Cadence. The People from the import list who were previously added to Salesloft will be excluded from this import.
- Add Everyone: Imports all of the names in the import list to Salesloft and adds them to the Cadence.
As Seen in Your Import List
From your import list, you can quickly view People information and select specific People to include in the final import from the list. You can select People by checking the box to the left of each Person’s name.
The list may be sorted by clicking on the column headers.
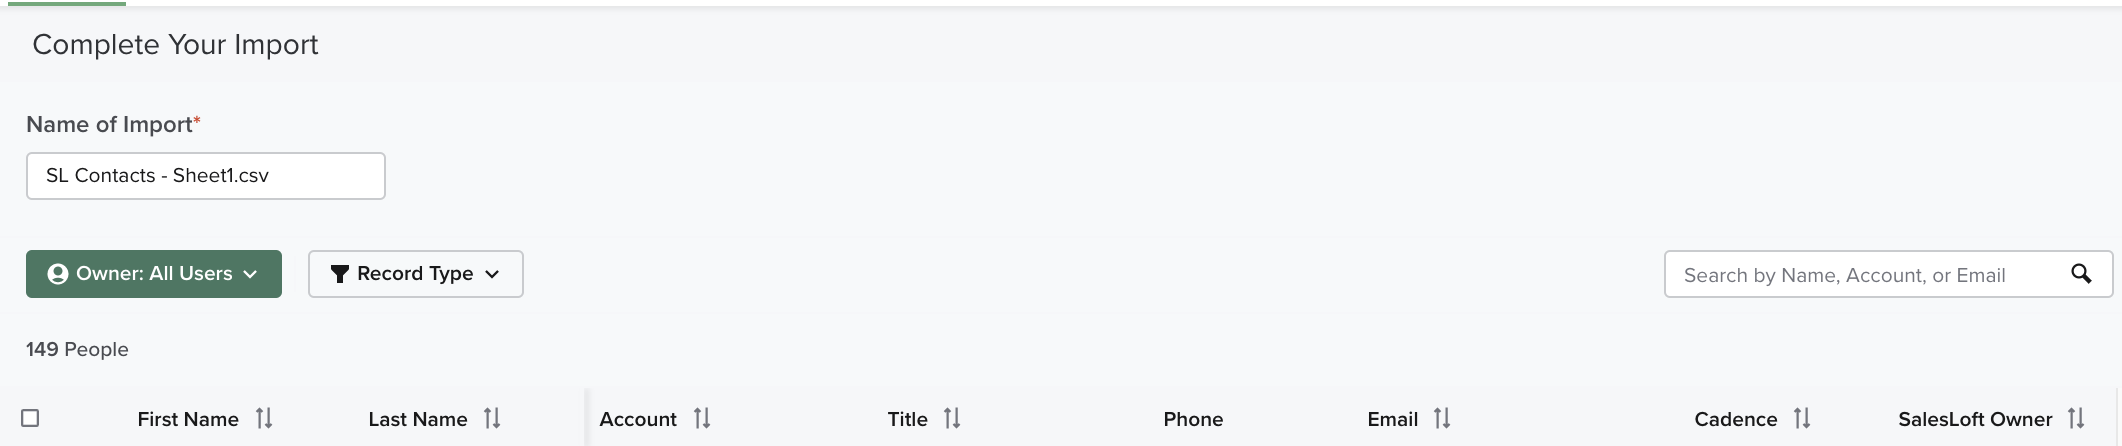
Figure 6: Complete Your Import Page
The import will show the following people details:
- First Name
- Last Name
- Account Name
- Title
- Phone Number
- Email
- Cadences applies to People that already exist in Salesloft.
- Owner
What are the Different Import List Colors?
You may see different colored rows on your import list. These different colors highlight people in the list with a different import status, specifically whether or not they’ve been previously imported into Salesloft.
Import list items in white with no icons mean that Person is brand new to Salesloft. Their information will create a new record in Salesloft.
Figure 7: Example - Complete Your Import List Item - White with No Icons
Import list items in yellow/orange with the Person icon visible in front of their name mean that Person has been previously imported into Salesloft. List items in this color will be unchecked by default, meaning they are not automatically being imported. You may choose to select the checkbox to add them to your final import. Importing these People will not create a new record in Salesloft, however, their previous record will be updated with any additional field information.
People being imported who have previously been imported may have data in one of the final two columns on the import list: Cadences and Owner. This way, you can see any active Cadences People are on as well as their current Salesloft owner. This may help you to determine which People should not be added to another Cadence, and uncheck them while importing to avoid unnecessary actions.
Figure 8: Example - Complete Your Import List Item - Yellow/Orange with the Person Icon
List items in a light blue with the rocket ship icon mean that Person has already been imported into Salesloft and is currently running in a Cadence. List items in this color will be unchecked by default, meaning they are not automatically being imported.
Figure 9: Example - Complete Your Import List Item - Light Blue with the Rocket Ship Icon
Also, you will notice that the Cadence name is listed in the Cadence column.
Import list items in red with an error symbol prior to the name mean that Person could not be imported into Salesloft. List items in this color will be unchecked by default, meaning they are not being imported. Hover over the error symbol to view the explicit reason for the error.
Figure 10: Example - Complete Your Import List Item - Red with an Error Symbol