The Salesloft Person Profile page allows you to view and manage all of the information related to your prospect in one central location.
Say goodbye to the days of scavenging Salesforce records or digging through Post-its on your desk for logs or notes. The Person Profile page consists of several panels that show you all of the relevant information about the prospect at a glance. The panels also allow you to take a number of Salesloft quick actions so if an opportunity presents itself, you can strike while the iron is hot.
The Person Profile layout includes collections of panels that are separated into thirds on the Person Profile page. The information panels take up the left side of the page. As their name suggests, these panels include basic information, stats, quick actions, contact info, and tags. The activity panel, located in the center of the page, shows the Person's Salesloft activity. Finally, the Cadences and integrations panels build up the right side of the page.
In this article, you will learn about the Person Profile page, including:
Person Information Panel
The Person information panel displays key information like the Person’s name, Account, Salesloft statuses, and their linked social and CRM records. Here you can also make one-off actions with the click of a button, including Call, Email, create a Task, and more.
You will see the panel in the top left corner of the Person Profile page.
Figure 1: Person Information Panel
Edit Person Panel Layout
The Edit Layout button in the upper right corner of the Person Profile page lets you organize the panels seen on the left and right sides of the Person Profile page. For example, if you don’t use Twitter in your sales process, you can toggle the Twitter panel off so it is no longer visible.
A drop-down menu shows a list of available panels you can reorder, enable, or disable to best fit your needs. You may access the menu from the top right of the Person Profile page.
To enable or disable the visibility of a panel, toggle the switch next to the panel name on or off.
To reorder the panels shown in the right column, simply click the icon to the left of the panel name and drag the name to the preferred spot in the list.
Figure 2: Edit Person Layout Menu
View Person Stats
The Stats panel displays an overview of valuable metrics based on activities between Salesloft users and the Person. The stats include:
- Number of calls logged
- Emails sent
- Emails opened
- Email links clicked
- Replied
Figure 3: Person Stats on the Person Profile Page
The Person Details Panel
The Person Details panel shows all populated fields for the Person, as well as custom fields. To update information in this panel, click the Edit icon in the top right corner.
Figure 4: The Person Details Panel on the Person Profile Page
For more information about the Person Details Panel, check out the
Person Details and Contact Info article.
Want to change the fields that appear in the Person Details Panel? Admins can do so from the Team Field Configuration settings. Check out the
Edit Person Field Layout article for more information.
The Account Details Panel
The Account Details panel shows all populated fields for the Account that the Person is associated with. To make changes to the Account information shown, access the Account's profile page.
Things to Note: The Account Details Panel will only appear when the Person is linked to an account record in Salesloft.
Figure 5: Account Details Panel on Person Profile Page
Manage Person Tags
Tags are labels or folders that you can use to organize groups of records in Salesloft. Use tags to quickly designate and filter People from a particular conference list or similar groupings.
The Tags panel displays tags associated with the Person. It also lets you add new tags or remove existing tags. To add a tag, type the name of the tag in the text box and hit your enter key. To remove a tag, find the tag you want to delete and click the X next to the tag name.
Figure 6: Tags Panel on the Person Profile Page
The Person Activity Feed
The activities panel contains different tabs that break down the activities that relate to the Person. In other words, the activities panel is your track record with the Person throughout the sales process and beyond.
The activities panel contains tabs for recent activities, calls, emails, Cadences, Live Web Tracking (if enabled), notes, reminders, and meetings.
Figure 7: Person Profile Activity Feed
For more information on each tab within the activities panel, check out the Person Activity Feed article.
The Research area of the Person profile page is where you can leverage Salesloft’s Research Agents.
From the Person profile page you can access the following:
- Person Research Agent: helps you quickly learn about prospects without doing hours of manual research. It summarizes relevant information from a variety of sources, including Salesloft activity, engagement data, internal signals, and CRM data.
- Account Research Agent: retrieves and summarizes relevant Account information.
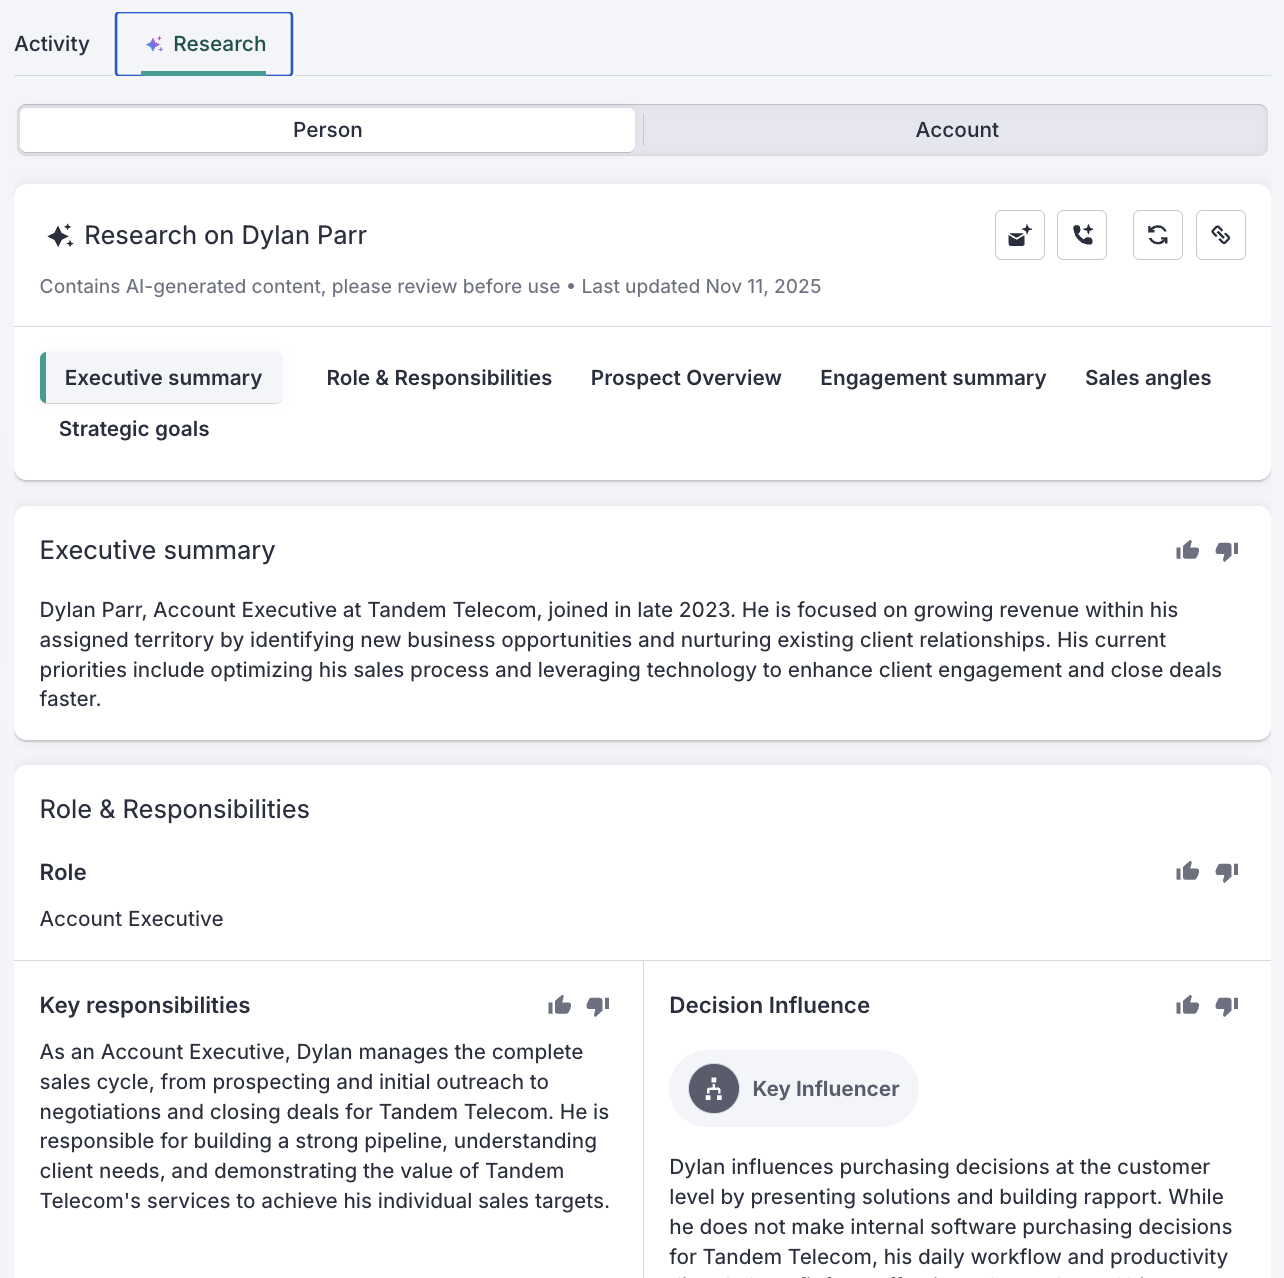
Figure 8: The Person Research Agent seen on the Person Profile Page
The Cadences Panel
The Cadences panel displays information about Cadences a Person is on as well as their Cadence history.
In addition to viewing the Person’s Cadence history, you can also take different Cadence actions, including:
- Add the Person to a Cadence: Select the + button in the top right of the panel to add the Person to a Cadence. Search from My Cadences or Team Cadences in the Add to Cadence pop-up window. Select the Cadence you want and hit Add to Cadence.
- Update the Person Stage: The Person stage keeps you up-to-date with where the Person is in the sales cycle. The Person stage may already be updated if you have configured your Cadence to update the stage settings automatically. To update a Person’s stage, select the Person Stage drop-down menu and pick the stage you want.
- Run the Step: Hover over the Cadence link and click Run.
- Change the Due Date of the Person’s Next Cadence Step: Pause the Person in their Cadence step by changing their due date. Hover over the Cadence link, and click the calendar icon. Select the new due date. Once the due date has been updated, the Person will appear in your Home Dashboard Cadences Panel when that date arrives.
- Skip the Step: Hover over the Cadence link and click the drop-down link. Select Skip This Step.
- Move to Step: Hover over the Cadence link and click the drop-down link. Select Move This Step.
- Reassign Remaining Steps (for team cadences): Hover over the Cadence link and click the drop-down link. Select Reassign Remaining Steps.
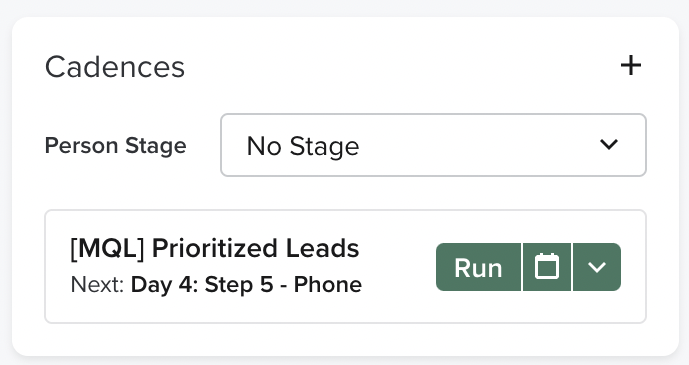 Figure 9: Cadences Panel on the Person Profile Page
The People at Account Panel
The People at Account panel shows you all of the People associated with the same Account as the Person you're viewing. The panel shows additional data about each Person. You can even take specific actions to engage with the People in that company.
To learn more about the details you can view and actions you can take from the People at Account panel, check out the People at Account Panel article.
Manage the Opportunities Panel
The Opportunities Panel allows you to view Opportunity information, such as where a deal is in the sales cycle, from the Person Profile page.
Salesloft syncs Opportunities from your CRM that are associated with a Contact who is also a Person in Salesloft. If a related Opportunity is found, the data will appear on the Person's Profile page Opportunity Panel.
From the Opportunities panel, you may take the following actions:
- View the Opportunity in your CRM: Click the name of the Opportunity (with the external link icon) to open that Opportunity in your CRM in a new tab.
- Sort & Filter: These options include the following:
- Sort By: You can sort the target field in ascending or descending order by these criteria:
- Created Date (select by default when you select descending order)
- Close Date
- Last Updated
- Stage: The dropdown field to select an opportunity stage to filter by. The stage values for the filter reflect the current setting for Salesloft opportunity stages (only active stages are populated in the filter). By default, the value for the filter is All.
- Things to Note:
- The Clear All button will reset the dropdown to its default values:
- Sort By: Created Date in descending order
- Stage: All
- Once applied, all filters in the opportunity panel for Person Profile pages will also be reflected in Account Profile pages.
- Show/hide Opportunity panel feature within the Edit Layout functionality doesn’t affect the filtered/sorted opportunity list.
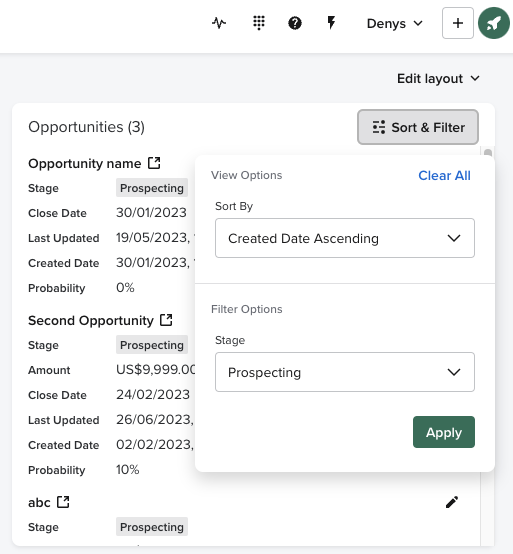
Figure 10: Opportunities Panel on the Person Profile Page
Integrations Panels
There are several integration panels that are available to display on the Person Profile page. For more information about integrations, visit the Salesloft Integrations Directory.