Salesloft makes it easy to bring Lead, Contact, and Account records from Salesforce directly into Salesloft. Use this guide to import People from Salesforce using the method that best fits your workflow.
After completing this guide, you will be able to:
- Import an individual Lead, Contact, or Account from Salesforce
- Import a full list, campaign, or report from Salesforce
- Selectively import specific records from a Salesforce list view using multi-select
In this article, you will learn how to import People from Salesforce. This article includes:
Before you import from Salesforce, there are some important things you should know:
- You must have a Salesloft account.
- To import from Salesforce into Salesloft, you will need to download the Salesloft Chrome Extension. The Salesloft extension will create Salesloft specific buttons in your Salesforce instance including the ability to import, view Salesloft profile pages, Click to Dial within Salesforce, and Connect for Salesforce features.
- The Import into Salesloft button will not appear if Salesforce is in accessibility mode. Temporarily disable accessibility mode to use this functionality.
- The import maximums are:
- 2,000 Contacts for a Contact list view.
- 2,000 Leads for a Lead list view.
- 500 Accounts for an Account list view.
- 100 Leads/Contacts for a Campaign.
- 2,000 People for a Report.
- Methods 2, 3, and 4 found in the instructions below require Salesforce Lightning.
- The Salesloft Chrome Extension is designed and tested for standard, out-of-the-box Salesforce app views, such as Sales and Sales Console. Custom app views built using Salesforce's Lightning App Builder (also known as "Flexi" pages) are not supported for single-record import buttons. Because Flexi pages allow custom layouts and dynamic HTML structures, the Chrome Extension cannot reliably detect the UI elements needed on individual record profiles. To import leads or contacts from a custom app view, use the bulk Import or Import All options directly from the Salesforce List View.
Watch this quick video to learn how to import records from Salesforce.
Import from Salesforce Instructions
The imports can be pulled from an individual record, lists, campaigns, or reports.
Method 1: Importing an Individual Lead, Contact, or Account
Follow these steps to import an individual Lead, Contact, or Account from Salesforce:
- Navigate to the Record: Navigate to the lead or contact record you want to import into Salesloft.
- Click "Import to Salesloft": Click the green Import to Salesloft button on the record page.
Figure 1: Import to Salesloft button
Method 2: Importing from a List or Campaign
Follow these steps to import a list or campaign from Salesforce:
- Navigate to the List or Campaign: From your Salesforce account, navigate to the Leads, Contacts, Accounts tabs or select an individual Campaign (depending on which list you want to import into Salesloft). Or Create a New View.
- Things to Note: Salesforce displays "Recently Viewed" as the default list for all objects. The Import to Salesloft button does not appear on the "Recently Viewed" page. You must select a specific list before the Import to Salesloft button will appear.
- Find the View pick list to select a previously created list and select Go.
- Click "Import to Salesloft": Click the green Import to Salesloft button.
Figure 2: Contacts List View in Salesforce Lightning
Figure 3: Leads List View in Salesforce Lightning
Figure 4: Campaign Import in Salesforce Lightning
Method 3: Importing from a Report
Salesforce reports are best used when you have a complex set of criteria or want to import Leads and Contacts related to other records in your Salesforce environment. Use reports when:
- You have Leads or Contacts with a complex set of criteria
- You want to import Contacts related to specific Opportunities
- You want to import Campaign Members based on status or across campaigns
- You want to import Leads or Contacts related to a custom object
- A manager or admin has provided a pre-built report to import from
1. Prepare your report: Before importing, confirm your report meets the following requirements:
- Contains a column with Lead IDs or Contact IDs (15 or 18 character values supported)
- Uses tabular format — no grouped rows or columns
- Is saved as a Public Report in Salesforce.
- Check Your Report Filters: Salesforce filters that compare fields using field-to-field filters or group data using bucket columns may not be interpretable. Reports that are not performant may not return data to Salesloft before the browser times out.
- Save and Run Your Report: Salesforce report filters can be updated to refresh the view without saving the underlying report. If you adjust filters and simply "Run" the report, those changes are not saved. Salesloft will import the records on the saved version of the report, so be sure to "Save & Run" after making updates to the Salesforce report.
- Things to Note: If your report has multiple columns with valid Lead or Contact IDs, Salesloft will prompt you to select which column to use after clicking Import to Salesloft.
Figure 5: Accepted Tabular Report Format
2. Navigate to your report: Open the saved Salesforce report you want to import.
3. Click Import to Salesloft: Click the green Import to Salesloft button.
Method 4: Import Selected Records Using Multi-Select
Multi-select import lets you hand-pick specific records from a Salesforce list view and import only those people — no bulk importing and no manual cleanup afterward. The Import button updates in real time to reflect exactly how many records you've selected.
1. Navigate to a list view: Go to the Leads, Contacts, or Accounts tab in Salesforce Lightning and open the list view you want to import from.
2. Select your records: Use the native Salesforce checkboxes to select the individual records you want to import. The Import button label updates dynamically as you select — for example, Import 1 person, Import 5 people.
- Things to Note: If you use Select All on a long list, Salesforce may not have fully loaded all records due to infinite scroll. If a toast message appears prompting you to scroll down, scroll to the bottom of the list to ensure all selected records are loaded before importing.
3. Click the Import button: Click the dynamically labeled Import button. Only the records you selected will be sent to the Salesloft import interface.
- Things to Note: If the Import button label does not update after making selections, refresh the Salesforce page to ensure the Salesloft Chrome Extension has correctly loaded on the list view.
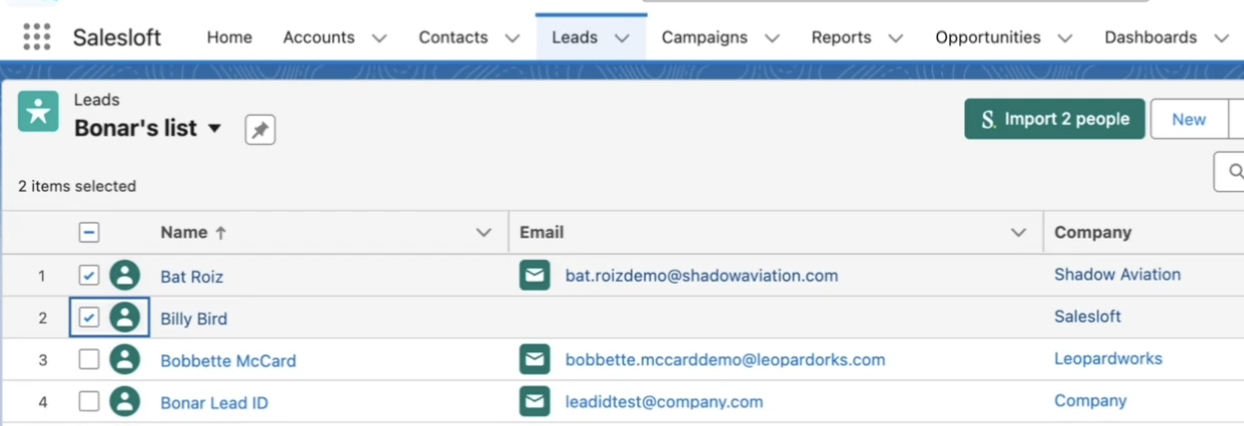
Figure 6: Salesforce list view with individual records checked and Import button showing "Import 2 people"
You've successfully imported from Salesforce when:
- You are redirected to the Complete Your Import page in Salesloft
- Your selected records appear in the import confirmation screen
- Any records that already exist in Salesloft are highlighted in orange on the confirmation screen, indicating their existing status
Additional Information: Imports from Salesforce
Custom Import Button
The Custom Import Button is not compatible with multi-select imports — having both active will prevent multi-select from working. If your organization has the Custom Import Button installed, you'll need to remove it before you can use Method 4. See: Custom Import Buttons in Salesforce article.
Record Status Icons
When viewing a Salesforce list view with the Salesloft Chrome Extension active, a colored icon appears to the left of each record's name indicating its import status. A green icon means the record has already been imported into Salesloft. A grey icon means the record has not yet been imported. Use these icons to identify net-new records
Complete Your Salesforce Import
After initiating any import, you'll be redirected to the Complete Your Import page in Salesloft. Follow the instructions on that page to finalize your import, handle any errors, and optionally add People to Cadences.
Avoid
Don't click Run after adjusting Salesforce report filters without also saving — Salesloft imports the saved version of the report, not the current browser view.
Troubleshooting when Importing Salesforce Reports
Problem
|
Likely Cause
|
Fix
|
| Import to Salesloft button doesn't appear | Salesforce is in accessibility mode, or you're on the Recently Viewed page | Disable accessibility mode, or navigate to a specific list view before importing |
| Multi-select import is pulling full page | The Custom Import Button is live in your team's Salesforce instance. This javascript code will override the multi-select function. | Work with your Salesforce admin to Remove the Custom Import Button. |
| Import button label doesn't update after selecting records | The Salesloft Chrome Extension hasn't loaded correctly on the list view | Refresh the Salesforce page and reselect your records |
| "Please scroll to the bottom" toast message appears | Select All was clicked but Salesforce hasn't fully loaded all records via infinite scroll | Scroll to the bottom of the list to load all records before clicking Import |
| Error: INVALID_FIELD during report import | When importing records to Salesloft, Salesloft also syncs field data. The Field Configuration page in SalesLoft tells Salesloft which fields to sync. This error indicates that the listed field(s) may not be visible to the Salesforce user who is importing records to Salesloft. | Work with your Salesforce system admin to review the Salesforce user's profile. Make sure the profile has Read/Edit access to all relevant fields. |
If you run into any errors during an import, learn how to solve errors from our Salesforce Troubleshooting Guide.
Next Steps and Related Articles
Next: Complete Your Import: How to finalize your import, resolve errors, and add People to Cadences
Related: Inbound CRM sync settings: How to configure your ongoing Salesforce sync after importing
Troubleshooting: Salesforce Troubleshooting Guide: Steps for resolving common errors during and after import